Beyond Three-Point Lighting: Part 02
(Cinematic Lighting Lesson 06)
Summary: In Part 01 we covered side lighting and cross-key lighting as alternatives to using the (overused) three-point lighting method. In Part 02, we’ll show you key-side fill and the “Robert Richardson.”
Length: 5:05 minutes
!! Want to see the whole video? Become a member !!
- If you are already a member, you can log in below.
Introduction
Three-point lighting is a great place to start but it isn’t where you should end. In Part 01 we gave you a quick overview of what three-point lighting is and then we showed you cross-key lighting as well as side lighting. In this video, I’m going to give you two more approaches: the key-sde fill and the “Robert Richardson Lighting.”
Key-Side Fill
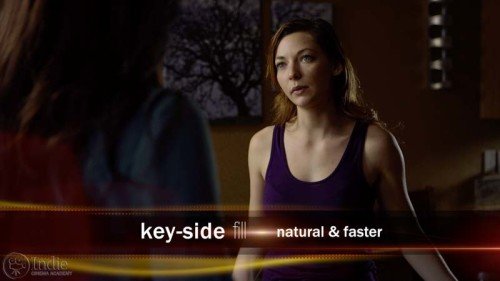
The key-side fill is one of my personal favorites for lighting a scene for two reasons: it feels more natural than the three-point method and it is easier to employ on set, allowing me to light faster. What’s not to like in a method that gives great results and is fast?
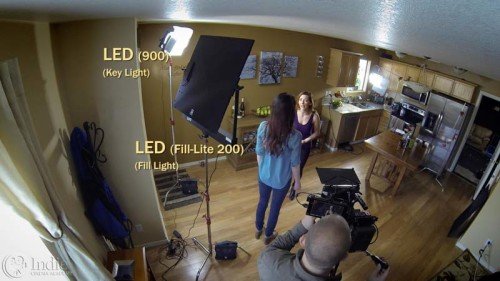
As the name suggests…
** Want to read the rest of the transcript? Become a member. **
** Want to see the lighting diagrams? Become a member. **
Camera / Audio
- Sony Alpha a7S Mirrorless Digital Camera
- Canon EF 24-70mm f/2.8L II USM Lens
- Fotodiox Lens Mount Adapter – Canon EOS (EF / EF-s) to Sony E-Mount
- Bright Tangerine Misfit Matte Box
- Tilta FF-T03 15mm Follow Focus with Hard Stops
- Sachtler Panorama 7+7 Head 100mm (similar head: 1006 DV 10 SB Fluid Head)
- Sachtler Carbon Fiber Tripod (similar tripod: Carbon Fiber HD Tripod Legs)
- MYT Works 4′ Medium slider w/ HiHat
- Hollywood Beefy Baby Stand (8.5′) (two, to raise the MYT Works slider)
- Movcam Cage for Sony A7S
- Sekonic L-758Cine DigitalMaster Light Meter
- Sekonic C-700 SpectroMaster Color Meter
- Wooden Camera A/B Gold-Mount Plate for Sony A7, A7r and A7s
- Audio Technica AT835b Shotgun Microphone
(similar microphone: Audio Technica BP4071 Shotgun Microphone)
- Wooden Camera DSLR A-Box
- Delkin Devices 64GB SDXC Memory Card 600x UHS-I
- DSC Labs One Shot Reference Chart (Matte Finish)
Behind the Scenes (BTS) Cameras
- GoPro Hero3 Black (similar camera: GoPro HERO4 Black)
- Motrr Galileo: App-Driven Motorized Head w/ GoPro Mount
- Sony Alpha SLT-A57
- Filmcity DSLR Camera Cage Shoulder Rig kit (FC-03)
Lighting / Grip Gear
- Fill-Lite 200
- LED (900) (Bestlight®)
- 24×36″ – Black Double Net
- 1/8 Color Temperature Orange (CTO) Filter (24×198″ Roll)
- 1/2 Color Temperature Orange (CTO) Filter (24×198″ Roll)
- Foam Core Bounce (White)
- Floppy – 48×48″ (1.2×1.2m)
- Matthews Century C Stand Grip Arm Kit – 10.5′ (3.2m)
- PBL Sandbags x4 bags
 https://indiecinemaacademy.com/wp-content/uploads/2016/01/LC120-CorporateVideo-Thumbnail-Web.jpg
450
800
Ryan E. Walters
https://indiecinemaacademy.com/wp-content/uploads/2013/12/Indie_cinema_Logo_2color-MF-300x116-web.png
Ryan E. Walters2016-01-11 00:15:082016-05-05 11:22:30How to Cinematically Light a Corporate Video (Cinematic Lighting Lesson 20)
 https://indiecinemaacademy.com/wp-content/uploads/2015/12/LC119-LightFast-Thumbnail.jpg
450
800
Ryan E. Walters
https://indiecinemaacademy.com/wp-content/uploads/2013/12/Indie_cinema_Logo_2color-MF-300x116-web.png
Ryan E. Walters2015-12-29 12:38:562016-01-10 21:42:39How To Light Quickly (Cinematic Lighting Lesson 19)
 https://indiecinemaacademy.com/wp-content/uploads/2015/09/LC121_LightingHighSpeed-Thumbnail-Web.jpg
450
800
Ryan E. Walters
https://indiecinemaacademy.com/wp-content/uploads/2013/12/Indie_cinema_Logo_2color-MF-300x116-web.png
Ryan E. Walters2015-09-21 00:15:372016-01-10 21:42:57Lighting For Extreme Frame Rates (Cinematic Lighting Lesson 21)
 https://indiecinemaacademy.com/wp-content/uploads/2015/09/LC115_12Questions-Thumbnail-Free-Web.jpg
450
800
Ryan E. Walters
https://indiecinemaacademy.com/wp-content/uploads/2013/12/Indie_cinema_Logo_2color-MF-300x116-web.png
Ryan E. Walters2015-09-07 00:30:532015-10-30 19:06:3612 Crucial Questions To Ask Before You Light Your Set (Cinematic Lighting Lesson 15)
 https://indiecinemaacademy.com/wp-content/uploads/2015/08/LC114-3StrLightingNghtExt-Thumbnail.jpg
450
800
Ryan E. Walters
https://indiecinemaacademy.com/wp-content/uploads/2013/12/Indie_cinema_Logo_2color-MF-300x116-web.png
Ryan E. Walters2015-08-24 00:30:112015-10-30 18:55:173 Strategies for Lighting Your Night Exteriors (Cinematic Lighting Lesson 14)
 https://indiecinemaacademy.com/wp-content/uploads/2015/08/LC112_5SratDayExt-Thumbnail-800x450-jpg-web.jpeg
450
800
Ryan E. Walters
https://indiecinemaacademy.com/wp-content/uploads/2013/12/Indie_cinema_Logo_2color-MF-300x116-web.png
Ryan E. Walters2015-08-10 00:15:422015-10-30 18:54:545 Essential Strategies To Lighting Day Exteriors (Cinematic Lighting Lesson 12)
 https://indiecinemaacademy.com/wp-content/uploads/2015/07/LC113-10TricksDayExt-Thumbnail-800x450-web-.jpg
450
800
Ryan E. Walters
https://indiecinemaacademy.com/wp-content/uploads/2013/12/Indie_cinema_Logo_2color-MF-300x116-web.png
Ryan E. Walters2015-07-27 00:15:252015-10-30 18:55:0310 Tips To Lighting Day Exteriors (Cinematic Lighting Lesson 13)
 https://indiecinemaacademy.com/wp-content/uploads/2015/07/LC123_SmallCommercial-thumbnail-800X450.jpg
450
800
Ryan E. Walters
https://indiecinemaacademy.com/wp-content/uploads/2013/12/Indie_cinema_Logo_2color-MF-300x116-web.png
Ryan E. Walters2015-07-13 14:24:582015-10-30 19:19:44How To Light A Small Commercial (Cinematic Lighting Lesson 23)
 https://indiecinemaacademy.com/wp-content/uploads/2015/06/LC118-WhereToBeginLighting-featured.jpg
450
800
Ryan E. Walters
https://indiecinemaacademy.com/wp-content/uploads/2013/12/Indie_cinema_Logo_2color-MF-300x116-web.png
Ryan E. Walters2015-06-29 00:30:302015-12-29 12:43:40Where To Begin Lighting Your Set (Cinematic Lighting Lesson 18)
https://indiecinemaacademy.com/wp-content/uploads/2015/06/LC118-WhereToBeginLighting-featured.jpg
450
800
Ryan E. Walters
https://indiecinemaacademy.com/wp-content/uploads/2013/12/Indie_cinema_Logo_2color-MF-300x116-web.png
Ryan E. Walters2015-06-29 00:30:302015-12-29 12:43:40Where To Begin Lighting Your Set (Cinematic Lighting Lesson 18)Leave a Reply
Want to join the discussion?Feel free to contribute!
Leave a Reply Cancel reply
You must be logged in to post a comment.
This site uses Akismet to reduce spam. Learn how your comment data is processed.

Hi there, great videos – thanks. Where do you get your large diffusion from?
What would one be searching for to buy to create the same large source soft light.
Many thanks
Glad you are enjoying the videos!
There are a lot of options for the diffusion cloth, called full-grid, 1/2 grid , and 1/4 grid cloth. And if you can sew, or know someone who can, a VERY economical solution is to make your own: 1/4 grid cloth – 54″x22′ Roll. The pre-sewed versions come in a wide variety of sizes.
For frames, you can either buy them pre-build (example: Butterfly/Overhead Snap-A-Part Light Duty Frame – 6×6′ or make your own for $50-$100.
In May we’re going to be creating a tutorial on how to make your own 4×4 and 6×6 frames for around $50 using 1″ square aluminum tubing.We built ours years ago and they’re still working great! No reason to spend $500-$1000 for these simple frames.Great ! Thanks for the reply
Salut, is the tutorial for building 4×4 and 6×6 frames already available? That would be great!
Thanks a lot!
Actually, Ryan created this very tutorial 4 years ago (down to the week! Perfect timing Andreas!) The video tutorials is for the 4×4 frame, which are the same instructions for a 6×6, just alter the measurements. These are great frames, and we are still using them to this day.
In reading over that post I’m seeing that some of the links are dead, and the prices are a little off. If you have difficulty finding parts, let me know and I’ll see if I can find some current sellers of those bits.
I found it, great tutorial, thanks Tim!
You are welcome!
What do you mean by netting on the back of the lens?
Thank you
Netting the back of the lens means to attach a literal net to the back of the lens. Here is a great short video on how to net a lens: https://vimeo.com/38670058
Nice demonstration. What does the netting actually do?
It is a type of camera filtration that softens the image and gives brighter objects a type of glow. We discuss camera filtration such as Classic Soft fiters and nets in our “Guide to Diffusion Filtration.”
Great lessons, but I had a hard to focusing with the two models arguing. It raised my stress levels.
Ha ha ha! Consider it practice with dealing with talent that stresses you out! Ha! 🙂
Thanks for your videos, really helpful!
how do you behave when you cant’ use far side key and place the camera on the “shadowy” side of the set.
I had to place the key light on the left behind the camera in the dialogue scene and it was awful!!!
thanks!
There are times when the room size or the background limit where you can place the camera or the lights. If you can’t change locations or move things around within a small space, another option is to change to a “beauty” lighting set-up where the light is a little higher and closer to the camera. We show how to do this in Tricks of the Trade #1: Lighting Faces. The tricky thing, though, is that with narrative shoots, changing the lighting change change the mood of the scene. This is when location scouting ahead is so important so you can experiment and come up with a lighting scheme that fits the mood of the scene and the space.
Great video!
In the key side fill scenario can you explain how would you light the colse up of the second actor?
thanks!
You would move the lights to wrap around the second actor (woman in blue) while still keeping the light hitting the same side of her face. One way to do this is to keep the key light in the same position (moved slightly) and moving the fill light to behind the first actor (woman in dark purple) since the camera would most likely be placed to that actor’s left side. Another option since the shot you suggest would be a close up, is to have the key light act as a hair light and bring in a third light to act as fill, placed in the same place I suggested above.