Inside at Night: Three Lighting Strategies
(Cinematic Lighting Lesson 11)
Summary: Lighting a night interior doesn’t have to be a daunting experience. If you follow these three lighting strategies you’ll be able to successfully create the right feel and mood of a interior night scene.
Length: 5:53 minutes
!! Want to see the whole video? Become a member !!
- If you are already a member, you can log in below.
Introduction
On-location night interiors are one of my favorite scenes to shoot. Why? Well, because it’s almost like being in a studio. You have near complete control of all of the light, and you don’t have to compete with the sun. In this video I’m going to share with you how to create the night look, as well as the three strategies that you should be thinking about anytime you light your night interior.
Creating The Night Look
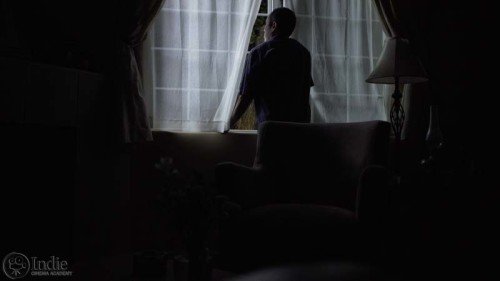
Before you start, remember that the most important thing is to determine the mood and the look of your scene. Obviously, we’re talking about a night scene here, but is it a romantic scene just after sunset. Or the pitch blackness of midnight. Or maybe the predawn light just before sunrise. Once you have the look figured out, you can start developing your lighting approach.
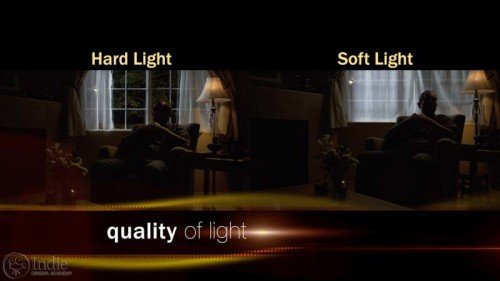
At night the sources of light are smaller and more directional. So it’s justifiable to light a night interior with hard directional light. Of course, that doesn’t mean you can’t use soft light; you can, and I often do. But if you want that hard light look, night interiors are a good place to use it.
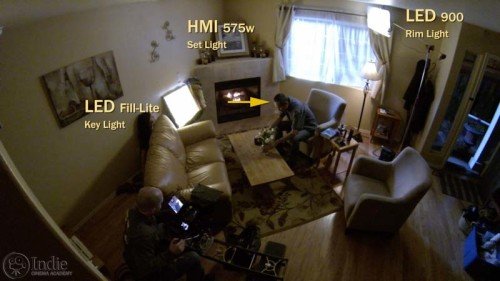
Another thing to keep in mind is that the illusion of night is best created by the angle and distribution of light. At night the angle of light tends to be less frontal; instead it comes from a three quarters back position and you’ll fill from the front. Lighting this way helps push more of the image into shadow, emphasizing that it’s night.
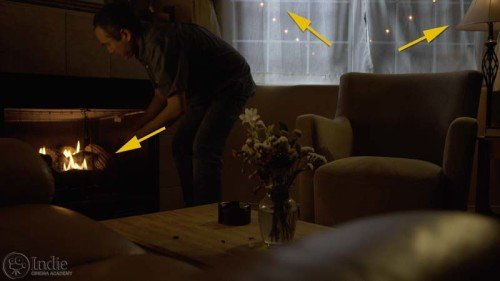
Typically, it is really easy to determine where your light should be coming from. Usually, there will be some sort of light source in the scene: a lamp, candle, whatever. If there is a window in the shot, you can play it as moonlight or a street light shining through.
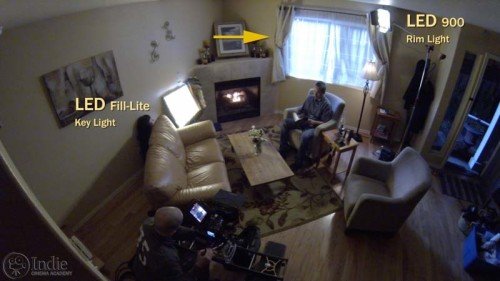
Once you’ve decided on the look and the approach you are going to take for your night interior, it’s time to start lighting. Here are three strategies to help you get better results for your night interiors...
** Want to read the rest of the transcript? Become a member. **
** Want to see the lighting diagrams? Become a member. **
Camera / Audio
- Sony Alpha a7S Mirrorless Digital Camera
- Canon EF 24-70mm f/2.8L II USM Lens
- Fotodiox Lens Mount Adapter – Canon EOS (EF / EF-s) to Sony E-Mount
- Bright Tangerine Misfit Matte Box
- Tilta FF-T03 15mm Follow Focus with Hard Stops
- Sachtler Panorama 7+7 Head 100mm (similar head: 1006 DV 10 SB Fluid Head)
- Sachtler Carbon Fiber Tripod (similar tripod: Carbon Fiber HD Tripod Legs)
- MYT Works 4′ Medium slider w/ HiHat
- Hollywood Beefy Baby Stand (8.5′) (two, to raise the MYT Works slider)
- Movcam Cage for Sony A7S
- Sekonic L-758Cine DigitalMaster Light Meter
- Sekonic C-700 SpectroMaster Color Meter
- Wooden Camera A/B Gold-Mount Plate for Sony A7, A7r and A7s
- Audio Technica AT835b Shotgun Microphone
(similar microphone: Audio Technica BP4071 Shotgun Microphone)
- Wooden Camera DSLR A-Box
- Delkin Devices 64GB SDXC Memory Card 600x UHS-I
- DSC Labs One Shot Reference Chart (Matte Finish)
Behind the Scenes (BTS) Cameras
- GoPro Hero3 Black (similar camera: GoPro HERO4 Black)
- Motrr Galileo: App-Driven Motorized Head w/ GoPro Mount
- Sony Alpha SLT-A57
- Filmcity DSLR Camera Cage Shoulder Rig kit (FC-03)
Lighting / Grip Gear
- Fill-Lite 200
- LED (900) (Bestlight®)
- 575W HMI Fresnel Light w/ Electronic Ballast (Queenshiny®)
- 24×36″ – Black Double Net
- Full Color Temperature Blue (CTB)
- 1/2 Color Temperature Blue (CTB)
- Steel Blue (21×24″ Sheet)
- Foam Core Bounce (White)
- Floppy – 48×48″ (1.2×1.2m)
- Matthews Century C Stand Grip Arm Kit – 10.5′ (3.2m)
- Master Combo HD Stand (11′)
- PBL Sandbags x4 bags
 https://indiecinemaacademy.com/wp-content/uploads/2016/01/LC120-CorporateVideo-Thumbnail-Web.jpg
450
800
Ryan E. Walters
https://indiecinemaacademy.com/wp-content/uploads/2013/12/Indie_cinema_Logo_2color-MF-300x116-web.png
Ryan E. Walters2016-01-11 00:15:082016-05-05 11:22:30How to Cinematically Light a Corporate Video (Cinematic Lighting Lesson 20)
 https://indiecinemaacademy.com/wp-content/uploads/2015/12/LC119-LightFast-Thumbnail.jpg
450
800
Ryan E. Walters
https://indiecinemaacademy.com/wp-content/uploads/2013/12/Indie_cinema_Logo_2color-MF-300x116-web.png
Ryan E. Walters2015-12-29 12:38:562016-01-10 21:42:39How To Light Quickly (Cinematic Lighting Lesson 19)
 https://indiecinemaacademy.com/wp-content/uploads/2015/09/LC121_LightingHighSpeed-Thumbnail-Web.jpg
450
800
Ryan E. Walters
https://indiecinemaacademy.com/wp-content/uploads/2013/12/Indie_cinema_Logo_2color-MF-300x116-web.png
Ryan E. Walters2015-09-21 00:15:372016-01-10 21:42:57Lighting For Extreme Frame Rates (Cinematic Lighting Lesson 21)
 https://indiecinemaacademy.com/wp-content/uploads/2015/09/LC115_12Questions-Thumbnail-Free-Web.jpg
450
800
Ryan E. Walters
https://indiecinemaacademy.com/wp-content/uploads/2013/12/Indie_cinema_Logo_2color-MF-300x116-web.png
Ryan E. Walters2015-09-07 00:30:532015-10-30 19:06:3612 Crucial Questions To Ask Before You Light Your Set (Cinematic Lighting Lesson 15)
 https://indiecinemaacademy.com/wp-content/uploads/2015/08/LC114-3StrLightingNghtExt-Thumbnail.jpg
450
800
Ryan E. Walters
https://indiecinemaacademy.com/wp-content/uploads/2013/12/Indie_cinema_Logo_2color-MF-300x116-web.png
Ryan E. Walters2015-08-24 00:30:112015-10-30 18:55:173 Strategies for Lighting Your Night Exteriors (Cinematic Lighting Lesson 14)
 https://indiecinemaacademy.com/wp-content/uploads/2015/08/LC112_5SratDayExt-Thumbnail-800x450-jpg-web.jpeg
450
800
Ryan E. Walters
https://indiecinemaacademy.com/wp-content/uploads/2013/12/Indie_cinema_Logo_2color-MF-300x116-web.png
Ryan E. Walters2015-08-10 00:15:422015-10-30 18:54:545 Essential Strategies To Lighting Day Exteriors (Cinematic Lighting Lesson 12)
 https://indiecinemaacademy.com/wp-content/uploads/2015/07/LC113-10TricksDayExt-Thumbnail-800x450-web-.jpg
450
800
Ryan E. Walters
https://indiecinemaacademy.com/wp-content/uploads/2013/12/Indie_cinema_Logo_2color-MF-300x116-web.png
Ryan E. Walters2015-07-27 00:15:252015-10-30 18:55:0310 Tips To Lighting Day Exteriors (Cinematic Lighting Lesson 13)
 https://indiecinemaacademy.com/wp-content/uploads/2015/07/LC123_SmallCommercial-thumbnail-800X450.jpg
450
800
Ryan E. Walters
https://indiecinemaacademy.com/wp-content/uploads/2013/12/Indie_cinema_Logo_2color-MF-300x116-web.png
Ryan E. Walters2015-07-13 14:24:582015-10-30 19:19:44How To Light A Small Commercial (Cinematic Lighting Lesson 23)
 https://indiecinemaacademy.com/wp-content/uploads/2015/06/LC118-WhereToBeginLighting-featured.jpg
450
800
Ryan E. Walters
https://indiecinemaacademy.com/wp-content/uploads/2013/12/Indie_cinema_Logo_2color-MF-300x116-web.png
Ryan E. Walters2015-06-29 00:30:302015-12-29 12:43:40Where To Begin Lighting Your Set (Cinematic Lighting Lesson 18)
https://indiecinemaacademy.com/wp-content/uploads/2015/06/LC118-WhereToBeginLighting-featured.jpg
450
800
Ryan E. Walters
https://indiecinemaacademy.com/wp-content/uploads/2013/12/Indie_cinema_Logo_2color-MF-300x116-web.png
Ryan E. Walters2015-06-29 00:30:302015-12-29 12:43:40Where To Begin Lighting Your Set (Cinematic Lighting Lesson 18)Leave a Reply
Want to join the discussion?Feel free to contribute!
Leave a Reply Cancel reply
You must be logged in to post a comment.
This site uses Akismet to reduce spam. Learn how your comment data is processed.

Hi guys 🙂
Leaving the set light un-gelled and modulating the light as a technique. Could you explain what you meant by this, I gather you refer to dimming the balast to change color temp to your desired look?
Cheers
Dave
There are some DPs that like to add various blue gels to their “moon” since traditionally that was the way it was done (especially in the 1980’s). In this video Ryan demonstrates some of these looks, along with not adding any gels and letting the light CCT be the same as what the camera is white-balanced to. Ryan prefers keeping it white and simply adjusting the brightness of the “moon” to properly fit the scene and story. Too much light and it starts to feel like the sun; not enough, and it feels like there isn’t even a moon.
While the color temp changes with some lights based on how bright the light it, this isn’t the best way to reliably adjust CCT since the change is very slight. Also, many traditional lights can’t be modulated very much and instead depend on ND gels and wire scrims.
Great thanks Tim 🙂
I practiced this on Friday but could not get it right. I placed the light to the side. I tried with a soft box and a hard light source. I put a highlight on the headboard and added a practical to one side. I recorded the scene with a slide movement. Unfortunately it didn’t look good. I experimented by dimming the lights and altering the ISO. Effectively they just offset each other. Please can you advise on how to get better results.
It’s hard to give advice without seeing what you’ve created. Could you post a screenshot or post a link to your video online? Or you can email us the screenshot/link directly: info [AT] indiecinemaacademy.com
Thanks for the tutorial , I suggest you add a tutorial about night scene with blocking with long duration , you show us in it the making of the tutorial because night scenes illusion depends on controlling the spill of light , which we want to know to learn , this is missing manual in all of the books , and if indie achieve that it will be very great, also we want to know the lighting ratios in night scene
These guys are a true blessing! I’ve learned so much from Cinema Academy team! Great job Ryan and Tim
Thank you! We aim to please! 🙂