How To Light A Narrative: Real World Application
(Cinematic Lighting Lesson 26)
Summary: Ryan takes you behind the scenes and explains his process in lighting the short film “O’ Danny Boy,” walking you through each shot, set-up and lighting design
Length: 11:51 minutes
!! Want to see the whole video? Become a member !!
- If you are already a member, you can log in below.
Introduction
Narrative projects rely on a lot of the techniques we’ve talked about so far–from creating certain moods through ratios, to creating soft light, to dealing with the unique challenges of shooting on location. In this video I’ll take you behind the scenes and show you shot by shot how I lit a short film. I’ll cover not only where I placed the lights, but why I made the choices I did. So let’s watch the 1 minute short “O’ Danny Boy,” and then I’ll break each shot down from there.
“O’ Danny Boy” Short
PAUL: Would you rather I told you?
PAUL: It was like falling asleep.
MARY: Don’t tell me that.
PAUL: I thought you wanted to know.
MARY: Not about that.
MARY: I would’ve liked to know you were doing it.
PAUL: I’m sorry.
SHOT 01: Extreme Close Up (Mary)
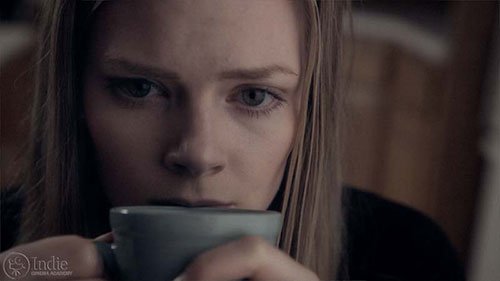 The film opens on an extreme close up of Mary as she sits at the table. Although we as the viewer don’t know it yet, her world is off-kilter. I wanted to reinforce that feeling through my camera and lighting decisions.
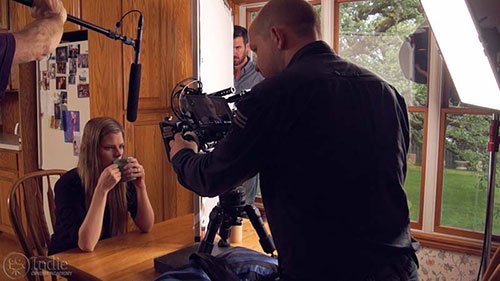
Instead of completely leveling the camera, I kept it a bit off. It isn’t extremely off, just enough so that it doesn’t feel right. We also designed the lighting scheme to enhance this feeling. When Tim and I were talking over this short, we decided that the overall look and feel of this film should be somber, cool, and detached. So, it was my job to create that look using the the four elements of light…
** Want to read the rest of the transcript? Become a member. **
** Want to see the lighting diagrams? Become a member. **
Camera / Audio
- Sony Alpha a7S Mirrorless Digital Camera
- Canon EF 24-70mm f/2.8L II USM Lens
- Fotodiox Lens Mount Adapter – Canon EOS (EF / EF-s) to Sony E-Mount
- Bright Tangerine Misfit Matte Box
- Tilta FF-T03 15mm Follow Focus with Hard Stops
- Sachtler Panorama 7+7 Head 100mm (similar head: 1006 DV 10 SB Fluid Head)
- Sachtler Carbon Fiber Tripod (similar tripod: Carbon Fiber HD Tripod Legs)
- MYT Works 4′ Medium slider w/ HiHat
- Hollywood Beefy Baby Stand (8.5′) (two, to raise the MYT Works slider)
- Movcam Cage for Sony A7S
- Hollywood Black Magic 1/2 Filter
- Sekonic L-758Cine DigitalMaster Light Meter
- Sekonic C-700 SpectroMaster Color Meter
- Wooden Camera A/B Gold-Mount Plate for Sony A7, A7r and A7s
- Audio Technica AT835b Shotgun Microphone
(similar microphone: Audio Technica BP4071 Shotgun Microphone)
- Wooden Camera DSLR A-Box
- Delkin Devices 64GB SDXC Memory Card 600x UHS-I
- DSC Labs One Shot Reference Chart (Matte Finish)
Behind the Scenes (BTS) Cameras
- GoPro Hero3 Black (similar camera: GoPro HERO4 Black)
- Motrr Galileo: App-Driven Motorized Head w/ GoPro Mount
- Sony Alpha SLT-A57
- Filmcity DSLR Camera Cage Shoulder Rig kit (FC-03)
Lighting / Grip Gear
- Fill-Lite 200
- Fill-Lite Wall Soft Light
- LED (900) (Bestlight®)
- 24×36″ – Black Double Net
- 1/8 Color Temperature Orange (CTO) Filter (24×198″ Roll)
- 1/2 Color Temperature Orange (CTO) Filter (24×198″ Roll)
- Foam Core Bounce (White)
- Floppy – 48×48″ (1.2×1.2m)
- Matthews Century C Stand Grip Arm Kit – 10.5′ (3.2m)
- PBL Sandbags x4 bags
Cast & Crew
Mary: Rachel Helling
Paul: Stephen Miller
Danny Boy (photo): Danny Boy (still alive!)
Director/Producer: Tim Park
Written by: AJ Brooks
Director of Photography: Ryan E. Walters
Gaffer: Dylan Wainwright
Swing: Chrissy Roes
Behind The Scenes Camera: Gabe Twigg
 https://indiecinemaacademy.com/wp-content/uploads/2016/01/LC120-CorporateVideo-Thumbnail-Web.jpg
450
800
Ryan E. Walters
https://indiecinemaacademy.com/wp-content/uploads/2013/12/Indie_cinema_Logo_2color-MF-300x116-web.png
Ryan E. Walters2016-01-11 00:15:082016-05-05 11:22:30How to Cinematically Light a Corporate Video (Cinematic Lighting Lesson 20)
 https://indiecinemaacademy.com/wp-content/uploads/2015/12/LC119-LightFast-Thumbnail.jpg
450
800
Ryan E. Walters
https://indiecinemaacademy.com/wp-content/uploads/2013/12/Indie_cinema_Logo_2color-MF-300x116-web.png
Ryan E. Walters2015-12-29 12:38:562016-01-10 21:42:39How To Light Quickly (Cinematic Lighting Lesson 19)
 https://indiecinemaacademy.com/wp-content/uploads/2015/09/LC121_LightingHighSpeed-Thumbnail-Web.jpg
450
800
Ryan E. Walters
https://indiecinemaacademy.com/wp-content/uploads/2013/12/Indie_cinema_Logo_2color-MF-300x116-web.png
Ryan E. Walters2015-09-21 00:15:372016-01-10 21:42:57Lighting For Extreme Frame Rates (Cinematic Lighting Lesson 21)
 https://indiecinemaacademy.com/wp-content/uploads/2015/09/LC115_12Questions-Thumbnail-Free-Web.jpg
450
800
Ryan E. Walters
https://indiecinemaacademy.com/wp-content/uploads/2013/12/Indie_cinema_Logo_2color-MF-300x116-web.png
Ryan E. Walters2015-09-07 00:30:532015-10-30 19:06:3612 Crucial Questions To Ask Before You Light Your Set (Cinematic Lighting Lesson 15)
 https://indiecinemaacademy.com/wp-content/uploads/2015/08/LC114-3StrLightingNghtExt-Thumbnail.jpg
450
800
Ryan E. Walters
https://indiecinemaacademy.com/wp-content/uploads/2013/12/Indie_cinema_Logo_2color-MF-300x116-web.png
Ryan E. Walters2015-08-24 00:30:112015-10-30 18:55:173 Strategies for Lighting Your Night Exteriors (Cinematic Lighting Lesson 14)
 https://indiecinemaacademy.com/wp-content/uploads/2015/08/LC112_5SratDayExt-Thumbnail-800x450-jpg-web.jpeg
450
800
Ryan E. Walters
https://indiecinemaacademy.com/wp-content/uploads/2013/12/Indie_cinema_Logo_2color-MF-300x116-web.png
Ryan E. Walters2015-08-10 00:15:422015-10-30 18:54:545 Essential Strategies To Lighting Day Exteriors (Cinematic Lighting Lesson 12)
 https://indiecinemaacademy.com/wp-content/uploads/2015/07/LC113-10TricksDayExt-Thumbnail-800x450-web-.jpg
450
800
Ryan E. Walters
https://indiecinemaacademy.com/wp-content/uploads/2013/12/Indie_cinema_Logo_2color-MF-300x116-web.png
Ryan E. Walters2015-07-27 00:15:252015-10-30 18:55:0310 Tips To Lighting Day Exteriors (Cinematic Lighting Lesson 13)
 https://indiecinemaacademy.com/wp-content/uploads/2015/07/LC123_SmallCommercial-thumbnail-800X450.jpg
450
800
Ryan E. Walters
https://indiecinemaacademy.com/wp-content/uploads/2013/12/Indie_cinema_Logo_2color-MF-300x116-web.png
Ryan E. Walters2015-07-13 14:24:582015-10-30 19:19:44How To Light A Small Commercial (Cinematic Lighting Lesson 23)
 https://indiecinemaacademy.com/wp-content/uploads/2015/06/LC118-WhereToBeginLighting-featured.jpg
450
800
Ryan E. Walters
https://indiecinemaacademy.com/wp-content/uploads/2013/12/Indie_cinema_Logo_2color-MF-300x116-web.png
Ryan E. Walters2015-06-29 00:30:302015-12-29 12:43:40Where To Begin Lighting Your Set (Cinematic Lighting Lesson 18)
https://indiecinemaacademy.com/wp-content/uploads/2015/06/LC118-WhereToBeginLighting-featured.jpg
450
800
Ryan E. Walters
https://indiecinemaacademy.com/wp-content/uploads/2013/12/Indie_cinema_Logo_2color-MF-300x116-web.png
Ryan E. Walters2015-06-29 00:30:302015-12-29 12:43:40Where To Begin Lighting Your Set (Cinematic Lighting Lesson 18)Leave a Reply
Want to join the discussion?Feel free to contribute!
Leave a Reply Cancel reply
You must be logged in to post a comment.
This site uses Akismet to reduce spam. Learn how your comment data is processed.

If this is lesson 26, there seems to be 10 lessons missing.
Those 10 aren’t missing… We know exactly where they are 😉
To be serious: some of those lessons involved filming outside–“Lighting a Night Exterior,” “Lighting a Day Exterior”–and we had to hold off until recently to film them. In fact, we just shot three of them and got very sun burnt in the process! Stay tuned….
Sunburnt? Filming “Lighting a Night Exterior”?? I KNEW video peeps were vampires!
Ok, fine, I’ll be patient….
I was wondering would the westcott flex lights work well with this type of setup as opposed to the 200 Fill-lite lights? If so I was thinking of getting the 1×2 or 1×3 flex. I also was wondering if there is a huge difference from the 1×2 and 1×3 especially if you use a silk to make the source light bigger. Thanks.
Yes, the Westcott Flex would be fine instead of the Fill-Lite 200 Lights. Both styles are compact and would work in the location. The Westcott would need a silk or other diffusion to reduce the effect of so many points of light that often happens with LED lights. The Fill-Lite lights use remote phosphor which softens the light and makes it less directional, solving this problem.
We have not worked with the Westcott Flex 1′ x 2′ and Westcott Flex 1′ x 3′
 , only the Westcott 1′ x 1′
 . I would imagine that if you are going for soft light then the 1′ x 3′ would be even better than the 1′ x 2′. Another option that is slightly less expensive is to get a 1′ x 1′ and a 1′ x 2′. Then you can make a 1′ x 3′ (or stack them to make a triangle that is 2′ wide and 2′ tall) when you want really soft light, or have two separate lights if you don’t. Being modular would give you even more flexibility!
Thanks
Would the Flex lights work? Kind off… The advantage of the Fill-lite for this setup is that it is a naturally soft source so I don’t have to add diffusion. You can add diffusion to the flex light but now you increase the space requirements on set. And for this shoot we were in right small spaces and adding on extra diffusion wasn’t possible since the light was just barely out of the shot. (For the wide shot and medium shots)
If you have the space on set to add a frame of diffusion, then yes it will work. If not, then you need a light that is naturally soft from the start- which is why I went with the Fill-Lite.
If you are adding a frame of diffusion in front of a light, then the light itself isn’t as big of a deal. What changes is the out put. So with the 1×3 you’ll have more output (brighter) than the 1×2. That’s the only real difference…
I just had another thought to add- Check out our lesson on 6 ways to create soft light. In there I demonstrate how creating soft light takes up more space on set which would be one of the draw backs to the method you mentioned with the Flex Lights. If you have the space and the time to set it up then it will work. If you don’t have the time or space, than a different tool would be the better choice. (Here is the lesson: https://indiecinemaacademy.com/academy/six-ways-create-soft-light-cinematic-lighting-04/ )
Good to know! I was thinking of getting one of the westcott shallow softboxes to minimize the footprint. Wish I could afford the fill-lite. lol Thanks.
Hi Ryan, I’m doing a shoot this Sunday and I need to dim the sunlight coming through a window or two. Each window has eight panes (16 panes total) separated by a wood divider. It is an old building. It would be prohibitively time consuming to cut a gel for each pane and tape each gel individually. I’m not allowed to go outside the window (it is on a third story). I guess my only option is to gel the entire window with one sheet on the inside. That will look a little funky. Any suggestions?
ps. Here is our last shoot in the location: activelab.me I think you’ll agree the window was too bright. The sunlight is actually is coming over the building and reflecting off another building. So I’m amazed it so bright.
I don’t think the windows are too bright, though. And I see that the sun changes throughout the shoot so perhaps timing shots of the window for when the sun is no longer directly shining on the windows might be an option.
I’m wondering if you could use black gaff tape to tape it to the inside of the window with one sheet covering an entire window. The black gaff tape should blend well with the window frame, appearing to be part of the frame. You may get some odd reflections off the gel, so you’ll want to make sure it doesn’t wiggle with any disturbance. Perhaps you could stick some take to the center of the cross-member so that the center of the gel stays against the window frame.