Negative Fill: The Best Kept Secret
(Cinematic Lighting Lesson 08)
Summary: In this video Ryan not only explains what negative fill is and how to use it, but he shows it being applied to different situations, gives tips on placement, and provides you with professional & DIY solutions.
Length: 5:47 minutes
Introduction
By now you should be familiar with the role of a fill light and how it shapes the mood or tone of your scene. But what is this thing called negative fill? And how do I use it to dial in the look of my images? In this video I’m going to show you why negative fill is so important, how the professional tools are used to create negative fill, as well as some do-it-yourself solutions in case you don’t have the budget for the pro gear.
What Is Negative Fill
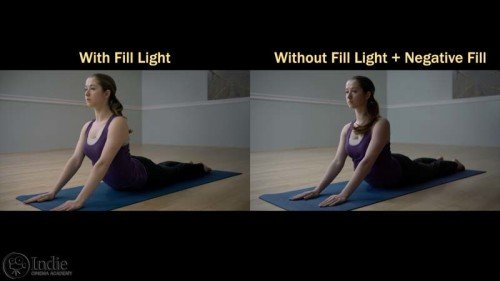
If the fill light adds light to the shot in order to decrease contrast levels of the key light, negative fill is the opposite. It removes light from the shot to increase contrast levels. Any time you are looking to make the blacks or the shadows of your image darker, consider adding negative fill.
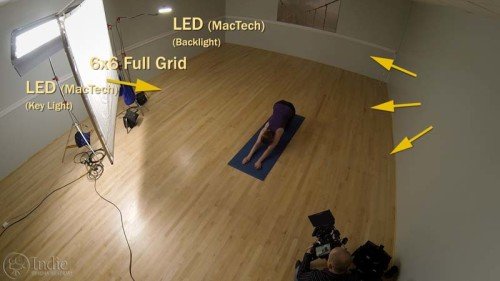
I’m guessing right about now you’re thinking, if negative fill is about removing light, can’t I just turn lights off? Yeah, that’s where you start. But many times simply turning off a light isn’t good enough. To stop light from bouncing around and filling in the shadows, additional measures have to be taken. Enter negative fill. Typically negative fill is a flag of some kind, and it’s positioned to cut the light bouncing back into the shadows or fill side of the shot.
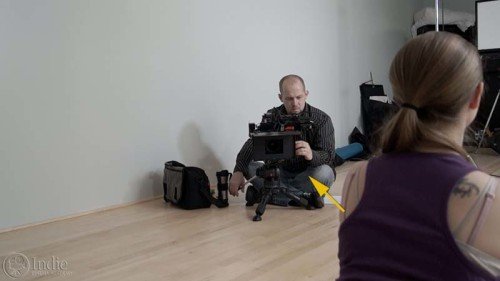
Another way to look at it is that the fill side of the shot is reflecting everything that it sees into the camera. If you’re looking from the talent’s position, the fill side of the shot reflects the light from that angle. If it’s a wall, it reflects that wall. If you put a black flag there, now it sees black, and it is “reflecting” black.
Now that you know what negative fill is, let’s put it into practice.
Using Negative Fill On Set
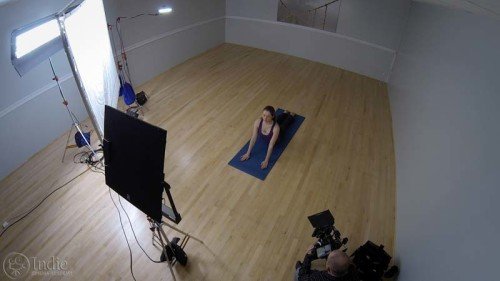
When I first began, I would often think to myself, “I’m inside and I can control the light at the location, so I don’t need to worry about negative fill. Wrong…that can’t be further from the truth. Even if you can turn every light off at a location, you should still be thinking about negative fill. That’s because every light you turn on adds to ambient light levels; it is adding to your fill. Like it or not, light continues to bounce around the room, off the walls, off the ceiling. Everywhere.
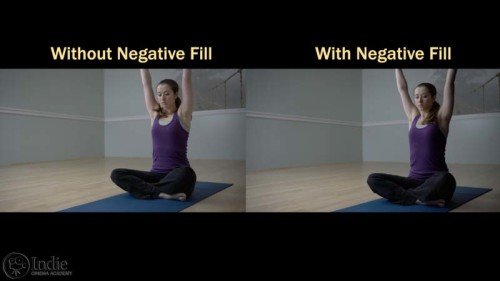
So to make sure your blacks are deep and rich, add in a flag or floppy to cut the light levels to the fill side of your shot in order to increase the contrast. The size of the negative fill you use will be dependent on the shot size and the size of your subject. The smaller the shot and subject, the smaller the negative fill can be. You might be able to use a 2’ x 3’ solid or smaller if the shot is only a close up. The larger the shot and subject, the bigger the negative fill has to be. If you’re on a medium or wide shot, you might have to use a 4’ x 4’ floppy or bigger.
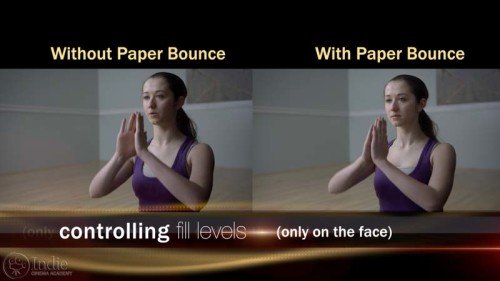
As a side note, here is a neat little trick: let’s say you want to increase the contrast levels overall for an interview. So you bring in your 4’ x 4’ floppy. And now you have the contrast set where you want it overall, but you still want to bring up just the fill levels on the face. What do you do? Well, it’s simple: just add in some copy paper or foam core. You can easily tape it to the flag and put it in the position you want it. This way the overall contrast isn’t affected, just the part of the shot you wanted to bring up.
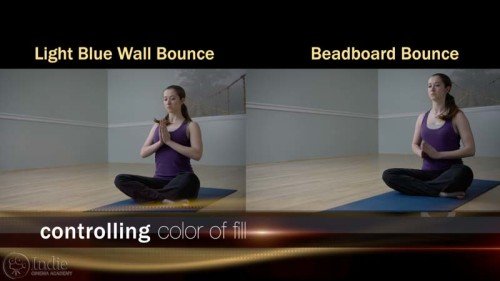
Another way to use negative fill is to help control the colors of your shadows. Maybe there are some colored walls that are contaminating the shadows, turning them a color you don’t want. Simply add in a large negative fill to block the bounce light, and then bring in a white card to dial in your fill levels. Now your shadows will be clean since they are being filled with a white bounce.
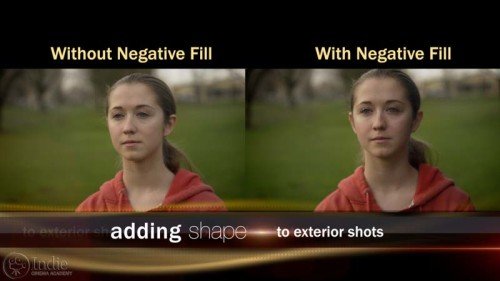
You should also be thinking about using negative fill any time you are shooting an exterior scene,. Outside light bounces around everywhere. And here in the Pacific Northwest, we usually get a lot of overcast days that really flatten out exterior scenes, making them boring. So to add contrast to the shot, I’ll bring in negative fill which instantly adds contrast and shape to my image.
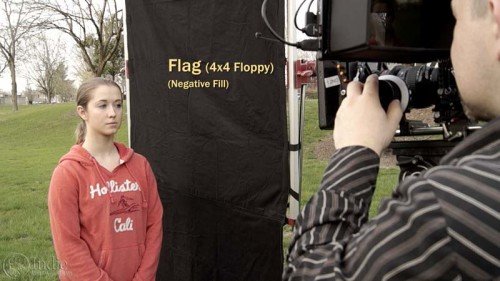
The tricky part of using negative fill outside is that the subject sees so much of the environment. That means the fill side is getting a lot of contamination from the sky and the ground; everything around it. So you have to bigger pieces of negative fill in order to see a difference. Most of the time, it means using at least a 4’ x 4’ solid, but that’s usually only good for a close up or maybe a medium shot.
Pro Gear & Do-It-Yourself Solutions
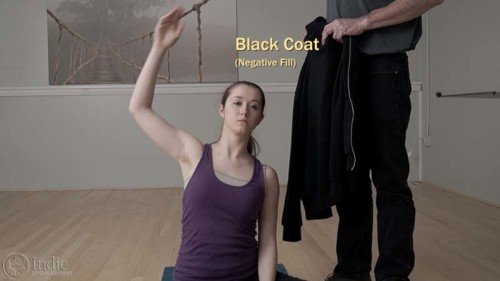
Since all you’re doing is removing light from the fill side, the tools for negative fill can be really cheap. If you’re really tight on funds, all you need is some kind of black material. Heck, if you’re in a pinch you could even use a coat. But usually you’ll want a thick black material like felt.

Then all you have to do it so clip it to a frame, a C-Stand, or anything you can safely mount it to for the shot. If the material is light enough, I’ve even tapped or pinned it to a wall.
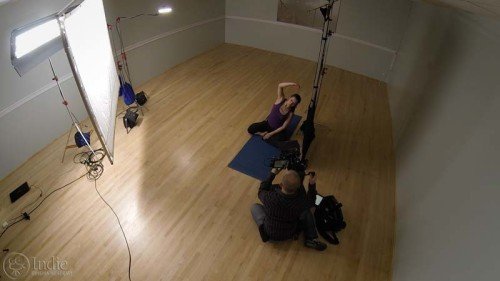
The drawback to any do-it-yourself solution is that it slows you down on set. So if you want to speed things up and not take forever trying to figure out how to rig your black cloth, just buy or rent the real tools: flags and floppies. They are made out of duvetyne which is a thick black material that is also flame retardant, meaning they are less likely to catch fire than your do-it-yourself fabric. I’ve found it’s usually a best practice to not burn down your sets. And the best part is that professional negative fill gear is really cheap to rent.
Final Thoughts
Negative fill is a quick and easy way to remove light from the fill side of your shot in order to increase the contrast in your images. Whether you are inside or out, I’d encourage you to think about using negative fill. It might just be the tool you need to get your blacks to the richness you want them.
I want to know if anything new stood out to you? Or have you been using negative fill all along? Leave a comment below and let me know. And if you have any questions, ask away, and I’ll be sure to respond.
Camera / Audio
- Sony Alpha a7S Mirrorless Digital Camera
- Canon EF 24-70mm f/2.8L II USM Lens
- Fotodiox Lens Mount Adapter – Canon EOS (EF / EF-s) to Sony E-Mount
- Bright Tangerine Misfit Matte Box
- Tilta FF-T03 15mm Follow Focus with Hard Stops
- Sachtler Panorama 7+7 Head 100mm (similar head: 1006 DV 10 SB Fluid Head)
- Sachtler Carbon Fiber Tripod (similar tripod: Carbon Fiber HD Tripod Legs)
- Induro DR Hi-Hat Tripod Set
- MYT Works 4′ Medium slider w/ HiHat
- Hollywood Beefy Baby Stand (8.5′) (two, to raise the MYT Works slider)
- Movcam Cage for Sony A7S
- Sekonic L-758Cine DigitalMaster Light Meter
- Sekonic C-700 SpectroMaster Color Meter
- Wooden Camera A/B Gold-Mount Plate for Sony A7, A7r and A7s
- Audio Technica AT835b Shotgun Microphone
(similar microphone: Audio Technica BP4071 Shotgun Microphone)
- Wooden Camera DSLR A-Box
- Delkin Devices 64GB SDXC Memory Card 600x UHS-I
- DSC Labs One Shot Reference Chart (Matte Finish)
Behind the Scenes (BTS) Cameras
- GoPro Hero3 Black (similar camera: GoPro HERO4 Black)
- Motrr Galileo: App-Driven Motorized Head w/ GoPro Mount
- Sony Alpha SLT-A57
- Filmcity DSLR Camera Cage Shoulder Rig kit (FC-03)
Lighting / Grip Gear
- Fill-Lite 200
- LED (900) (Bestlight®)
- 24×36″ – Black Double Net
- 1/8 Color Temperature Orange (CTO) Filter (24×198″ Roll)
- 1/2 Color Temperature Orange (CTO) Filter (24×198″ Roll)
- Foam Core Bounce (White)
- Floppy – 48×48″ (1.2×1.2m)
- Matthews Century C Stand Grip Arm Kit – 10.5′ (3.2m)
- PBL Sandbags x4 bags
 https://indiecinemaacademy.com/wp-content/uploads/2016/01/LC120-CorporateVideo-Thumbnail-Web.jpg
450
800
Ryan E. Walters
https://indiecinemaacademy.com/wp-content/uploads/2013/12/Indie_cinema_Logo_2color-MF-300x116-web.png
Ryan E. Walters2016-01-11 00:15:082016-05-05 11:22:30How to Cinematically Light a Corporate Video (Cinematic Lighting Lesson 20)
 https://indiecinemaacademy.com/wp-content/uploads/2015/12/LC119-LightFast-Thumbnail.jpg
450
800
Ryan E. Walters
https://indiecinemaacademy.com/wp-content/uploads/2013/12/Indie_cinema_Logo_2color-MF-300x116-web.png
Ryan E. Walters2015-12-29 12:38:562016-01-10 21:42:39How To Light Quickly (Cinematic Lighting Lesson 19)
 https://indiecinemaacademy.com/wp-content/uploads/2015/09/LC121_LightingHighSpeed-Thumbnail-Web.jpg
450
800
Ryan E. Walters
https://indiecinemaacademy.com/wp-content/uploads/2013/12/Indie_cinema_Logo_2color-MF-300x116-web.png
Ryan E. Walters2015-09-21 00:15:372016-01-10 21:42:57Lighting For Extreme Frame Rates (Cinematic Lighting Lesson 21)
 https://indiecinemaacademy.com/wp-content/uploads/2015/09/LC115_12Questions-Thumbnail-Free-Web.jpg
450
800
Ryan E. Walters
https://indiecinemaacademy.com/wp-content/uploads/2013/12/Indie_cinema_Logo_2color-MF-300x116-web.png
Ryan E. Walters2015-09-07 00:30:532015-10-30 19:06:3612 Crucial Questions To Ask Before You Light Your Set (Cinematic Lighting Lesson 15)
 https://indiecinemaacademy.com/wp-content/uploads/2015/08/LC114-3StrLightingNghtExt-Thumbnail.jpg
450
800
Ryan E. Walters
https://indiecinemaacademy.com/wp-content/uploads/2013/12/Indie_cinema_Logo_2color-MF-300x116-web.png
Ryan E. Walters2015-08-24 00:30:112015-10-30 18:55:173 Strategies for Lighting Your Night Exteriors (Cinematic Lighting Lesson 14)
 https://indiecinemaacademy.com/wp-content/uploads/2015/08/LC112_5SratDayExt-Thumbnail-800x450-jpg-web.jpeg
450
800
Ryan E. Walters
https://indiecinemaacademy.com/wp-content/uploads/2013/12/Indie_cinema_Logo_2color-MF-300x116-web.png
Ryan E. Walters2015-08-10 00:15:422015-10-30 18:54:545 Essential Strategies To Lighting Day Exteriors (Cinematic Lighting Lesson 12)
 https://indiecinemaacademy.com/wp-content/uploads/2015/07/LC113-10TricksDayExt-Thumbnail-800x450-web-.jpg
450
800
Ryan E. Walters
https://indiecinemaacademy.com/wp-content/uploads/2013/12/Indie_cinema_Logo_2color-MF-300x116-web.png
Ryan E. Walters2015-07-27 00:15:252015-10-30 18:55:0310 Tips To Lighting Day Exteriors (Cinematic Lighting Lesson 13)
 https://indiecinemaacademy.com/wp-content/uploads/2015/07/LC123_SmallCommercial-thumbnail-800X450.jpg
450
800
Ryan E. Walters
https://indiecinemaacademy.com/wp-content/uploads/2013/12/Indie_cinema_Logo_2color-MF-300x116-web.png
Ryan E. Walters2015-07-13 14:24:582015-10-30 19:19:44How To Light A Small Commercial (Cinematic Lighting Lesson 23)
 https://indiecinemaacademy.com/wp-content/uploads/2015/06/LC118-WhereToBeginLighting-featured.jpg
450
800
Ryan E. Walters
https://indiecinemaacademy.com/wp-content/uploads/2013/12/Indie_cinema_Logo_2color-MF-300x116-web.png
Ryan E. Walters2015-06-29 00:30:302015-12-29 12:43:40Where To Begin Lighting Your Set (Cinematic Lighting Lesson 18)
https://indiecinemaacademy.com/wp-content/uploads/2015/06/LC118-WhereToBeginLighting-featured.jpg
450
800
Ryan E. Walters
https://indiecinemaacademy.com/wp-content/uploads/2013/12/Indie_cinema_Logo_2color-MF-300x116-web.png
Ryan E. Walters2015-06-29 00:30:302015-12-29 12:43:40Where To Begin Lighting Your Set (Cinematic Lighting Lesson 18)Trackbacks & Pingbacks
-
[…] this video Ryan E. Walters from the indiecinemaacademy looks at something that a lot of photographers and filmmakers do not know or consider – […]
-
[…] this video Ryan E. Walters from the indiecinemaacademy looks at something that a lot of photographers and filmmakers do not know or consider – […]
Leave a Reply
Want to join the discussion?Feel free to contribute!
Leave a Reply Cancel reply
You must be logged in to post a comment.
This site uses Akismet to reduce spam. Learn how your comment data is processed.

Great lesson! Really informative. I have used negative fill sometimes in interiors, but I find using it in exteriors a little complicated when time and budget is really tight. It’s a great technique we all should know. Thanks!
Thanks- I’m glad you liked it & found it helpful. 🙂
I personally think negative fill is affordable for any production, since the rental for everything is about $20 tops. However, your point about time, is the bigger consideration for me. If you are doing everything yourself, then it does add extra time to setup. The only way around that is to have an additional crew member- and that is where additional expense could come into play.
And that’s always the trade off in this line of work isn’t it? Especially on small shoots- trying to balance time vs. budgets vs. quality… unfortunately we can only pick two…
Thanks again for watching. 🙂
Really enjoyed this lesson! I haven’t used negative fill much, if at all. So I will certainly begin looking for opportunities for this technique to help shape lighting.
Glad this lesson has sparked some ideas for you! Years ago I would see filmmakers put up negative fill, and thought it was a bit odd (once it was for a night scene even!). But when I started to do use it, it made perfect sense. The nuance is subtle, but really affects the entire feel of the shot.
Nicely done Ryan. I just had to incorporate this on a shoot yesterday with a blue wall close to talent. It also had a noisy monitor mounted on rails that couldn’t be shut. Rather than using (relatively) thin black fabric, I employed a heavy-duty moving blanket (black on one side, white on the other). I bring this to every shoot, as it serves so many useful purposes. So neg. fill + sound absorption in one.
Awesome! Well done- I like that idea of a moving blanket. Very handy to have on hand for sure. 🙂
Hey Ryan , love the whole training series , i have a question about shooting “sort of ” related to this subject , i am following some cinematographers and i wanted to ask when you are shooting sort of a low key look like these images : https://www.dropbox.com/sh/l4fe9lr8vc7yzy1/AACMfSYPRK57sxAJEf375eyda?dl=0
how do you get the shadows to be as thick and rich , and you sort of have light rays coming in , i tried to do it with a smoke machine and with reflector tried to disperse it into sort of haze it worked but it needed to keep the smoke going and that was difficult on everyone on set, is there is another way, more lungs friendly ?
thanks
Thanks- I’m glad you’re enjoying the series. Tim & I are having fun putting it together. 🙂
The answer to the haze question, is that you need to use a hazer, not a smoke machine. Smoke machines are great for a low budget solution, but as you probably experienced, the smoke doesn’t hang around very long, and it is harder to control. If you use a Hazer, it puts out an even distribution across the set, and it hangs in the air longer than a smoke machine does. So if you are in a drafty environment, a hazer is going to work a lot better than a smoke machine.
As for the rich shadows, those will be helped by keeping the bulk of the haze farther away from the camera, so that your shadows do not get too milky, and then you’ll clean up the shadows in the grade, by crunching the milky parts of the shadows into blackness. (Just be careful that you don’t over grade the image, and lose all detail in the shadows…)
Unfortunately, I don’t know of a lung friendly solution for everyone on set. It’s been my experience that hazers are more tolerable than smoke machines, but I don’t think either are great long term. I’ve heard that there are different solutions you can get, but I haven’t researched it or tried any out. I just usually request a hazer and one shows up on the grip truck.
Is a flag the same thing as a floppy?
A floppy is a type of flag. In many ways it is better.
A flag is something that blocks the light and is almost always black. Often it is a black piece of fabric stretched between a metal frame.
A floppy is also a black piece of fabric stretched between a metal frame. However, it also has an extra piece of fabric that “flops” down. This can be used to double the size of the flag. Or if you position the flag horizontally to act like a ceiling, the floppy part creates a wall. This really helps to block A LOT of light for situations such as reducing light leak for video village or the camera operator.
Hi Ryan, what about the frame you use for the floppy. Is it home made?
Thank you!
Yes, Daniele, that is a DIY (do it yourself) frame for the floppy. Here are the materials and plans that Ryan used to build it. Some of the materials are no longer available, but similar parts can be swapped out:
Lighting Alchemy: Building A 4×4 Quick Frame
Thanks a lot Tim. Have a nice weekend!
This was extremely useful, especially for outdoor shots. Thanks for the post.
Thanks Brian!
Really useful video – thank you from a small island in North Wales….
You are welcome! I’m glad this helped give you a variety of ways that negative hill can make your images better.