The Three Functions of Light
(Cinematic Lighting Lesson 01)
Summary: Ryan covers the three functions that light plays in the creation of your images: separation, shadow, and fill.
Length: 4:02 minutes
!! Want to see the whole video? Become a member !!
- If you are already a member, you can log in below.
Introduction
Without light, all we are doing is creating a radio program.
Talented filmmakers use light to do more than just create an exposure. They use it to really craft their story and shape how they want their audience to feel. It’s about creating mood and tone, and about telling your audience what they should see and what they shouldn’t see. Every light that you use should be doing one of three things: it should be creating separation, it should be casting a shadow, or it should be adding fill.
Creating Separation
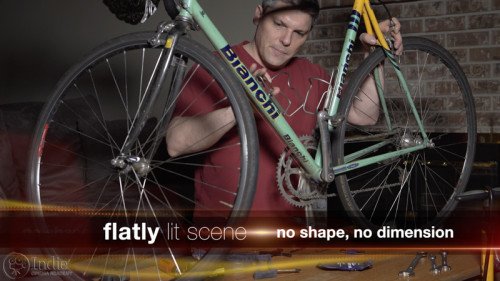
Despite the on again and off again hype of 3-D films over the years, film and video is a two dimensional medium. We work with a flat image. In order to make our images come to life and engage our viewers in the world in front of them we need to create the illusion of depth.
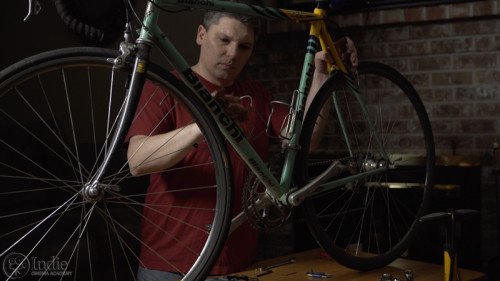
We create depth in our images by creating separation in our image. One of the ways we create separation is through the placement of foreground, mid-ground, and background elements in our scene. But an even more powerful tool we have at our disposal is lighting.
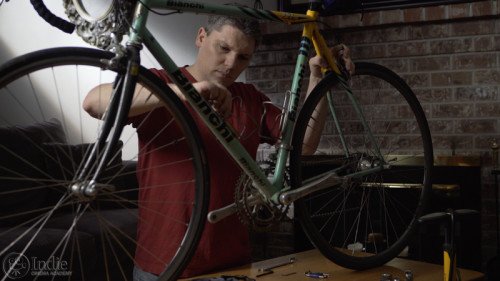
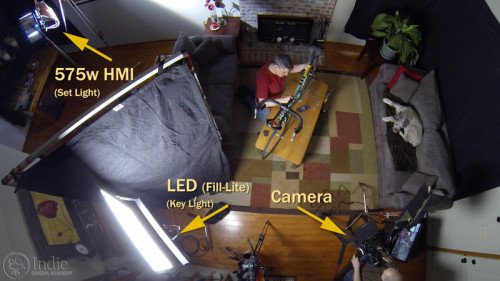
We create separation in lighting by placing light against dark, or dark against light. This combination automatically creates separation between different layers in an image and we can do this on as many planes or layers as we want.
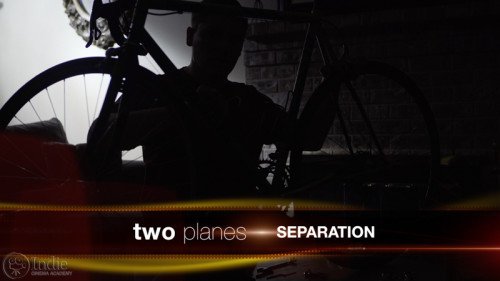
For example, we can have a dark silhouette against a bright slash on a wall, which would be two plains.
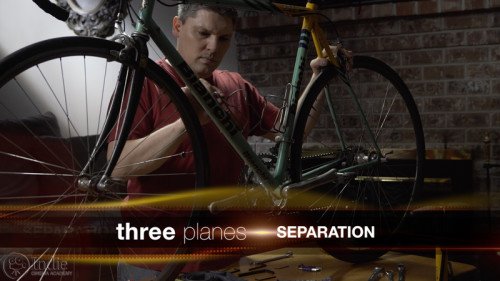
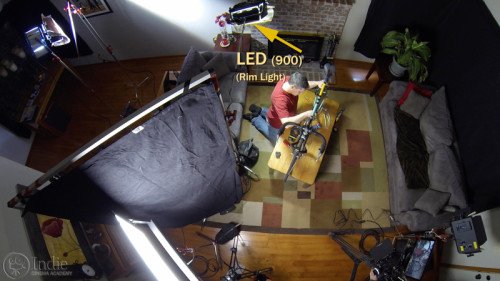
Or in the classic interview setup, when we place a rim light on someone with dark hair, or a dark background, we are creating three planes of separation: the dark hair, the bright edge light, and the dark background.
As you light, think about…
** Want to read the rest of the transcript? Become a member. **
** Want to see the lighting diagrams? Become a member. **
Camera / Audio
- Sony Alpha a7S Mirrorless Digital Camera
- Canon EF 24-70mm f/2.8L II USM Lens
- Fotodiox Lens Mount Adapter – Canon EOS (EF / EF-s) to Sony E-Mount
- Bright Tangerine Misfit Matte Box
- Tilta FF-T03 15mm Follow Focus with Hard Stops
- Sachtler Panorama 7+7 Head 100mm (similar head: 1006 DV 10 SB Fluid Head)
- Sachtler Carbon Fiber Tripod (similar tripod: Carbon Fiber HD Tripod Legs)
- MYT Works 4′ Medium slider w/ HiHat
- Hollywood Beefy Baby Stand (8.5′) (two, to raise the MYT Works slider)
- Movcam Cage for Sony A7S
- Sekonic L-758Cine DigitalMaster Light Meter
- Sekonic C-700 SpectroMaster Color Meter
- Wooden Camera A/B Gold-Mount Plate for Sony A7, A7r and A7s
- Audio Technica AT835b Shotgun Microphone
(similar microphone: Audio Technica BP4071 Shotgun Microphone)
- Wooden Camera DSLR A-Box
- Delkin Devices 64GB SDXC Memory Card 600x UHS-I
- DSC Labs One Shot Reference Chart (Matte Finish)
Behind the Scenes (BTS) Cameras
- GoPro Hero3 Black (similar camera: GoPro HERO4 Black)
- Canon EOS 60D DSLR Camera w/ Canon EF-S 18-135mm IS Lens
Lighting / Grip Gear
- Fill-Lite 200
- 575W HMI Fresnel Light w/ Electronic Ballast (Queenshiny®)
- LED (900) (Bestlight®)
- Cucoloris – 24 x 36″ – Wood
- 24×36″ – Black Double Net
- 1/8 Color Temperature Orange (CTO) Filter (24×198″ Roll)
- 1/2 Color Temperature Orange (CTO) Filter (24×198″ Roll)
- Foam Core Bounce (White)
- Floppy – 48×48″ (1.2×1.2m)
- Matthews Century C Stand Grip Arm Kit – 10.5′ (3.2m)
- PBL Sandbags x4 bags
 https://indiecinemaacademy.com/wp-content/uploads/2016/10/ICA_DoF01_How_Aperture_and_ISO_Affects_Focus-Thumbnail-web.jpg
450
800
Tim
https://indiecinemaacademy.com/wp-content/uploads/2013/12/Indie_cinema_Logo_2color-MF-300x116-web.png
Tim2016-10-10 00:15:202025-03-11 14:46:47Depth of Field, Part 1: How Aperture and ISO Affect Focus
 https://indiecinemaacademy.com/wp-content/uploads/2015/12/CS006-HighSpeed-Part06-FREE-Thumbnail-Web.jpg
450
800
Ryan E. Walters
https://indiecinemaacademy.com/wp-content/uploads/2013/12/Indie_cinema_Logo_2color-MF-300x116-web.png
Ryan E. Walters2015-12-14 00:15:052015-12-29 13:20:06Your Guide To High Speed, Part 6: Five Tips For A Successful Shoot
 https://indiecinemaacademy.com/wp-content/uploads/2015/12/CS005-HighSpeed-Part05-FREE-Thumbnail-Web.jpg
450
800
Ryan E. Walters
https://indiecinemaacademy.com/wp-content/uploads/2013/12/Indie_cinema_Logo_2color-MF-300x116-web.png
Ryan E. Walters2015-11-30 09:00:282015-12-29 15:41:16Your Guide To High Speed, Part 5: Lighting Six High Speed Sets
 https://indiecinemaacademy.com/wp-content/uploads/2015/12/CS004-HighSpeed-Part04-FREE-Thumbnail-Web.jpg
450
800
Ryan E. Walters
https://indiecinemaacademy.com/wp-content/uploads/2013/12/Indie_cinema_Logo_2color-MF-300x116-web.png
Ryan E. Walters2015-11-16 00:15:182015-12-29 13:17:26Your Guide To High Speed, Part 4: Common Lighting Problems
 https://indiecinemaacademy.com/wp-content/uploads/2015/12/CS003-HighSpeed-Part03-FREE-Thumbnail-Web.jpg
450
800
Ryan E. Walters
https://indiecinemaacademy.com/wp-content/uploads/2013/12/Indie_cinema_Logo_2color-MF-300x116-web.png
Ryan E. Walters2015-11-02 00:15:272015-12-29 13:15:49Your Guide To High Speed, Part 3: Camera Operation & Workflow
 https://indiecinemaacademy.com/wp-content/uploads/2015/12/CS002-HighSpeed-Part02-FREE-Thumbnail-Web.jpg
450
800
Ryan E. Walters
https://indiecinemaacademy.com/wp-content/uploads/2013/12/Indie_cinema_Logo_2color-MF-300x116-web.png
Ryan E. Walters2015-10-19 12:25:282015-12-29 15:21:30Your Guide To High Speed, Part 2: Frame Rate
 https://indiecinemaacademy.com/wp-content/uploads/2015/12/CS001-HighSpeed-Part01-FREE-Thumbnail-Web.jpg
450
800
Ryan E. Walters
https://indiecinemaacademy.com/wp-content/uploads/2013/12/Indie_cinema_Logo_2color-MF-300x116-web.png
Ryan E. Walters2015-10-05 00:15:592015-12-29 13:20:38Your Guide To High Speed, Part 1: Introduction
 https://indiecinemaacademy.com/wp-content/uploads/2015/09/LC115_12Questions-Thumbnail-Free-Web.jpg
450
800
Ryan E. Walters
https://indiecinemaacademy.com/wp-content/uploads/2013/12/Indie_cinema_Logo_2color-MF-300x116-web.png
Ryan E. Walters2015-09-07 00:30:532015-10-30 19:06:3612 Crucial Questions To Ask Before You Light Your Set (Cinematic Lighting Lesson 15)
 https://indiecinemaacademy.com/wp-content/uploads/2015/03/LC108-NegativeFill-Thumbnail-Web.jpg
450
800
Ryan E. Walters
https://indiecinemaacademy.com/wp-content/uploads/2013/12/Indie_cinema_Logo_2color-MF-300x116-web.png
Ryan E. Walters2015-03-23 00:30:392015-10-30 18:34:25Negative Fill: The Best Kept Secret (Cinematic Lighting Lesson 08)
https://indiecinemaacademy.com/wp-content/uploads/2015/03/LC108-NegativeFill-Thumbnail-Web.jpg
450
800
Ryan E. Walters
https://indiecinemaacademy.com/wp-content/uploads/2013/12/Indie_cinema_Logo_2color-MF-300x116-web.png
Ryan E. Walters2015-03-23 00:30:392015-10-30 18:34:25Negative Fill: The Best Kept Secret (Cinematic Lighting Lesson 08)Leave a Reply
Want to join the discussion?Feel free to contribute!
Leave a Reply Cancel reply
You must be logged in to post a comment.
This site uses Akismet to reduce spam. Learn how your comment data is processed.

I appreciate the bird’s eye shots, lighting diagrams and tools list! As well, a concept was made clear here that was muddled prior; I am using light to create the illusion of 3D on a 2D image.
Thank you! We are adding more behind the scenes (BTS) cameras to better help everyone “see” everything that we do to create the the images on camera, so you can do the same (and more!). In some of the upcoming lessons, we recreated a living room and a kitchen in an empty studio. When you look at the bird’s eye shots, you’ll see we only did art decoration (“art dec”) in a corner of the room since our framing was very tight. This is another trick to keep budgets and time under control. 🙂
Thanks glad you like it. 🙂 Tim & I are having lot of fun putting these together- we’ve got a lot of content shot, and we are releasing these as fast as we can…
*muddled in my mind prior to watching this video e.g., what am I really doing with all of these lights?! Camera Foundations was empowering and I’m highly anticipating what’s to come here.
I’m glad Camera Foundations was empowering. We hope to make Cinematic Lighting even more so. If you have any input / comments / suggestions along the way, we are all ears. 🙂
I love how well those videos are put together! Well structured, very informative and straight to the point. I’ve used a number of online educational services in past couple of years and, unfortunately, most of those provide an interview-type, or a master-class type of content which are not the best for educational purposes. I just want to give you guys a HUGE thank you and tell you how much I appreciate your work, how thorough and clear that is.
With deep respect, from a glittering snowy Moscow,
Pavel
Thanks Pavel- I’m glad you’re liking the content and that it is coming across well. 🙂
Hi guys I noticed the dog on the couch, can he be included on the next birds eye, appreciate it. Also what angle from the camera should the dog be placed?
Jokes aside keep up the brilliant work.
Dave 🙂
Awe, keen eye! Actually, the angle of the dog to the key light is integral to your lighting setup. If you don’t have him placed at the correct angle, you might as well give up and go home. 😉
I’m glad you’re liking the tutorials- thanks for the support. 🙂
Cheers,
Ryan
Hi Ryan
In the 3 layers and closing diagram is the 4x 4 floppy working as a flag for the fill lite 200 key or as a large white soft diffusion modifier for it?
Cheers
Dave
The 4×4 floppy is acting as a flag for the Fill-Lite 200. Since it is a soft light, it’s light rays bounce everywhere. By adding the flag it removes the spill of the light from the background and makes the shadows in the background darker.
Cheers,
Ryan
hey ryan its my first day on ICA, Just worndering why i can’t download lession in 1080p ?
Welcome!
At the current 720p resolution, the downloads are already quite large (in the hundreds of megabytes). If we made them 1080p, the file size would be more than most members’ connections could handle.
Ryan,
In one of your youtube videos, you explain how valuable a light meter can be. When googling light meters with video, I find meters valuable when video recording with a DSLR camera. Since I am using a JVC GY-HM600 camera that does not have ISO, will a light meter still be of value? Are there other settings I need to use in the light meter equation in place of ISO?
Thanks for your help!
Sam
Sam,
Great question, yes a light meter is a very helpful tool to use for sure! I’m actually surprised that there are still video cameras out there that don’t use ISO. A lot of manufactures have switched over to using ISO, or at least let you change how the readout appears, whether it reads in gain or ISO.
In any case, yes you can still use a light meter even if the camera only reads out in Gain, or if it doesn’t have and ISO/Gain adjustable settings. In either case, what you have to do is to calibrate the light meter and the camera together to figure out the ISO. Then you can set your light meter to that ISO and know it will match the camera. To do that, you need your camera, a gray card, and your light meter. Then follow the instructions I made for MasterLegend in the comments section of this video: https://indiecinemaacademy.com/academy/key-terms-aperture-shutter-iso/
If your camera doesn’t have a waveform, you can do the same thing by setting the zebras at 50% or 50 IRE. (But a waveform is going to be better.)
Happy Shooting!
Ryan