Five Roles Of Light
(Cinematic Lighting Lesson 02)
Summary: Every light you use should fulfill one of five roles: key, fill, backlight, set, effects. If it isn’t, turn it off. In this video Ryan covers what those five roles are, shows how they’re used to create cinematic images, offers tips on placement of each light, and gives you questions to think about when placing a light.
Length: 8:17 minutes
!! Want to see the whole video? Become a member !!
- If you are already a member, you can log in below.
Overview
In the last video we covered the three functions that a light has: casting shadow, creating fill, or creating separation. In this video we’re going to cover the five roles that a light can have, whether it is a key light, a fill light, a backlight, a set light, or an effects light. I’ll offer you tips on where to place those lights and how best to use each one.
Key Light
The dominate source of light for a scene or for the talent is called the key light. Because the key light is the main source of light, there may actually be more than one key light in a scene.
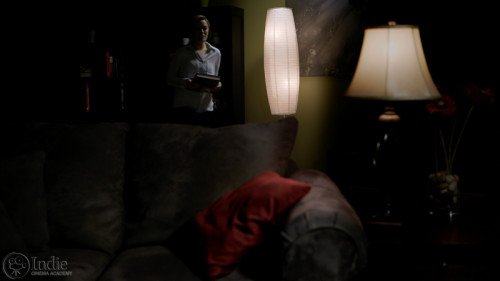
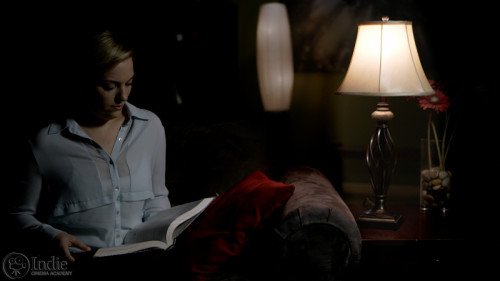
For example, the talent may move from the back of the room and then sit at a couch. In that case, there are actually two key lights.
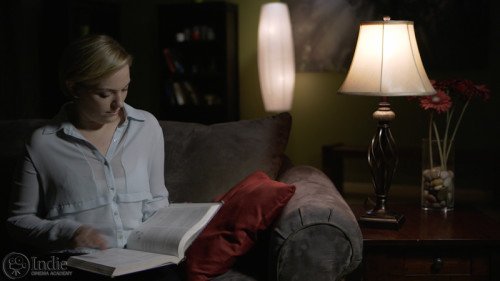
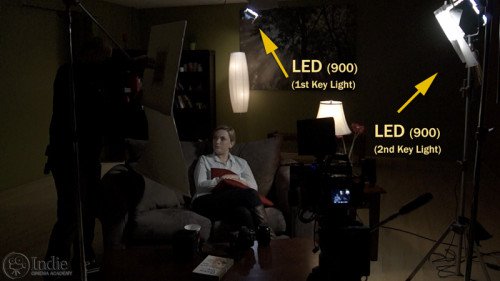
The first one is when the talent is at the back of the room; at that position the key is the light coming from the lamp. And then as the talent sits at the couch, the key becomes the lamp next to the couch. Or, if you only wanted one key light in the scene, you could turn off the lamp next to the couch, and now the lamp in the back is the key, since it’s dominant light source in the scene.
While the key light can come from any direction and there can be multiple keys in a scene, there are some basic guidelines for where to place your key light. The most flattering place to put your key light is 45 degrees off axis from the camera and 45 degrees above the talent.
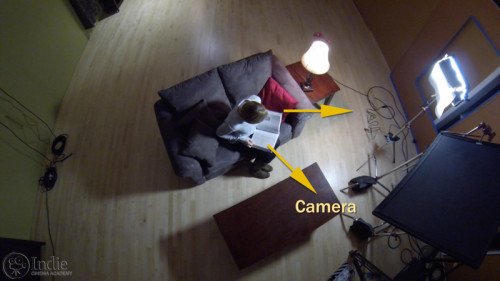
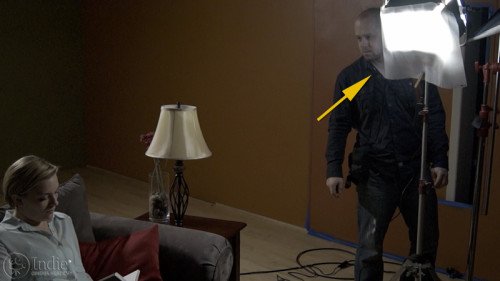
By placing the light in this position, the shadows fall toward the camera and it usually creates a triangularly shaped shadow on the talent’s face. And speaking of shadows, another best practice is…
** Want to read the rest of the transcript? Become a member. **
** Want to see the lighting diagrams? Become a member. **
Camera / Audio
- Sony Alpha a7S Mirrorless Digital Camera
- Canon EF 24-70mm f/2.8L II USM Lens
- Fotodiox Lens Mount Adapter – Canon EOS (EF / EF-s) to Sony E-Mount
- Bright Tangerine Misfit Matte Box
- Tilta FF-T03 15mm Follow Focus with Hard Stops
- Sachtler Panorama 7+7 Head 100mm (similar head: 1006 DV 10 SB Fluid Head)
- Sachtler Carbon Fiber Tripod (similar tripod: Carbon Fiber HD Tripod Legs)
- MYT Works 4′ Medium slider w/ HiHat
- Hollywood Beefy Baby Stand (8.5′) (two, to raise the MYT Works slider)
- Movcam Cage for Sony A7S
- Sekonic L-758Cine DigitalMaster Light Meter
- Sekonic C-700 SpectroMaster Color Meter
- Wooden Camera A/B Gold-Mount Plate for Sony A7, A7r and A7s
- Audio Technica AT835b Shotgun Microphone
(similar microphone: Audio Technica BP4071 Shotgun Microphone)
- Wooden Camera DSLR A-Box
- Delkin Devices 64GB SDXC Memory Card 600x UHS-I
- DSC Labs One Shot Reference Chart (Matte Finish)
Behind the Scenes (BTS) Cameras
- GoPro Hero3 Black (similar camera: GoPro HERO4 Black)
- Sony Alpha SLT-A57
- Filmcity DSLR Camera Cage Shoulder Rig kit (FC-03)
Lighting / Grip Gear
- Fill-Lite 200
- 650 Watt Fresnel Tungsten Light
- LED (900) (Bestlight®)
- #216 White Diffusion (21×24″ Sheet)
- 1/4 CTO Orange Cine Filter (24×198″ Roll)
- 1/2 Color Temperature Orange (CTO) Filter (24×198″ Roll)
- Matthews 24×36″ Solid Black Flag
- Matthews Century C Stand Grip Arm Kit – 10.5′ (3.2m)
- PBL Sandbags x4 bags
 https://indiecinemaacademy.com/wp-content/uploads/2016/10/ICA_DoF01_How_Aperture_and_ISO_Affects_Focus-Thumbnail-web.jpg
450
800
Tim
https://indiecinemaacademy.com/wp-content/uploads/2013/12/Indie_cinema_Logo_2color-MF-300x116-web.png
Tim2016-10-10 00:15:202017-01-08 20:23:28Depth of Field, Part 1: How Aperture and ISO Affect Focus
 https://indiecinemaacademy.com/wp-content/uploads/2015/12/CS006-HighSpeed-Part06-FREE-Thumbnail-Web.jpg
450
800
Ryan E. Walters
https://indiecinemaacademy.com/wp-content/uploads/2013/12/Indie_cinema_Logo_2color-MF-300x116-web.png
Ryan E. Walters2015-12-14 00:15:052015-12-29 13:20:06Your Guide To High Speed, Part 6: Five Tips For A Successful Shoot
 https://indiecinemaacademy.com/wp-content/uploads/2015/12/CS005-HighSpeed-Part05-FREE-Thumbnail-Web.jpg
450
800
Ryan E. Walters
https://indiecinemaacademy.com/wp-content/uploads/2013/12/Indie_cinema_Logo_2color-MF-300x116-web.png
Ryan E. Walters2015-11-30 09:00:282015-12-29 15:41:16Your Guide To High Speed, Part 5: Lighting Six High Speed Sets
 https://indiecinemaacademy.com/wp-content/uploads/2015/12/CS004-HighSpeed-Part04-FREE-Thumbnail-Web.jpg
450
800
Ryan E. Walters
https://indiecinemaacademy.com/wp-content/uploads/2013/12/Indie_cinema_Logo_2color-MF-300x116-web.png
Ryan E. Walters2015-11-16 00:15:182015-12-29 13:17:26Your Guide To High Speed, Part 4: Common Lighting Problems
 https://indiecinemaacademy.com/wp-content/uploads/2015/12/CS003-HighSpeed-Part03-FREE-Thumbnail-Web.jpg
450
800
Ryan E. Walters
https://indiecinemaacademy.com/wp-content/uploads/2013/12/Indie_cinema_Logo_2color-MF-300x116-web.png
Ryan E. Walters2015-11-02 00:15:272015-12-29 13:15:49Your Guide To High Speed, Part 3: Camera Operation & Workflow
 https://indiecinemaacademy.com/wp-content/uploads/2015/12/CS002-HighSpeed-Part02-FREE-Thumbnail-Web.jpg
450
800
Ryan E. Walters
https://indiecinemaacademy.com/wp-content/uploads/2013/12/Indie_cinema_Logo_2color-MF-300x116-web.png
Ryan E. Walters2015-10-19 12:25:282015-12-29 15:21:30Your Guide To High Speed, Part 2: Frame Rate
 https://indiecinemaacademy.com/wp-content/uploads/2015/12/CS001-HighSpeed-Part01-FREE-Thumbnail-Web.jpg
450
800
Ryan E. Walters
https://indiecinemaacademy.com/wp-content/uploads/2013/12/Indie_cinema_Logo_2color-MF-300x116-web.png
Ryan E. Walters2015-10-05 00:15:592015-12-29 13:20:38Your Guide To High Speed, Part 1: Introduction
 https://indiecinemaacademy.com/wp-content/uploads/2015/09/LC115_12Questions-Thumbnail-Free-Web.jpg
450
800
Ryan E. Walters
https://indiecinemaacademy.com/wp-content/uploads/2013/12/Indie_cinema_Logo_2color-MF-300x116-web.png
Ryan E. Walters2015-09-07 00:30:532015-10-30 19:06:3612 Crucial Questions To Ask Before You Light Your Set (Cinematic Lighting Lesson 15)
 https://indiecinemaacademy.com/wp-content/uploads/2015/03/LC108-NegativeFill-Thumbnail-Web.jpg
450
800
Ryan E. Walters
https://indiecinemaacademy.com/wp-content/uploads/2013/12/Indie_cinema_Logo_2color-MF-300x116-web.png
Ryan E. Walters2015-03-23 00:30:392015-10-30 18:34:25Negative Fill: The Best Kept Secret (Cinematic Lighting Lesson 08)
https://indiecinemaacademy.com/wp-content/uploads/2015/03/LC108-NegativeFill-Thumbnail-Web.jpg
450
800
Ryan E. Walters
https://indiecinemaacademy.com/wp-content/uploads/2013/12/Indie_cinema_Logo_2color-MF-300x116-web.png
Ryan E. Walters2015-03-23 00:30:392015-10-30 18:34:25Negative Fill: The Best Kept Secret (Cinematic Lighting Lesson 08)Leave a Reply
Want to join the discussion?Feel free to contribute!
Leave a Reply Cancel reply
You must be logged in to post a comment.
This site uses Akismet to reduce spam. Learn how your comment data is processed.

Beautiful work, gents! This was sooooo worth the wait.
I have read about lighting a scene but the way you both show and explain it here really helps. Thank you for this. So, for me at least, one of the key takeaways is you want to purposefully build your lighting to meet the needs of your story – what you are trying to say and show – instead of to meet some theoretical construct like 3-point lighting. I am sure this gets better with experience but as a novice I have to ask is it just pure repetition, previzualization, some sort of workflow (all of the above) that gets you to proficiency quicker? I’m not trying to distill this down to a rule or formula and I know each setting and story will require something different, but there has to be a common, baseline approach that gets you to better lighting, right? I mean I see what you did here and I get it but I want to start to think that way more often so as to build muscle memory and be more consistent in how I tackle my lighting.
This was excellent and I am sure I’ll pick more up in additional viewings and I can’t thank you enough for this.
Thanks. Tim & I are really glad you are liking it and getting a lot out of it. We’re having fun putting these together. 🙂
You are correct, that it is a bit of everything that gets you to proficiency quicker. The more you light, the more familiar you’ll get with your tools and what they do. The more you know what they do, the easier it will be to pre-visualize it in your head. And the more comfortable you get, the more you can experiment and try new things out.
As far as a baseline approach goes, I’d recommend starting with turning one light on at a time, and build up the scene that way. Then you’ll be able to see what each light is doing, and figure out if it is adding to or taking away from the look. Something else I have done, is to turn off all the lights except for the one I’m working with- that way I can see exactly what it is doing.
Hope that helps. 🙂
This is amazing with simplified explanations,
Thank you very much!
Thank Tony! We aim to make the concepts as clear as possible. Much more to come!!!
You guys are strong teachers; your explanations are clear and reinforced well with solid images. Thank you for the clear distinction between rim/hair lights and edge/kickers. Questions: what is the 3/4 back position for the edge/kicker relative to the subject and camera?
Also, regarding making the key light shadows fall toward vs. away from the camera: what is the difference in the position of the key light? It seems in the 2 comparative images that the key moved from the subject’s left to right, but how does this alter toward vs. away from the camera? Enjoying these spatial questions?
Again, I really dig the lighting diagrams and BTS shots. What are you using to create the lighting diagrams?
Thanks. 🙂 Yeah, 3/4 back is relative to the subject and camera- or more precisely- the camera’s view. For example- look at the 5 Roles diagram. The lights in front of the talent, are in the frontal position, the lights behind the talent are in the back position. The hair light is on the same axis as the camera- it is in the full back position. If the hair light were to move either to the right or the left (around the 10-11 o’clock, or 1-2 o’clock) it would now be in a 3/4 back position.
In regards to the shadows falling toward camera- the key light is typically from a 3/4 front position, and the light comes toward the direction that the talent looks. So if they look screen left, the key would be on the left side. If they look right, it would come from the right. That pushes the shadow toward the opposite side of the face, which is the side that the camera sees. If the talent looks right, and the key is on the left, the shadows get pushed to the side of the face that the camera doesn’t see, and the lighting gets more flat, and less shapely. (If you’re trying to hide shape, that’s a good thing, if you want to reveal shape, that’s not so good…)
Diagrams are all created by hand in Photoshop. It takes a lot of time to do those… unfortunately I haven’t found an app that I like yet- and I’ve tried a bunch of them out…
Aha, makes sense. Thanks Ryan!
Hi guys and gals,
Omnigraffle link
https://www.omnigroup.com/omnigraffle
Software for doing similar lighting plans and a stencil link for film and tv, you can download a trial first to see if you like it, easy to use as well.
Stencil link
https://www.graffletopia.com/categories/film-and-tv
Cheers
Dave
Thanks for sharing those links. 🙂
Omnigraffle is a great program for that. It’s what I use to start my lighting diagrams to hand off to the crew for my shoots. For these diagrams I will also incorporate another program called Shot Designer: http://www.hollywoodcamerawork.com/sd_index.html to help finesse it a bit more.
As you mentioned, Omnigraffle is easy to use, and it will probably fit 80% of peoples needs. (And it works on my iPad!) Definitely worth the money if you’re making a lot of diagrams, IMO.
Unfortunately, I haven’t found a one stop solution for the diagrams we’re publishing on the site, so I combine all the tools we’re using in Photoshop… a bit laborious, but it seems to work for now…
Hi Ryan and Tim 🙂
What dimmer did you guys have the practicals running on?
Cheers
Dave
The dimmers we use on practicals is actually one we put together ourselves, but it looks exactly like this one from FilmTools: http://www.filmtools.com/ligdep/lighting-equipment/dimmers/600watsliddi.html
It isn’t hard to build as long as you know how to correctly wire the box. You can probably build your own for $20 (USD) with parts from Home Depot, Lowes, or Ace Hardware.
There are other options too, such as this dimmer.
Be sure to test whatever dimmer you get with the bulbs you plan to use for your production since some bulbs make a buzzing sound when dimmed that can ruin your audio. Also these dimmers are all for incandescent bulbs; if you are using LED bulbs you will need to get a dimmer specific to LEDs.
Great thanks Tim 🙂