Four Must Have Accessories (Camera Lesson 14)
Summary: Ryan covers the four camera accessories you simply must have, what they’re used for, tips on using them, and recommendations on which brands to buy.
Length: 9:14 minutes
!! Want to see the whole video? Become a member !!
- If you are already a member, you can log in below.
Introduction
Accessories can make your shoot more enjoyable by making your camera ergonomic, easier to operate, and allow you to deliver better results. There are a ton of accessories that you can add to your camera depending on your needs and your own style of working. In this video I’m going to cover what I think are the four essential camera accessories.
Tripods
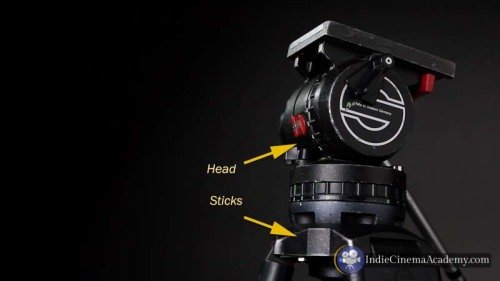
In my opinion, tripods are the one essential must have camera accessory. If you can only afford to spend money in on area, this is the place to spend it. The tripod system is made up of the head and the legs, which are also referred to as the sticks. The head allows you to move you camera, and the sticks support everything.

When looking at tripods, you’ll find that there are two kinds of heads out there: fluid and non-fluid. Fluid head tripods allow you to get smooth movement when you are panning or tilting your camera. Non-fluid heads are jerky, and hard to use. A good fluid head will outlast any camera you buy, so it is worth it to spend extra money on something that will last.
As you are looking at tripods, get one that will support the weight of your camera system plus some. So for example, if your camera package weighs 10 pounds, get a head that will support at least 15 pounds. Just because the head says it will support 10 pounds, doesn’t mean that it will work well there when you put your 10 pound camera on it.
Additionally, the height of your camera system also affects the weight that your tripod head sees. The higher the center of gravity, the more torque, or the more weight that your tripod head experiences. So even if your camera only weighs 8 lbs, if it is a tall camera system your tripod may be experiencing a load of 12 lbs.…
** Want to read the rest of the transcript? Become a member. **
 https://indiecinemaacademy.com/wp-content/uploads/2016/10/ICA_DoF01_How_Aperture_and_ISO_Affects_Focus-Thumbnail-web.jpg
450
800
Tim
https://indiecinemaacademy.com/wp-content/uploads/2013/12/Indie_cinema_Logo_2color-MF-300x116-web.png
Tim2016-10-10 00:15:202017-01-08 20:23:28Depth of Field, Part 1: How Aperture and ISO Affect Focus
 https://indiecinemaacademy.com/wp-content/uploads/2015/12/CS006-HighSpeed-Part06-FREE-Thumbnail-Web.jpg
450
800
Ryan E. Walters
https://indiecinemaacademy.com/wp-content/uploads/2013/12/Indie_cinema_Logo_2color-MF-300x116-web.png
Ryan E. Walters2015-12-14 00:15:052015-12-29 13:20:06Your Guide To High Speed, Part 6: Five Tips For A Successful Shoot
 https://indiecinemaacademy.com/wp-content/uploads/2015/12/CS005-HighSpeed-Part05-FREE-Thumbnail-Web.jpg
450
800
Ryan E. Walters
https://indiecinemaacademy.com/wp-content/uploads/2013/12/Indie_cinema_Logo_2color-MF-300x116-web.png
Ryan E. Walters2015-11-30 09:00:282015-12-29 15:41:16Your Guide To High Speed, Part 5: Lighting Six High Speed Sets
 https://indiecinemaacademy.com/wp-content/uploads/2015/12/CS004-HighSpeed-Part04-FREE-Thumbnail-Web.jpg
450
800
Ryan E. Walters
https://indiecinemaacademy.com/wp-content/uploads/2013/12/Indie_cinema_Logo_2color-MF-300x116-web.png
Ryan E. Walters2015-11-16 00:15:182015-12-29 13:17:26Your Guide To High Speed, Part 4: Common Lighting Problems
 https://indiecinemaacademy.com/wp-content/uploads/2015/12/CS003-HighSpeed-Part03-FREE-Thumbnail-Web.jpg
450
800
Ryan E. Walters
https://indiecinemaacademy.com/wp-content/uploads/2013/12/Indie_cinema_Logo_2color-MF-300x116-web.png
Ryan E. Walters2015-11-02 00:15:272015-12-29 13:15:49Your Guide To High Speed, Part 3: Camera Operation & Workflow
 https://indiecinemaacademy.com/wp-content/uploads/2015/12/CS002-HighSpeed-Part02-FREE-Thumbnail-Web.jpg
450
800
Ryan E. Walters
https://indiecinemaacademy.com/wp-content/uploads/2013/12/Indie_cinema_Logo_2color-MF-300x116-web.png
Ryan E. Walters2015-10-19 12:25:282015-12-29 15:21:30Your Guide To High Speed, Part 2: Frame Rate
 https://indiecinemaacademy.com/wp-content/uploads/2015/12/CS001-HighSpeed-Part01-FREE-Thumbnail-Web.jpg
450
800
Ryan E. Walters
https://indiecinemaacademy.com/wp-content/uploads/2013/12/Indie_cinema_Logo_2color-MF-300x116-web.png
Ryan E. Walters2015-10-05 00:15:592015-12-29 13:20:38Your Guide To High Speed, Part 1: Introduction
 https://indiecinemaacademy.com/wp-content/uploads/2015/09/LC115_12Questions-Thumbnail-Free-Web.jpg
450
800
Ryan E. Walters
https://indiecinemaacademy.com/wp-content/uploads/2013/12/Indie_cinema_Logo_2color-MF-300x116-web.png
Ryan E. Walters2015-09-07 00:30:532015-10-30 19:06:3612 Crucial Questions To Ask Before You Light Your Set (Cinematic Lighting Lesson 15)
 https://indiecinemaacademy.com/wp-content/uploads/2015/03/LC108-NegativeFill-Thumbnail-Web.jpg
450
800
Ryan E. Walters
https://indiecinemaacademy.com/wp-content/uploads/2013/12/Indie_cinema_Logo_2color-MF-300x116-web.png
Ryan E. Walters2015-03-23 00:30:392015-10-30 18:34:25Negative Fill: The Best Kept Secret (Cinematic Lighting Lesson 08)
https://indiecinemaacademy.com/wp-content/uploads/2015/03/LC108-NegativeFill-Thumbnail-Web.jpg
450
800
Ryan E. Walters
https://indiecinemaacademy.com/wp-content/uploads/2013/12/Indie_cinema_Logo_2color-MF-300x116-web.png
Ryan E. Walters2015-03-23 00:30:392015-10-30 18:34:25Negative Fill: The Best Kept Secret (Cinematic Lighting Lesson 08)Leave a Reply
Want to join the discussion?Feel free to contribute!
Leave a Reply Cancel reply
You must be logged in to post a comment.
This site uses Akismet to reduce spam. Learn how your comment data is processed.

I’m just getting started. now. I need suggestion for monitors that provides 1 to 1 mode for critical focus. I’ve never heard this term, 1 to 1 mode. I currently own low end Marshalls (V-LCD70MD 7″). Can you please check my model to see if it has a 1 to 1 mode? Under a $800 each. I have them mounted on C100 Mark II’s. At the time of purchase I thought the Marshall’s were on the pro side. I’m attempting to build a three camera one man interviewing setup. Realizing all this is very ambitious I decided to replicate everything. Same cameras, tripod and heads and same monitors. My third camera sits on a frankinstien 8′ motorized slider that includes a Dana Dolly and a Kessler motor and controller. Thank you in advance for any and all your help.
The term 1-to-1 mode or pixel-to-pixel (often written 1:1) means that one pixel from the camera sensor is shown as one pixel on the monitor. It means that the image has not been scaled, so it helps you with critical focus since it acts like you’ve “zoomed in.” I’m pretty sure the Marshall monitor you mentioned has pixel-to-pixel mode.
Another option is getting a external recorder/monitor like what Atomos offers. (We use the Atomos Shogun , and love it!). These let you record your footage using better codecs than in the camera, and double as a very good monitor. The downside is that the SSD recording media is spendy. Your Marshall monitors are fine, perfect for building up a new camera set-up. And replicating everything simplifies things a lot. The C100 Mark II camera is great for this kind of work.
Tim covered it really well. The only thing I can add is that the C100 has a 1:1 mode in it- I forget what it is called on that camera, it might be zoom, or Pixel to Pixel, or 100% view, or something like that… Anyway, you can even program that option to be one of the programable buttons on the C100. (That is what I did when I had that camera.)
To help even more, I set the C100 to turn the monitor black and white when I did the 1:1 view which makes it easier to see if something is in focus or not. The only down side is that this view is not sent out to an external monitor. You have to use the C100 monitors.
Anyway, check out the manual for the C100 and for the Marshal monitor. They do a great job at showing you the specifics of what buttons to press and how to use those specific features. 🙂
I am a bit confused about the Matte box. The box fits to rods if the box is too heavy for the lens. I saw the rods on the tangerine web site but it was not clear how the rods fit to the tripod. Would I need an adaptor or plate of some description to fit the rods?
You would mount a baseplate to the tripod and then the camera to the top of the baseplate. The baseplate would have slots for rods. Here is an example of a baseplate: camera baseplate. There are many types and sizes, with some that are very basic, some with a quick release, and still others that help you balance your camera by letting you slide the quick release forward and aft.
What is blue only mode used for?
Blue only mode is for calibrating your monitor so that the color and tint are correct. When in this mode, SMPTE color bars appear either blue or black. By adjusting color, contrast, and brightness, the blue bars should all look even, aiding in the calibration process.
What does SDI in/out do on a monitor?
What is the difference between a production monitor and a normal monitor?