Four Elements of Light
(Cinematic Lighting Lesson 03)
Summary: Ryan covers the four elements of light: color, angle, intensity and quality. He then shows you how they can be used to better craft your images, gives you practical tips, and questions to ask yourself as you light your scene.
Length: 5:18 minutes
!! Want to see the whole video? Become a member !!
- If you are already a member, you can log in below.
Introduction
Understanding the functions and the role that light plays is not enough to be able to craft cinematic images; you also need to understand the four elements: color, angle, intensity, and quality. Once you understand these elements and you begin to apply them to your work, your work is going to really shine.
Color
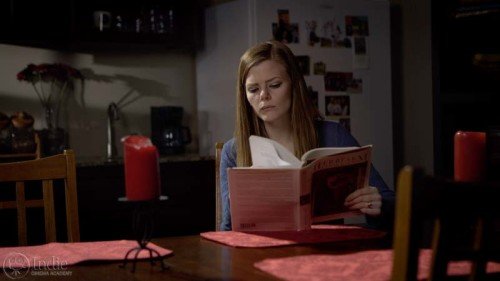
As I covered in Lighting Foundations, the color of light is measured in color temperature. But great lighting is more than just accurate color. It’s about using color to convey tone and set the mood.
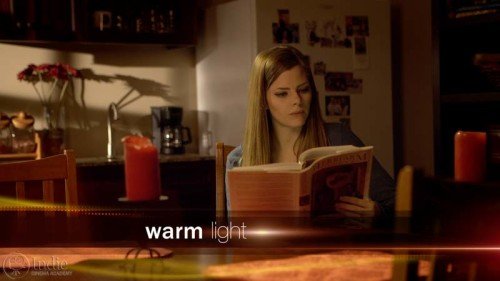
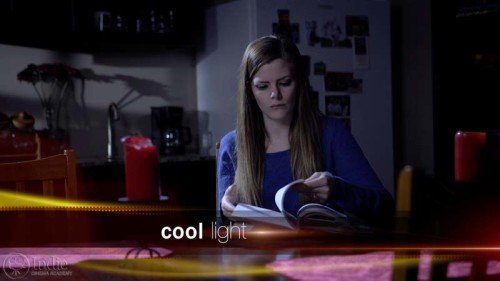
For example, warm light is more inviting and welcoming, while cool light is more removed and distancing.
The color of light can also help us create a sense of space. As objects recede in space, they become more monochromatic and become more cool in color. And objects that are closer to us are more vibrant and warm in color. Knowing this can allow us to use the color of light to create separation...
** Want to read the rest of the transcript? Become a member. **
** Want to see the lighting diagrams? Become a member. **
Camera / Audio
- Sony Alpha a7S Mirrorless Digital Camera
- Canon EF 24-70mm f/2.8L II USM Lens
- Fotodiox Lens Mount Adapter – Canon EOS (EF / EF-s) to Sony E-Mount
- Bright Tangerine Misfit Matte Box
- Tilta FF-T03 15mm Follow Focus with Hard Stops
- Sachtler Panorama 7+7 Head 100mm (similar head: 1006 DV 10 SB Fluid Head)
- Sachtler Carbon Fiber Tripod (similar tripod: Carbon Fiber HD Tripod Legs)
- MYT Works 4′ Medium slider w/ HiHat
- Hollywood Beefy Baby Stand (8.5′) (two, to raise the MYT Works slider)
- Movcam Cage for Sony A7S
- Sekonic L-758Cine DigitalMaster Light Meter
- Sekonic C-700 SpectroMaster Color Meter
- Wooden Camera A/B Gold-Mount Plate for Sony A7, A7r and A7s
- Audio Technica AT835b Shotgun Microphone
(similar microphone: Audio Technica BP4071 Shotgun Microphone)
- Wooden Camera DSLR A-Box
- Delkin Devices 64GB SDXC Memory Card 600x UHS-I
- DSC Labs One Shot Reference Chart (Matte Finish)
Behind the Scenes (BTS) Cameras
- GoPro Hero3 Black (similar camera: GoPro HERO4 Black)
- Sony Alpha SLT-A57
- Filmcity DSLR Camera Cage Shoulder Rig kit (FC-03)
Lighting / Grip Gear
- Fill-Lite 200
- LED (900) (Bestlight®)
- 575W HMI Fresnel Light w/ Electronic Ballast (Queenshiny®)
- 24×36″ – Black Double Net
- 1/8 Color Temperature Orange (CTO) Filter (24×198″ Roll)
- 1/2 Color Temperature Orange (CTO) Filter (24×198″ Roll)
- Foam Core Bounce (White)
- Floppy – 48×48″ (1.2×1.2m)
- Matthews Century C Stand Grip Arm Kit – 10.5′ (3.2m)
- PBL Sandbags x4 bags
 https://indiecinemaacademy.com/wp-content/uploads/2016/01/LC120-CorporateVideo-Thumbnail-Web.jpg
450
800
Ryan E. Walters
https://indiecinemaacademy.com/wp-content/uploads/2013/12/Indie_cinema_Logo_2color-MF-300x116-web.png
Ryan E. Walters2016-01-11 00:15:082016-05-05 11:22:30How to Cinematically Light a Corporate Video (Cinematic Lighting Lesson 20)
 https://indiecinemaacademy.com/wp-content/uploads/2015/12/LC119-LightFast-Thumbnail.jpg
450
800
Ryan E. Walters
https://indiecinemaacademy.com/wp-content/uploads/2013/12/Indie_cinema_Logo_2color-MF-300x116-web.png
Ryan E. Walters2015-12-29 12:38:562016-01-10 21:42:39How To Light Quickly (Cinematic Lighting Lesson 19)
 https://indiecinemaacademy.com/wp-content/uploads/2015/09/LC121_LightingHighSpeed-Thumbnail-Web.jpg
450
800
Ryan E. Walters
https://indiecinemaacademy.com/wp-content/uploads/2013/12/Indie_cinema_Logo_2color-MF-300x116-web.png
Ryan E. Walters2015-09-21 00:15:372016-01-10 21:42:57Lighting For Extreme Frame Rates (Cinematic Lighting Lesson 21)
 https://indiecinemaacademy.com/wp-content/uploads/2015/09/LC115_12Questions-Thumbnail-Free-Web.jpg
450
800
Ryan E. Walters
https://indiecinemaacademy.com/wp-content/uploads/2013/12/Indie_cinema_Logo_2color-MF-300x116-web.png
Ryan E. Walters2015-09-07 00:30:532015-10-30 19:06:3612 Crucial Questions To Ask Before You Light Your Set (Cinematic Lighting Lesson 15)
 https://indiecinemaacademy.com/wp-content/uploads/2015/08/LC114-3StrLightingNghtExt-Thumbnail.jpg
450
800
Ryan E. Walters
https://indiecinemaacademy.com/wp-content/uploads/2013/12/Indie_cinema_Logo_2color-MF-300x116-web.png
Ryan E. Walters2015-08-24 00:30:112015-10-30 18:55:173 Strategies for Lighting Your Night Exteriors (Cinematic Lighting Lesson 14)
 https://indiecinemaacademy.com/wp-content/uploads/2015/08/LC112_5SratDayExt-Thumbnail-800x450-jpg-web.jpeg
450
800
Ryan E. Walters
https://indiecinemaacademy.com/wp-content/uploads/2013/12/Indie_cinema_Logo_2color-MF-300x116-web.png
Ryan E. Walters2015-08-10 00:15:422015-10-30 18:54:545 Essential Strategies To Lighting Day Exteriors (Cinematic Lighting Lesson 12)
 https://indiecinemaacademy.com/wp-content/uploads/2015/07/LC113-10TricksDayExt-Thumbnail-800x450-web-.jpg
450
800
Ryan E. Walters
https://indiecinemaacademy.com/wp-content/uploads/2013/12/Indie_cinema_Logo_2color-MF-300x116-web.png
Ryan E. Walters2015-07-27 00:15:252015-10-30 18:55:0310 Tips To Lighting Day Exteriors (Cinematic Lighting Lesson 13)
 https://indiecinemaacademy.com/wp-content/uploads/2015/07/LC123_SmallCommercial-thumbnail-800X450.jpg
450
800
Ryan E. Walters
https://indiecinemaacademy.com/wp-content/uploads/2013/12/Indie_cinema_Logo_2color-MF-300x116-web.png
Ryan E. Walters2015-07-13 14:24:582015-10-30 19:19:44How To Light A Small Commercial (Cinematic Lighting Lesson 23)
 https://indiecinemaacademy.com/wp-content/uploads/2015/06/LC118-WhereToBeginLighting-featured.jpg
450
800
Ryan E. Walters
https://indiecinemaacademy.com/wp-content/uploads/2013/12/Indie_cinema_Logo_2color-MF-300x116-web.png
Ryan E. Walters2015-06-29 00:30:302015-12-29 12:43:40Where To Begin Lighting Your Set (Cinematic Lighting Lesson 18)
https://indiecinemaacademy.com/wp-content/uploads/2015/06/LC118-WhereToBeginLighting-featured.jpg
450
800
Ryan E. Walters
https://indiecinemaacademy.com/wp-content/uploads/2013/12/Indie_cinema_Logo_2color-MF-300x116-web.png
Ryan E. Walters2015-06-29 00:30:302015-12-29 12:43:40Where To Begin Lighting Your Set (Cinematic Lighting Lesson 18)Leave a Reply
Want to join the discussion?Feel free to contribute!
Leave a Reply Cancel reply
You must be logged in to post a comment.
This site uses Akismet to reduce spam. Learn how your comment data is processed.

This may be an artifact of the streaming server, but there was a significant audio-to-video delay when I watched this clip.
Thanks for bringing this to our attention. It looks like there might be a frame or two delay. I’ll have to pull it up in the editor to see for sure.
Hi guys 🙂
The 1k with the 2 times 2 x 3 doubles in the hard light lighting diagram what are these?
Cheers
Dave
The light is a 1,000 kilowatt tungsten light, abbreviated 1kW and often called simply a “1k.” It has double and single wire scrims in it. A wire scrim is a wire mesh mounted to a round metal frame that you insert in front of the tungsten lamp that reduces the amount of light output. The single reduces the amount of light by about half stop, and the double by about a full stop.
The 2×3 doubles in front of the light are fabric nets. These are doubles so they each reduce the amount of light by about a full stop.
Great thanks Tim 🙂
Can you tell me if there is a need to gel bi-color led panels? Does this provide a different look or do the changes in Kelvin adjustments on the panel simulate their look appropriately?
That’s a very good question, one that not many people think about. While bi-color LED lights can change the Correlated Color Temperature (CCT), such as between tungsten balanced to daylight balanced, it doesn’t mean that their light output has the best color quality. Some LEDs still might have a green or magenta tint, or another problematic color. This is true of single color LEDs as well as bi-color LEDs.
I recommend checking out our article on how LEDs might be ruining your project. We now use LEDs almost exclusively, so I’m not knocking LEDs at all. You just want to be selective with which ones you use, and be sure to test them ahead of the shoot day.
Another resource that we’ve created is the LED database. I’m currently finalizing data from over 160 LED lights that I sampled at this year’s NAB. The list includes around 80 bi-color lights, and give values and graphs for CRI, TLCI, CQS, and TM30-15 for everything on the list. It should be posted in the next two weeks. Until then, check out last year’s LED database.
Also remember that bicolor only changes which version of white your camera is white balanced to. If you want to purposely create an effect with the light — such as a steel blue for moonlight, and Urban Sodium gel to make it feel like a sodium-vapor lamp, etc — you of course will have to use gels. (Note: there are a few RGB LEDs on the market, that let you create light that is more than just a version of white. Since those are not “bi-color” I didn’t mention them. With some of these lights, you can actual add or remove magenta or green tints so as to balance with lights that have that issue or to create an effect.)
Thanks for your detailed answer – very helpful, I will check out your links.