Properly Exposed: Using Your Camera Meters (Camera Lesson 28)
Summary: Ryan shows you how to use your exposure tools and covers two tough exposure situations.
Length: 9:29 minutes
!! Want to see the whole video? Become a member !!
- If you are already a member, you can log in below.
Introduction
So now that you have determined what you want your image to look like using the exposure triangle, how do you use your exposure tools to know that you have a properly exposed image? Well, in this video I’ll show you how to do just that.
Waveform
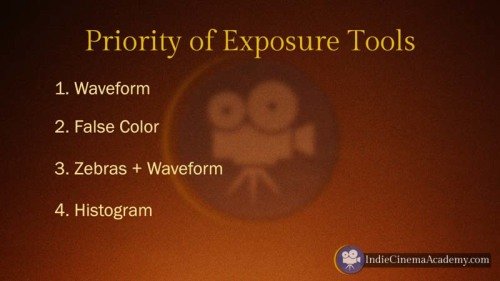
From the exposure tools that you have at your disposal, the best option is to use your waveform or your false color, or to use your zebras along with your waveform, and then finally the histogram. However using the histogram is bad news in my opinion as it leads to sloppy camera work. But I’ll get into that in the next video.
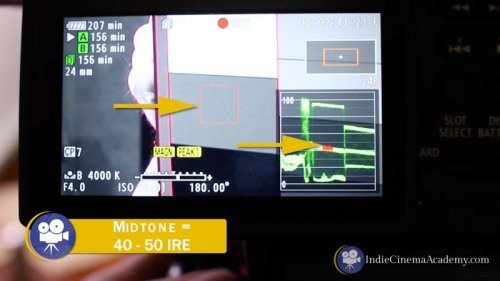
In my opinion waveforms are the best in-camera tool to use because they show exactly what exposure level everything is falling at in the scene. As a general rule you want mid-tone to fall at 50 IRE when it is being lit by the key light, which is the main light in your scene. If you’re not sure what mid-tone is, you can pick up a gray card, something like this. It runs about $20 for a set of two from Filmtools, B&H, or Amazon.
Another tool I highly recommend getting is the DSC Labs One Shot chart. On one side it has a grey card and on the other side it has a color chart which comes in very handy for color grading. But at $300 this chart is a little bit more spendy.
If you use a gray card to help you expose you will want to place the card in the key light. The card should fall at the 50 IRE line when it is properly exposed.
Caucasian skin should fall around 60 – 70 IRE, with highlights somewhere around 80 or so. This of course is going to depend on your own preferences, as some people like these highlights to fall closer to 70 IRE. Darker skin should fall somewhere around 40 – 50. And as you expose your image any important information that you want to see…
** Want to read the rest of the transcript? Become a member. **
 https://indiecinemaacademy.com/wp-content/uploads/2016/10/ICA_DoF01_How_Aperture_and_ISO_Affects_Focus-Thumbnail-web.jpg
450
800
Tim
https://indiecinemaacademy.com/wp-content/uploads/2013/12/Indie_cinema_Logo_2color-MF-300x116-web.png
Tim2016-10-10 00:15:202025-03-11 14:46:47Depth of Field, Part 1: How Aperture and ISO Affect Focus
 https://indiecinemaacademy.com/wp-content/uploads/2015/12/CS006-HighSpeed-Part06-FREE-Thumbnail-Web.jpg
450
800
Ryan E. Walters
https://indiecinemaacademy.com/wp-content/uploads/2013/12/Indie_cinema_Logo_2color-MF-300x116-web.png
Ryan E. Walters2015-12-14 00:15:052015-12-29 13:20:06Your Guide To High Speed, Part 6: Five Tips For A Successful Shoot
 https://indiecinemaacademy.com/wp-content/uploads/2015/12/CS005-HighSpeed-Part05-FREE-Thumbnail-Web.jpg
450
800
Ryan E. Walters
https://indiecinemaacademy.com/wp-content/uploads/2013/12/Indie_cinema_Logo_2color-MF-300x116-web.png
Ryan E. Walters2015-11-30 09:00:282015-12-29 15:41:16Your Guide To High Speed, Part 5: Lighting Six High Speed Sets
 https://indiecinemaacademy.com/wp-content/uploads/2015/12/CS004-HighSpeed-Part04-FREE-Thumbnail-Web.jpg
450
800
Ryan E. Walters
https://indiecinemaacademy.com/wp-content/uploads/2013/12/Indie_cinema_Logo_2color-MF-300x116-web.png
Ryan E. Walters2015-11-16 00:15:182015-12-29 13:17:26Your Guide To High Speed, Part 4: Common Lighting Problems
 https://indiecinemaacademy.com/wp-content/uploads/2015/12/CS003-HighSpeed-Part03-FREE-Thumbnail-Web.jpg
450
800
Ryan E. Walters
https://indiecinemaacademy.com/wp-content/uploads/2013/12/Indie_cinema_Logo_2color-MF-300x116-web.png
Ryan E. Walters2015-11-02 00:15:272015-12-29 13:15:49Your Guide To High Speed, Part 3: Camera Operation & Workflow
 https://indiecinemaacademy.com/wp-content/uploads/2015/12/CS002-HighSpeed-Part02-FREE-Thumbnail-Web.jpg
450
800
Ryan E. Walters
https://indiecinemaacademy.com/wp-content/uploads/2013/12/Indie_cinema_Logo_2color-MF-300x116-web.png
Ryan E. Walters2015-10-19 12:25:282015-12-29 15:21:30Your Guide To High Speed, Part 2: Frame Rate
 https://indiecinemaacademy.com/wp-content/uploads/2015/12/CS001-HighSpeed-Part01-FREE-Thumbnail-Web.jpg
450
800
Ryan E. Walters
https://indiecinemaacademy.com/wp-content/uploads/2013/12/Indie_cinema_Logo_2color-MF-300x116-web.png
Ryan E. Walters2015-10-05 00:15:592015-12-29 13:20:38Your Guide To High Speed, Part 1: Introduction
 https://indiecinemaacademy.com/wp-content/uploads/2015/09/LC115_12Questions-Thumbnail-Free-Web.jpg
450
800
Ryan E. Walters
https://indiecinemaacademy.com/wp-content/uploads/2013/12/Indie_cinema_Logo_2color-MF-300x116-web.png
Ryan E. Walters2015-09-07 00:30:532015-10-30 19:06:3612 Crucial Questions To Ask Before You Light Your Set (Cinematic Lighting Lesson 15)
 https://indiecinemaacademy.com/wp-content/uploads/2015/03/LC108-NegativeFill-Thumbnail-Web.jpg
450
800
Ryan E. Walters
https://indiecinemaacademy.com/wp-content/uploads/2013/12/Indie_cinema_Logo_2color-MF-300x116-web.png
Ryan E. Walters2015-03-23 00:30:392015-10-30 18:34:25Negative Fill: The Best Kept Secret (Cinematic Lighting Lesson 08)
https://indiecinemaacademy.com/wp-content/uploads/2015/03/LC108-NegativeFill-Thumbnail-Web.jpg
450
800
Ryan E. Walters
https://indiecinemaacademy.com/wp-content/uploads/2013/12/Indie_cinema_Logo_2color-MF-300x116-web.png
Ryan E. Walters2015-03-23 00:30:392015-10-30 18:34:25Negative Fill: The Best Kept Secret (Cinematic Lighting Lesson 08)Leave a Reply
Want to join the discussion?Feel free to contribute!
Leave a Reply Cancel reply
You must be logged in to post a comment.
This site uses Akismet to reduce spam. Learn how your comment data is processed.

Hi Ryan
I understand the importance of shooting majority of the time on a 180 degree shutter 24fps for a cinema look and obtaining ‘normal pleasing motion blur’ (setting wise on the camera anyhow). In the example of the man in the cinema, 1) assuming there was very little movement (which there seemed to be) and hypothetically speaking you had to grab the shot there and then without a lighting kit available, the shutter angle adjustment to 360 degrees for a stop of light would work yes? (though obviously not something you want to do and adequate preproduction/lighting kit would prevent this scenario). In a narrow dof shot (eg the shot in the cinema where the man is out of focus nearest the camera with furthest man in focus) will a shutter angle such as 360 degrees have an effect on the out of focus (bokeh) man assuming very little movement? Is the bokeh made to look even softer than if it were at 180 degrees?
Thanks
Dave
Dave,
Yes, you’re correct- if there is little movement, then setting the shutter at 360 would be a good way to get that extra stop of light if you couldn’t get there with a lighting kit. (I’ve done that from time to time over the years. If the choice is getting the shot, or loosing the shot, it’s better to get it in my opinion. It can always be thrown out later.)
As for the bokeh- the shutter doesn’t affect it at all. If the out of focus man moves, what you will notice is a blurriness to the motion. So it wouldn’t be softer, as in look more out of focus, it would just look more blurry if he moved. It would have a more “dreamy” and “smeary” quality to it, if that makes sense.
If the bokeh were affected, then the man would be “bloom” more and feel a bit “bigger” since he is softer, or more out of focus. But with the shutter increased, the depth of field and the bokeh remain the same, it would only be when he moved that you’d see a difference.
Hope that helps. 🙂
Understood 🙂
Cheers
Dave