10 Tips To Lighting Day Exteriors
(Cinematic Lighting Lesson 13)
Summary: Shooting outside involves a few different techniques and things to keep in mind, since one of your main light sources–the sun–is very bright and constantly on the move. In this video Ryan shows you ten tricks for lighting day exteriors that help you really control the sun and advance your shots from good to great.
Length: 7:04 minutes
!! Want to see the whole video? Become a member !!
- If you are already a member, you can log in below.
Introduction
Now that you know the five strategies to shooting a day exterior, you’re going to run into some unique challenges when you’re out on set. So in this video I’ll give you ten tips to over come any issue that you may run into when shooting your day exterior. Then I’ll wrap it up by giving you some affordable do it yourself solutions that you can use on any production.
TIP #1: BLOCKING RELATIVE TO THE SUN
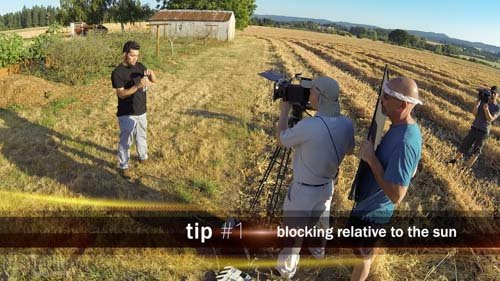
Shooting in direct sun is harsh and unflattering to your talent. It’s even less flattering when you use it as a front light. So my first tip is to always use the sun as either a backlight or a three-quarters front light. Blocking the scene so that the sun falls in these positions not only makes the location look better, but your talent too, especially if you are not diffusing the light with some kind of silk.
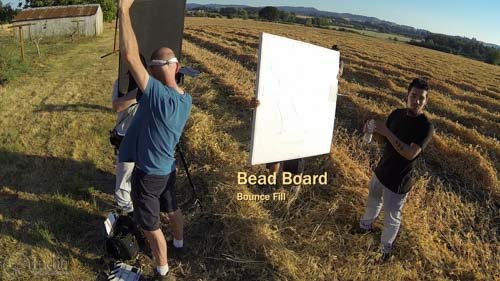
Another benefit of placing the light in this position, is that you can use a bead board as your fill to bounce the light back into the shot, balancing out your exposure. It’s quick and simple.
TIP #2: AVERAGING BETWEEN THE SUN AND CLOUDS
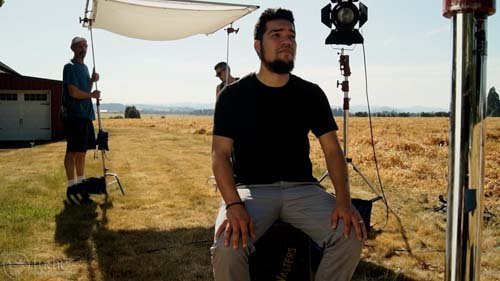
If you’re shooting on a day with inconsistent cloud cover, where the sun comes in and out all day, your best bet is to…
** Want to read the rest of the transcript? Become a member. **
** Want to see the lighting diagrams? Become a member. **
Camera / Audio
- Sony Alpha a7S Mirrorless Digital Camera
- Canon EF 24-70mm f/2.8L II USM Lens
- Fotodiox Lens Mount Adapter – Canon EOS (EF / EF-s) to Sony E-Mount
- Bright Tangerine Misfit Matte Box
- Tilta FF-T03 15mm Follow Focus with Hard Stops
- Sachtler Panorama 7+7 Head 100mm (similar head: 1006 DV 10 SB Fluid Head)
- Sachtler Carbon Fiber Tripod (similar tripod: Carbon Fiber HD Tripod Legs)
- MYT Works 4′ Medium slider w/ HiHat
- Hollywood Beefy Baby Stand (8.5′) (two, to raise the MYT Works slider)
- Movcam Cage for Sony A7S
- Sekonic L-758Cine DigitalMaster Light Meter
- Sekonic C-700 SpectroMaster Color Meter
- Wooden Camera A/B Gold-Mount Plate for Sony A7, A7r and A7s
- Audio Technica AT835b Shotgun Microphone
(similar microphone: Audio Technica BP4071 Shotgun Microphone)
- Wooden Camera DSLR A-Box
- Delkin Devices 64GB SDXC Memory Card 600x UHS-I
- DSC Labs One Shot Reference Chart (Matte Finish)
Behind the Scenes (BTS) Cameras
- GoPro Hero3 Black (similar camera: GoPro HERO4 Black)
- Motrr Galileo: App-Driven Motorized Head w/ GoPro Mount
- Sony Alpha SLT-A57
- Filmcity DSLR Camera Cage Shoulder Rig kit (FC-03)
Lighting / Grip Gear
 https://indiecinemaacademy.com/wp-content/uploads/2016/01/LC120-CorporateVideo-Thumbnail-Web.jpg
450
800
Ryan E. Walters
https://indiecinemaacademy.com/wp-content/uploads/2013/12/Indie_cinema_Logo_2color-MF-300x116-web.png
Ryan E. Walters2016-01-11 00:15:082016-05-05 11:22:30How to Cinematically Light a Corporate Video (Cinematic Lighting Lesson 20)
 https://indiecinemaacademy.com/wp-content/uploads/2015/12/LC119-LightFast-Thumbnail.jpg
450
800
Ryan E. Walters
https://indiecinemaacademy.com/wp-content/uploads/2013/12/Indie_cinema_Logo_2color-MF-300x116-web.png
Ryan E. Walters2015-12-29 12:38:562016-01-10 21:42:39How To Light Quickly (Cinematic Lighting Lesson 19)
 https://indiecinemaacademy.com/wp-content/uploads/2015/09/LC121_LightingHighSpeed-Thumbnail-Web.jpg
450
800
Ryan E. Walters
https://indiecinemaacademy.com/wp-content/uploads/2013/12/Indie_cinema_Logo_2color-MF-300x116-web.png
Ryan E. Walters2015-09-21 00:15:372016-01-10 21:42:57Lighting For Extreme Frame Rates (Cinematic Lighting Lesson 21)
 https://indiecinemaacademy.com/wp-content/uploads/2015/09/LC115_12Questions-Thumbnail-Free-Web.jpg
450
800
Ryan E. Walters
https://indiecinemaacademy.com/wp-content/uploads/2013/12/Indie_cinema_Logo_2color-MF-300x116-web.png
Ryan E. Walters2015-09-07 00:30:532015-10-30 19:06:3612 Crucial Questions To Ask Before You Light Your Set (Cinematic Lighting Lesson 15)
 https://indiecinemaacademy.com/wp-content/uploads/2015/08/LC114-3StrLightingNghtExt-Thumbnail.jpg
450
800
Ryan E. Walters
https://indiecinemaacademy.com/wp-content/uploads/2013/12/Indie_cinema_Logo_2color-MF-300x116-web.png
Ryan E. Walters2015-08-24 00:30:112015-10-30 18:55:173 Strategies for Lighting Your Night Exteriors (Cinematic Lighting Lesson 14)
 https://indiecinemaacademy.com/wp-content/uploads/2015/08/LC112_5SratDayExt-Thumbnail-800x450-jpg-web.jpeg
450
800
Ryan E. Walters
https://indiecinemaacademy.com/wp-content/uploads/2013/12/Indie_cinema_Logo_2color-MF-300x116-web.png
Ryan E. Walters2015-08-10 00:15:422015-10-30 18:54:545 Essential Strategies To Lighting Day Exteriors (Cinematic Lighting Lesson 12)
 https://indiecinemaacademy.com/wp-content/uploads/2015/07/LC113-10TricksDayExt-Thumbnail-800x450-web-.jpg
450
800
Ryan E. Walters
https://indiecinemaacademy.com/wp-content/uploads/2013/12/Indie_cinema_Logo_2color-MF-300x116-web.png
Ryan E. Walters2015-07-27 00:15:252015-10-30 18:55:0310 Tips To Lighting Day Exteriors (Cinematic Lighting Lesson 13)
 https://indiecinemaacademy.com/wp-content/uploads/2015/07/LC123_SmallCommercial-thumbnail-800X450.jpg
450
800
Ryan E. Walters
https://indiecinemaacademy.com/wp-content/uploads/2013/12/Indie_cinema_Logo_2color-MF-300x116-web.png
Ryan E. Walters2015-07-13 14:24:582015-10-30 19:19:44How To Light A Small Commercial (Cinematic Lighting Lesson 23)
 https://indiecinemaacademy.com/wp-content/uploads/2015/06/LC118-WhereToBeginLighting-featured.jpg
450
800
Ryan E. Walters
https://indiecinemaacademy.com/wp-content/uploads/2013/12/Indie_cinema_Logo_2color-MF-300x116-web.png
Ryan E. Walters2015-06-29 00:30:302015-12-29 12:43:40Where To Begin Lighting Your Set (Cinematic Lighting Lesson 18)
https://indiecinemaacademy.com/wp-content/uploads/2015/06/LC118-WhereToBeginLighting-featured.jpg
450
800
Ryan E. Walters
https://indiecinemaacademy.com/wp-content/uploads/2013/12/Indie_cinema_Logo_2color-MF-300x116-web.png
Ryan E. Walters2015-06-29 00:30:302015-12-29 12:43:40Where To Begin Lighting Your Set (Cinematic Lighting Lesson 18)Leave a Reply
Want to join the discussion?Feel free to contribute!
Leave a Reply Cancel reply
You must be logged in to post a comment.
This site uses Akismet to reduce spam. Learn how your comment data is processed.

Do the reflectors have to be rectangular? Is it possible to work with round reflectors and get decent results?
Great question. 🙂 No the reflectors do not have to be rectangular. They can be any shape. You could even make them star shaped.
Rectangular shapes tend to be the easiest to manufacture, and they also tend to be more stable and easier to grip with clamps and stands.
The other thing to keep in mind with reflectors is that what ever shape they are will be reflected in the eyes of the talent. So a rectangular reflector gives a rectangular eye light. Some people don’t like that look and prefer other shapes. But that’s all personal preference.
Happy shooting!
I really appreciate the efforts of you, I have increased my skills and I saw new possibilities to create the images that I want to create, I made the right decision to enter indie cinema academy, thank you!
You are very welcome! We appreciate you telling us!
I have been watching the FIA World Rally Championships for some time. I have noticed their footage is very strong in colour and detail. I am wondering how they go about it. They clearly do not light as it isn’t practical. Nor use flags. So they must get the image right in camera. As it is a live broadcast it is unlikely they grade their shots either. Presumably, they have some kind of in camera control. Even the headlights on night stages look well exposed, though occasionally the highlights do wash out on the headlights depending on the position of the cars. Any comments or tips would be appreciated. How are they setting up their cameras? Shoulder or tripod mounted and they shoot from helicopters.
Broadcast companies invest millions of dollars into the cameras, broadcast trucks, equipment, and software so that have complete control over the image.
There are a few things going on: they are most likely using high quality lenses to keep everything sharp even at high focal lengths. They have very sophisticated stabilization equipment so blur from the camera movement is minimized.
Another big thing to note is that even though it is a live broadcast, it doesn’t mean they aren’t altering and augmenting the colors. A lot of this is done before broadcast starts, when they create the LUT (look up table) they will use for the image. If for some reason something happens during the live event that alters the color, they can adjust the output to correct it.
Depending on the live event, they will use both tripod and shoulder mounted cameras. Arena sports (American football, Association football/soccer, baseball, etc) can depend on tripods since they have established positions at high vantage points. Yet they still utilize shoulder mounted cameras for close in action shots.
Very interesting, thank you for the info.