5 Essential Strategies To Lighting Day Exteriors
(Cinematic Lighting Lesson 12)
Summary: Day exteriors can feel intimidating to light, but it doesn’t have to be. In this video, Ryan shares with you five essential strategies that will set you up for success on all of your day exterior shoots.
Length: 8:54 minutes
!! Want to see the whole video? Become a member !!
- If you are already a member, you can log in below.
Introduction
Interiors are easy, right? We can control and shape the light exactly how we want it. But where do we begin when it come time to controlling the sun? Is it even possible to get great looking footage outside? Fortunately it is. In this video, I’ll share with you the five essential strategies to lighting a day exterior.
Prepping and the Virtual Scout (Strategy 01)

The key to shooting day exteriors lies in the pre-production. If you just show up to the shoot hoping to get something magical, you’ll be disappointed. That’s because if you don’t show up prepared, you’ll just be reacting to the situation, rather than controlling it. Remember, the best images are a result of being proactive in your lighting. One solution — something I did back in my earlier years — is to visit the location at various times to see how the light played throughout the day. I would take photos of how the light changed, then would use these as reference when planning out the shots. This habit also will help train your eye to see various aspects of light and how it can dramatically change the mood and look of a location.

Unfortunately, these days everyone is rushed to get the project done, so scouting trips often get the axe. Other times accessing the location isn’t possible until the day of the shoot. For these situations the next best alternative is our good friend Google.
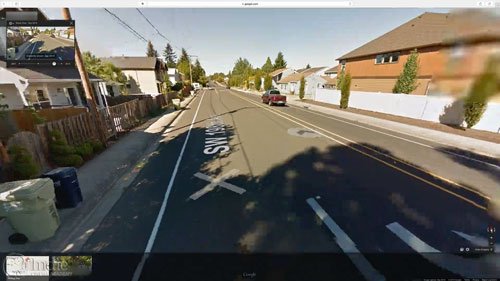
Once the location is locked, I’ll use Google Maps and move around the location using street view and 3D view. As I take this “virtual scouting trip,” I’ll look at where the sun is positioned and how it makes the location look. My focus is to see how the location is oriented to the path of the sun, and what features in the space could affect the look. Maybe there is a tall building or tree that will cast a shadow I don’t want.

There is also another handy little feature I’ll use: the time clock. On street-view, underneath the address, there is a little clock. Clicking that reveals the street-views taken over the years. There are usually enough weather variations in there to see a range of looks, from sunny, to cloudy, to overcast.
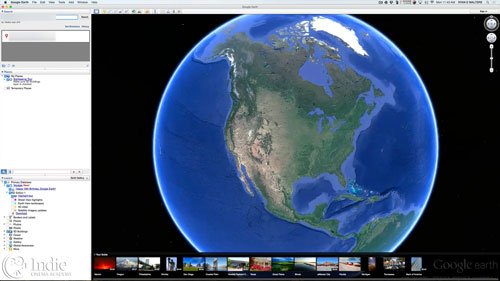
If I want to take my virtual scout even further, I’ll pull up Google Earth. I’ll bring up the location, move into street view, then click on the building icon to go to ground level view. Now for the cool part: I’ll click the sun icon to turn the sun on. From here I can scroll through the day and watch the position of the sun in relation to the location. And if Google has converted it into a 3D environment, I can figure out exact times when the sun will clear buildings or be in the position that I need it to be in. Even if it isn’t a 3D environment, I can still get a rough sense of timing. If that still isn’t specific enough, I can also enter a future date and see where the sun will be on the day we’re filming. It’s pretty impressive what we can do with technology these days.
Now that we have virtually scouted the location and know the path of the sun, let’s look at the best strategies for making the most of our day exteriors...
** Want to read the rest of the transcript? Become a member. **
** Want to see the lighting diagrams? Become a member. **
Camera / Audio
- Sony Alpha a7S Mirrorless Digital Camera
- Canon EF 24-70mm f/2.8L II USM Lens
- Fotodiox Lens Mount Adapter – Canon EOS (EF / EF-s) to Sony E-Mount
- Bright Tangerine Misfit Matte Box
- Tilta FF-T03 15mm Follow Focus with Hard Stops
- Sachtler Panorama 7+7 Head 100mm (similar head: 1006 DV 10 SB Fluid Head)
- Sachtler Carbon Fiber Tripod (similar tripod: Carbon Fiber HD Tripod Legs)
- MYT Works 4′ Medium slider w/ HiHat
- Hollywood Beefy Baby Stand (8.5′) (two, to raise the MYT Works slider)
- Movcam Cage for Sony A7S
- Sekonic L-758Cine DigitalMaster Light Meter
- Sekonic C-700 SpectroMaster Color Meter
- Wooden Camera A/B Gold-Mount Plate for Sony A7, A7r and A7s
- Audio Technica AT835b Shotgun Microphone
(similar microphone: Audio Technica BP4071 Shotgun Microphone)
- Wooden Camera DSLR A-Box
- Delkin Devices 64GB SDXC Memory Card 600x UHS-I
- DSC Labs One Shot Reference Chart (Matte Finish)
Behind the Scenes (BTS) Cameras
- GoPro Hero3 Black (similar camera: GoPro HERO4 Black)
- Motrr Galileo: App-Driven Motorized Head w/ GoPro Mount
- Sony Alpha SLT-A57
- Filmcity DSLR Camera Cage Shoulder Rig kit (FC-03)
Lighting / Grip Gear
 https://indiecinemaacademy.com/wp-content/uploads/2016/01/LC120-CorporateVideo-Thumbnail-Web.jpg
450
800
Ryan E. Walters
https://indiecinemaacademy.com/wp-content/uploads/2013/12/Indie_cinema_Logo_2color-MF-300x116-web.png
Ryan E. Walters2016-01-11 00:15:082016-05-05 11:22:30How to Cinematically Light a Corporate Video (Cinematic Lighting Lesson 20)
 https://indiecinemaacademy.com/wp-content/uploads/2015/12/LC119-LightFast-Thumbnail.jpg
450
800
Ryan E. Walters
https://indiecinemaacademy.com/wp-content/uploads/2013/12/Indie_cinema_Logo_2color-MF-300x116-web.png
Ryan E. Walters2015-12-29 12:38:562016-01-10 21:42:39How To Light Quickly (Cinematic Lighting Lesson 19)
 https://indiecinemaacademy.com/wp-content/uploads/2015/09/LC121_LightingHighSpeed-Thumbnail-Web.jpg
450
800
Ryan E. Walters
https://indiecinemaacademy.com/wp-content/uploads/2013/12/Indie_cinema_Logo_2color-MF-300x116-web.png
Ryan E. Walters2015-09-21 00:15:372016-01-10 21:42:57Lighting For Extreme Frame Rates (Cinematic Lighting Lesson 21)
 https://indiecinemaacademy.com/wp-content/uploads/2015/09/LC115_12Questions-Thumbnail-Free-Web.jpg
450
800
Ryan E. Walters
https://indiecinemaacademy.com/wp-content/uploads/2013/12/Indie_cinema_Logo_2color-MF-300x116-web.png
Ryan E. Walters2015-09-07 00:30:532015-10-30 19:06:3612 Crucial Questions To Ask Before You Light Your Set (Cinematic Lighting Lesson 15)
 https://indiecinemaacademy.com/wp-content/uploads/2015/08/LC114-3StrLightingNghtExt-Thumbnail.jpg
450
800
Ryan E. Walters
https://indiecinemaacademy.com/wp-content/uploads/2013/12/Indie_cinema_Logo_2color-MF-300x116-web.png
Ryan E. Walters2015-08-24 00:30:112015-10-30 18:55:173 Strategies for Lighting Your Night Exteriors (Cinematic Lighting Lesson 14)
 https://indiecinemaacademy.com/wp-content/uploads/2015/08/LC112_5SratDayExt-Thumbnail-800x450-jpg-web.jpeg
450
800
Ryan E. Walters
https://indiecinemaacademy.com/wp-content/uploads/2013/12/Indie_cinema_Logo_2color-MF-300x116-web.png
Ryan E. Walters2015-08-10 00:15:422015-10-30 18:54:545 Essential Strategies To Lighting Day Exteriors (Cinematic Lighting Lesson 12)
 https://indiecinemaacademy.com/wp-content/uploads/2015/07/LC113-10TricksDayExt-Thumbnail-800x450-web-.jpg
450
800
Ryan E. Walters
https://indiecinemaacademy.com/wp-content/uploads/2013/12/Indie_cinema_Logo_2color-MF-300x116-web.png
Ryan E. Walters2015-07-27 00:15:252015-10-30 18:55:0310 Tips To Lighting Day Exteriors (Cinematic Lighting Lesson 13)
 https://indiecinemaacademy.com/wp-content/uploads/2015/07/LC123_SmallCommercial-thumbnail-800X450.jpg
450
800
Ryan E. Walters
https://indiecinemaacademy.com/wp-content/uploads/2013/12/Indie_cinema_Logo_2color-MF-300x116-web.png
Ryan E. Walters2015-07-13 14:24:582015-10-30 19:19:44How To Light A Small Commercial (Cinematic Lighting Lesson 23)
 https://indiecinemaacademy.com/wp-content/uploads/2015/06/LC118-WhereToBeginLighting-featured.jpg
450
800
Ryan E. Walters
https://indiecinemaacademy.com/wp-content/uploads/2013/12/Indie_cinema_Logo_2color-MF-300x116-web.png
Ryan E. Walters2015-06-29 00:30:302015-12-29 12:43:40Where To Begin Lighting Your Set (Cinematic Lighting Lesson 18)
https://indiecinemaacademy.com/wp-content/uploads/2015/06/LC118-WhereToBeginLighting-featured.jpg
450
800
Ryan E. Walters
https://indiecinemaacademy.com/wp-content/uploads/2013/12/Indie_cinema_Logo_2color-MF-300x116-web.png
Ryan E. Walters2015-06-29 00:30:302015-12-29 12:43:40Where To Begin Lighting Your Set (Cinematic Lighting Lesson 18)Leave a Reply
Want to join the discussion?Feel free to contribute!
Leave a Reply Cancel reply
You must be logged in to post a comment.
This site uses Akismet to reduce spam. Learn how your comment data is processed.

Hey Ryan, Great video thank you very much!
I am curious inparticular with those black floppys you used in this video since they are paired with your DIY frames, did you make those yourself or did you purchase them made already with all the velcro ties and corner straps for the frame? Been needing something exactly like it since I built my own frames. 🙂
Hey Brandon,
These pre-made floppies are meant for other frames, but they work on our DIY 1″ square tube frames. The floppies come with elastic on the corners and Velcro along the edges. The Velcro isn’t much help because our tubes are bigger than they can fully reach. But they definitely do the job. I’m not sure of the brand; Ryan bought them years ago. I looked around at various supply stores, but couldn’t find the exact type we use.
Glad you liked it. 🙂 To follow up on Tim’s reply, I bought the floppies from Modern Studio. I had originally made some of my own, but I’m not much of a seamstress, so the Velcro didn’t hold up well, so I bought the real thing and that has worked a lot better. 🙂 Here’s the 48″ x 48″ floppy we use. (Opens to 48″ x 96″)
Hi guys 🙂 which Arri HMI is this?
It actually isn’t ARRI, but a knock-off of ARRI from Queenshiny. We bought their 1.2 kW and 575W HMIs over a year ago to see if they were adequate so we could recommend less expensive options to members. These lights work great. (Well, after we fixed the power cord on one and the power switch on the other. Always good to be knowledgeable with electronics in this industry!) We also figured that if the bulbs didn’t produce decent color quality, we could always buy ARRI brand bulbs and use those. So far we haven’t had to.
Just checked and they are currently only selling the 575W version. Best to buy well ahead of when you need it since it takes a month to ship to the United States since it’s coming from Asia.
Awesome thanks Tim 🙂