Three Strategies For Lighting A Day Interior
(Cinematic Lighting Lesson 10)
Summary: Interior day interiors may seem easy to light, but there are challenges to consider. In this video Ryan goes over how to control the color, intensity, and ambient light levels when shooting indoors so that the mood and feel of your images are the look you want.
Length: 7:48 minutes
!! Want to see the whole video? Become a member !!
- If you are already a member, you can log in below.
Introduction
Lighting a day interior may seem pretty straight forward, but there are actually some unique challenges that can really bite you in the butt if you’re not careful. In this video I’m going to begin by sharing with you how to create the look of a day interior, and then we’ll move on to the three strategies that you should be aware of in order to help you overcome the issues that you’ll face on set.
Creating The Look
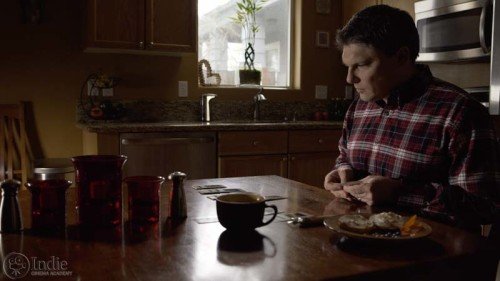
As I mentioned in the previous videos, the most important part of the lighting process is to determine the look and mood you want to create. This determines how you’ll approach your day interior lighting, so it’s best to settle on this first. As you light your scene, here are some things to keep in mind.
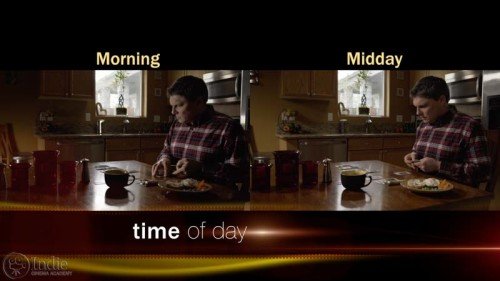
Usually a day interior will have a softer light because that light is bouncing all around the environment, raising the ambient light levels and providing a lot of soft fill. The exception to this, of course, is direct sun through a window. Earlier in the morning and in the evening the sun is lower, which means it rakes through the windows and hits lower on the walls. This makes the bottom of the wall brighter and the top of the wall darker. Towards the middle of the day the sun moves overhead, light bounces around more, filling a space more evenly; so the walls get brighter. Of course, you don’t have to light your scene that way, but it’s a good idea to be aware of reality so that you can recreate a specific look if needed.
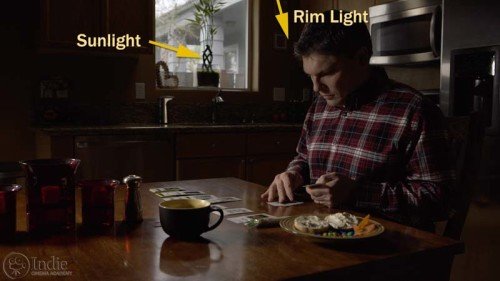
Oh, and speaking of windows: they are usually the most logical sources of light for your day interior. I’ll use them as a starting place for the positions of lights I setup. Our eyes are easily fooled with light placement in film because we are compressing 3D space onto a 2D image. I can add in a backlight or an edge light to someone, and as long as it is coming from the same direction as the window, our eyes will accept it even if the light isn’t really traveling in that direction.
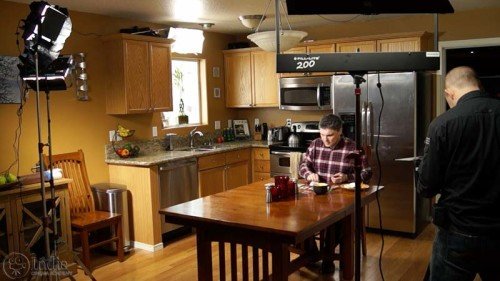
In the real world the light outside tends to be brighter than the light inside. If you’re after a sunny day look, make sure that whatever you see out the window feels brighter than your interior. How much brighter depends on the look you want and the camera you are using. Having a good understanding of your camera is essential. If you want to have a solid understanding of your camera, then jump on over to our camera series.
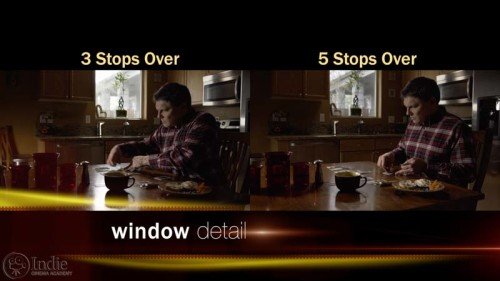
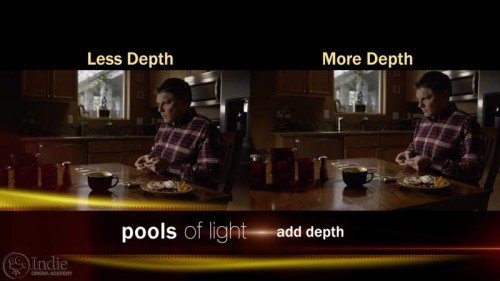
Personally, I like to see some detail out of my windows, so I’ll keep them to somewhere around 3 – 5 stops over key depending on the camera I’m using. Another touch I like to do is add streaks of sunlight or pools of daylight to the set. Not only does it add visual interest to the shot, but it can really help a shot from feeling like it is flatly lit.
Once you’ve decided on the look you want for your day interior and where you want your light to come from, it’s time to start lighting. But lighting a day interior on location presents a series of challenges that you should be aware of. Let’s take a look at the three main challenges and the strategies to overcome them...
** Want to read the rest of the transcript? Become a member. **
** Want to see the lighting diagrams? Become a member. **
Camera / Audio
- Sony Alpha a7S Mirrorless Digital Camera
- Canon EF 24-70mm f/2.8L II USM Lens
- Fotodiox Lens Mount Adapter – Canon EOS (EF / EF-s) to Sony E-Mount
- Bright Tangerine Misfit Matte Box
- Tilta FF-T03 15mm Follow Focus with Hard Stops
- Sachtler Panorama 7+7 Head 100mm (similar head: 1006 DV 10 SB Fluid Head)
- Sachtler Carbon Fiber Tripod (similar tripod: Carbon Fiber HD Tripod Legs)
- MYT Works 4′ Medium slider w/ HiHat
- Hollywood Beefy Baby Stand (8.5′) (two, to raise the MYT Works slider)
- Movcam Cage for Sony A7S
- Sekonic L-758Cine DigitalMaster Light Meter
- Sekonic C-700 SpectroMaster Color Meter
- Wooden Camera A/B Gold-Mount Plate for Sony A7, A7r and A7s
- Audio Technica AT835b Shotgun Microphone
(similar microphone: Audio Technica BP4071 Shotgun Microphone)
- Wooden Camera DSLR A-Box
- Delkin Devices 64GB SDXC Memory Card 600x UHS-I
- DSC Labs One Shot Reference Chart (Matte Finish)
Behind the Scenes (BTS) Cameras
- GoPro Hero3 Black (similar camera: GoPro HERO4 Black)
- Motrr Galileo: App-Driven Motorized Head w/ GoPro Mount
- Sony Alpha SLT-A57
- Filmcity DSLR Camera Cage Shoulder Rig kit (FC-03)
Lighting / Grip Gear
- Fill-Lite 200
- LED (900) (Bestlight®)
- Queenshiny 1.2kW HMI Fresnel Light
- 24×36″ – Black Double Net
- 1/8 Color Temperature Orange (CTO) Filter (24×198″ Roll)
- 1/2 Color Temperature Orange (CTO) Filter (24×198″ Roll)
- Foam Core Bounce (White)
- Floppy – 48×48″ (1.2×1.2m)
- Matthews Century C Stand Grip Arm Kit – 10.5′ (3.2m)
- PBL Sandbags x4 bags
- Butterfly/Overhead Set – 8×8′
- Master Combo HD Stand (11′)
 https://indiecinemaacademy.com/wp-content/uploads/2016/01/LC120-CorporateVideo-Thumbnail-Web.jpg
450
800
Ryan E. Walters
https://indiecinemaacademy.com/wp-content/uploads/2013/12/Indie_cinema_Logo_2color-MF-300x116-web.png
Ryan E. Walters2016-01-11 00:15:082016-05-05 11:22:30How to Cinematically Light a Corporate Video (Cinematic Lighting Lesson 20)
 https://indiecinemaacademy.com/wp-content/uploads/2015/12/LC119-LightFast-Thumbnail.jpg
450
800
Ryan E. Walters
https://indiecinemaacademy.com/wp-content/uploads/2013/12/Indie_cinema_Logo_2color-MF-300x116-web.png
Ryan E. Walters2015-12-29 12:38:562016-01-10 21:42:39How To Light Quickly (Cinematic Lighting Lesson 19)
 https://indiecinemaacademy.com/wp-content/uploads/2015/09/LC121_LightingHighSpeed-Thumbnail-Web.jpg
450
800
Ryan E. Walters
https://indiecinemaacademy.com/wp-content/uploads/2013/12/Indie_cinema_Logo_2color-MF-300x116-web.png
Ryan E. Walters2015-09-21 00:15:372016-01-10 21:42:57Lighting For Extreme Frame Rates (Cinematic Lighting Lesson 21)
 https://indiecinemaacademy.com/wp-content/uploads/2015/09/LC115_12Questions-Thumbnail-Free-Web.jpg
450
800
Ryan E. Walters
https://indiecinemaacademy.com/wp-content/uploads/2013/12/Indie_cinema_Logo_2color-MF-300x116-web.png
Ryan E. Walters2015-09-07 00:30:532015-10-30 19:06:3612 Crucial Questions To Ask Before You Light Your Set (Cinematic Lighting Lesson 15)
 https://indiecinemaacademy.com/wp-content/uploads/2015/08/LC114-3StrLightingNghtExt-Thumbnail.jpg
450
800
Ryan E. Walters
https://indiecinemaacademy.com/wp-content/uploads/2013/12/Indie_cinema_Logo_2color-MF-300x116-web.png
Ryan E. Walters2015-08-24 00:30:112015-10-30 18:55:173 Strategies for Lighting Your Night Exteriors (Cinematic Lighting Lesson 14)
 https://indiecinemaacademy.com/wp-content/uploads/2015/08/LC112_5SratDayExt-Thumbnail-800x450-jpg-web.jpeg
450
800
Ryan E. Walters
https://indiecinemaacademy.com/wp-content/uploads/2013/12/Indie_cinema_Logo_2color-MF-300x116-web.png
Ryan E. Walters2015-08-10 00:15:422015-10-30 18:54:545 Essential Strategies To Lighting Day Exteriors (Cinematic Lighting Lesson 12)
 https://indiecinemaacademy.com/wp-content/uploads/2015/07/LC113-10TricksDayExt-Thumbnail-800x450-web-.jpg
450
800
Ryan E. Walters
https://indiecinemaacademy.com/wp-content/uploads/2013/12/Indie_cinema_Logo_2color-MF-300x116-web.png
Ryan E. Walters2015-07-27 00:15:252015-10-30 18:55:0310 Tips To Lighting Day Exteriors (Cinematic Lighting Lesson 13)
 https://indiecinemaacademy.com/wp-content/uploads/2015/07/LC123_SmallCommercial-thumbnail-800X450.jpg
450
800
Ryan E. Walters
https://indiecinemaacademy.com/wp-content/uploads/2013/12/Indie_cinema_Logo_2color-MF-300x116-web.png
Ryan E. Walters2015-07-13 14:24:582015-10-30 19:19:44How To Light A Small Commercial (Cinematic Lighting Lesson 23)
 https://indiecinemaacademy.com/wp-content/uploads/2015/06/LC118-WhereToBeginLighting-featured.jpg
450
800
Ryan E. Walters
https://indiecinemaacademy.com/wp-content/uploads/2013/12/Indie_cinema_Logo_2color-MF-300x116-web.png
Ryan E. Walters2015-06-29 00:30:302015-12-29 12:43:40Where To Begin Lighting Your Set (Cinematic Lighting Lesson 18)
https://indiecinemaacademy.com/wp-content/uploads/2015/06/LC118-WhereToBeginLighting-featured.jpg
450
800
Ryan E. Walters
https://indiecinemaacademy.com/wp-content/uploads/2013/12/Indie_cinema_Logo_2color-MF-300x116-web.png
Ryan E. Walters2015-06-29 00:30:302015-12-29 12:43:40Where To Begin Lighting Your Set (Cinematic Lighting Lesson 18)Leave a Reply
Want to join the discussion?Feel free to contribute!
Leave a Reply Cancel reply
You must be logged in to post a comment.
This site uses Akismet to reduce spam. Learn how your comment data is processed.

Another great tutorial – thank you !
Very excellent tutorial , I hope that you create some tutorials you show us in it how to rig and control the light in much more details , also I suggest you show us the making for every tutorial because will show us the fine tuning and subtle naunaces