What Exposure Meters Tell You: Histogram, Waveform, Zebra, False Color (Camera Lesson 26)
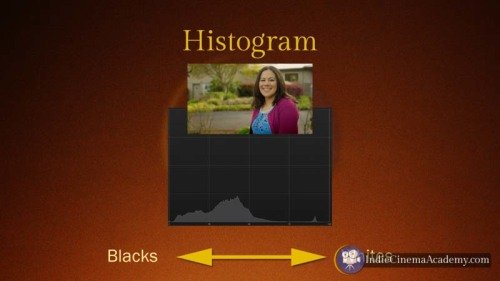
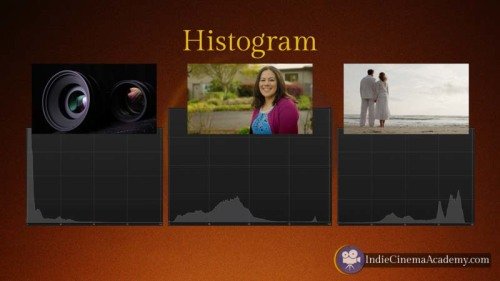
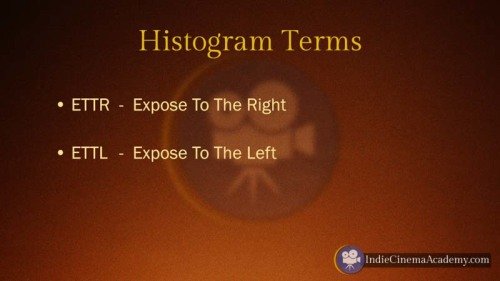
Summary: Ryan explains the four most popular in camera exposure meters, and when you should use them: waveform, zebras, false color and histogram.
Length: 5:09 minutes
Video Lesson
!! Want to see the whole video? Become a member !!
- If you are already a member, you can log in below.
Transcript

 https://indiecinemaacademy.com/wp-content/uploads/2016/10/ICA_DoF01_How_Aperture_and_ISO_Affects_Focus-Thumbnail-web.jpg
450
800
Tim
https://indiecinemaacademy.com/wp-content/uploads/2013/12/Indie_cinema_Logo_2color-MF-300x116-web.png
Tim2016-10-10 00:15:202025-03-11 14:46:47Depth of Field, Part 1: How Aperture and ISO Affect Focus
https://indiecinemaacademy.com/wp-content/uploads/2016/10/ICA_DoF01_How_Aperture_and_ISO_Affects_Focus-Thumbnail-web.jpg
450
800
Tim
https://indiecinemaacademy.com/wp-content/uploads/2013/12/Indie_cinema_Logo_2color-MF-300x116-web.png
Tim2016-10-10 00:15:202025-03-11 14:46:47Depth of Field, Part 1: How Aperture and ISO Affect Focus https://indiecinemaacademy.com/wp-content/uploads/2015/12/CS006-HighSpeed-Part06-FREE-Thumbnail-Web.jpg
450
800
Ryan E. Walters
https://indiecinemaacademy.com/wp-content/uploads/2013/12/Indie_cinema_Logo_2color-MF-300x116-web.png
Ryan E. Walters2015-12-14 00:15:052015-12-29 13:20:06Your Guide To High Speed, Part 6: Five Tips For A Successful Shoot
https://indiecinemaacademy.com/wp-content/uploads/2015/12/CS006-HighSpeed-Part06-FREE-Thumbnail-Web.jpg
450
800
Ryan E. Walters
https://indiecinemaacademy.com/wp-content/uploads/2013/12/Indie_cinema_Logo_2color-MF-300x116-web.png
Ryan E. Walters2015-12-14 00:15:052015-12-29 13:20:06Your Guide To High Speed, Part 6: Five Tips For A Successful Shoot https://indiecinemaacademy.com/wp-content/uploads/2015/12/CS005-HighSpeed-Part05-FREE-Thumbnail-Web.jpg
450
800
Ryan E. Walters
https://indiecinemaacademy.com/wp-content/uploads/2013/12/Indie_cinema_Logo_2color-MF-300x116-web.png
Ryan E. Walters2015-11-30 09:00:282015-12-29 15:41:16Your Guide To High Speed, Part 5: Lighting Six High Speed Sets
https://indiecinemaacademy.com/wp-content/uploads/2015/12/CS005-HighSpeed-Part05-FREE-Thumbnail-Web.jpg
450
800
Ryan E. Walters
https://indiecinemaacademy.com/wp-content/uploads/2013/12/Indie_cinema_Logo_2color-MF-300x116-web.png
Ryan E. Walters2015-11-30 09:00:282015-12-29 15:41:16Your Guide To High Speed, Part 5: Lighting Six High Speed Sets https://indiecinemaacademy.com/wp-content/uploads/2015/12/CS004-HighSpeed-Part04-FREE-Thumbnail-Web.jpg
450
800
Ryan E. Walters
https://indiecinemaacademy.com/wp-content/uploads/2013/12/Indie_cinema_Logo_2color-MF-300x116-web.png
Ryan E. Walters2015-11-16 00:15:182015-12-29 13:17:26Your Guide To High Speed, Part 4: Common Lighting Problems
https://indiecinemaacademy.com/wp-content/uploads/2015/12/CS004-HighSpeed-Part04-FREE-Thumbnail-Web.jpg
450
800
Ryan E. Walters
https://indiecinemaacademy.com/wp-content/uploads/2013/12/Indie_cinema_Logo_2color-MF-300x116-web.png
Ryan E. Walters2015-11-16 00:15:182015-12-29 13:17:26Your Guide To High Speed, Part 4: Common Lighting Problems https://indiecinemaacademy.com/wp-content/uploads/2015/12/CS003-HighSpeed-Part03-FREE-Thumbnail-Web.jpg
450
800
Ryan E. Walters
https://indiecinemaacademy.com/wp-content/uploads/2013/12/Indie_cinema_Logo_2color-MF-300x116-web.png
Ryan E. Walters2015-11-02 00:15:272015-12-29 13:15:49Your Guide To High Speed, Part 3: Camera Operation & Workflow
https://indiecinemaacademy.com/wp-content/uploads/2015/12/CS003-HighSpeed-Part03-FREE-Thumbnail-Web.jpg
450
800
Ryan E. Walters
https://indiecinemaacademy.com/wp-content/uploads/2013/12/Indie_cinema_Logo_2color-MF-300x116-web.png
Ryan E. Walters2015-11-02 00:15:272015-12-29 13:15:49Your Guide To High Speed, Part 3: Camera Operation & Workflow https://indiecinemaacademy.com/wp-content/uploads/2015/12/CS002-HighSpeed-Part02-FREE-Thumbnail-Web.jpg
450
800
Ryan E. Walters
https://indiecinemaacademy.com/wp-content/uploads/2013/12/Indie_cinema_Logo_2color-MF-300x116-web.png
Ryan E. Walters2015-10-19 12:25:282015-12-29 15:21:30Your Guide To High Speed, Part 2: Frame Rate
https://indiecinemaacademy.com/wp-content/uploads/2015/12/CS002-HighSpeed-Part02-FREE-Thumbnail-Web.jpg
450
800
Ryan E. Walters
https://indiecinemaacademy.com/wp-content/uploads/2013/12/Indie_cinema_Logo_2color-MF-300x116-web.png
Ryan E. Walters2015-10-19 12:25:282015-12-29 15:21:30Your Guide To High Speed, Part 2: Frame Rate https://indiecinemaacademy.com/wp-content/uploads/2015/12/CS001-HighSpeed-Part01-FREE-Thumbnail-Web.jpg
450
800
Ryan E. Walters
https://indiecinemaacademy.com/wp-content/uploads/2013/12/Indie_cinema_Logo_2color-MF-300x116-web.png
Ryan E. Walters2015-10-05 00:15:592015-12-29 13:20:38Your Guide To High Speed, Part 1: Introduction
https://indiecinemaacademy.com/wp-content/uploads/2015/12/CS001-HighSpeed-Part01-FREE-Thumbnail-Web.jpg
450
800
Ryan E. Walters
https://indiecinemaacademy.com/wp-content/uploads/2013/12/Indie_cinema_Logo_2color-MF-300x116-web.png
Ryan E. Walters2015-10-05 00:15:592015-12-29 13:20:38Your Guide To High Speed, Part 1: Introduction https://indiecinemaacademy.com/wp-content/uploads/2015/09/LC115_12Questions-Thumbnail-Free-Web.jpg
450
800
Ryan E. Walters
https://indiecinemaacademy.com/wp-content/uploads/2013/12/Indie_cinema_Logo_2color-MF-300x116-web.png
Ryan E. Walters2015-09-07 00:30:532015-10-30 19:06:3612 Crucial Questions To Ask Before You Light Your Set (Cinematic Lighting Lesson 15)
https://indiecinemaacademy.com/wp-content/uploads/2015/09/LC115_12Questions-Thumbnail-Free-Web.jpg
450
800
Ryan E. Walters
https://indiecinemaacademy.com/wp-content/uploads/2013/12/Indie_cinema_Logo_2color-MF-300x116-web.png
Ryan E. Walters2015-09-07 00:30:532015-10-30 19:06:3612 Crucial Questions To Ask Before You Light Your Set (Cinematic Lighting Lesson 15) https://indiecinemaacademy.com/wp-content/uploads/2015/03/LC108-NegativeFill-Thumbnail-Web.jpg
450
800
Ryan E. Walters
https://indiecinemaacademy.com/wp-content/uploads/2013/12/Indie_cinema_Logo_2color-MF-300x116-web.png
Ryan E. Walters2015-03-23 00:30:392015-10-30 18:34:25Negative Fill: The Best Kept Secret (Cinematic Lighting Lesson 08)
https://indiecinemaacademy.com/wp-content/uploads/2015/03/LC108-NegativeFill-Thumbnail-Web.jpg
450
800
Ryan E. Walters
https://indiecinemaacademy.com/wp-content/uploads/2013/12/Indie_cinema_Logo_2color-MF-300x116-web.png
Ryan E. Walters2015-03-23 00:30:392015-10-30 18:34:25Negative Fill: The Best Kept Secret (Cinematic Lighting Lesson 08)
Leave a Reply
Want to join the discussion?Feel free to contribute!