Your Guide To High Speed
Part 5: Lighting Six High Speed Sets
Summary: In Part 5 of our series on high speed videography, we cover lighting six different high speed sets: bullet time, pie in the face, shooting an apple at 150,000 frames per second, along with lighting water and fire.
Length: 10:48 minutes
Introduction
Now that you have a good idea of what it takes to light for high speed video, I’m going to take you behind the scenes and show you six different setups we lit specifically for this series on high speed video. I’ll show you how we lit our “bullet time effect,” what it took to light at 150,000 frames per second, I’ll show you what our set looked like for me taking a pie to the face, and how to light for both fire and water. And of course I’d really like to thank our friends over at Via Films for helping us make this series a reality. Without their help, this series wouldn’t have happened.
Slow Motion Pie In The Face
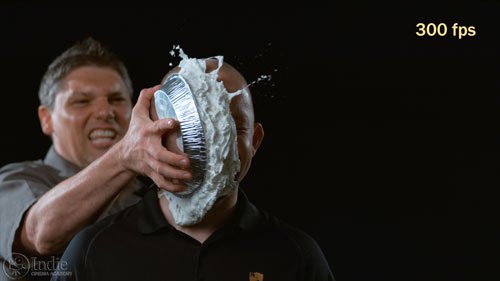
Throwing a pie in someones face is fun. Better is when you can relish it in slow motion. The goal of this shot was to highlight the creamy texture of the pie as it hit me and splattered across my face. As we covered in the Cinematic Lighting series, the less frontal a light is positioned, the more it reveals texture and shape. So we decided to use a backlight for this setup.
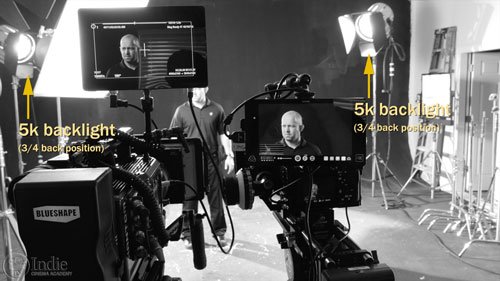
We decided to go with two backlights in the ¾ back position. Why two backlights? Well, one light would have worked just fine, but I wanted to make sure that you could see the texture of the whipped cream throughout the shot. By placing the lights on either side, I knew that regardless of the motion of the pie or my face, the whipped cream would have a good backlight to highlight it.

Notice that the backlight on the camera left side is closer than the one on the right. Technically speaking, that backlight as acting as my key light. It is creating a much sharper, brighter edge not only on Tim and me, but on the pie as well. I also focused that light more to help bring up the light levels on that side of my face. This is a good example of the key light not always having to be in the frontal position.
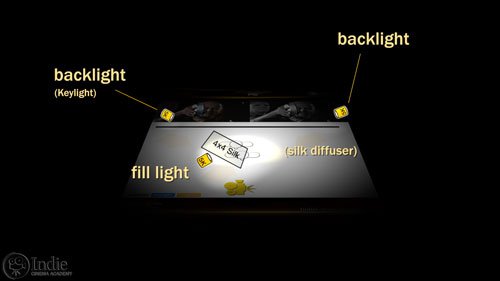
With two back lights set to show texture and shape, I essentially created a silhouette. It looked fine, but wasn’t what I was after. More important than the detail in the whip cream was the look on my face. After all, it is the expression that makes this shot work. This meant I needed to bring up my fill levels. For this I used another 5k tungsten light from the ¾ front position. To make it a soft light that washed over the scene, I added a 4×4 silk in front of the light to complete the lighting setup for this shot. Quick, simple, and effective.
Individual Water Drops At High Speed
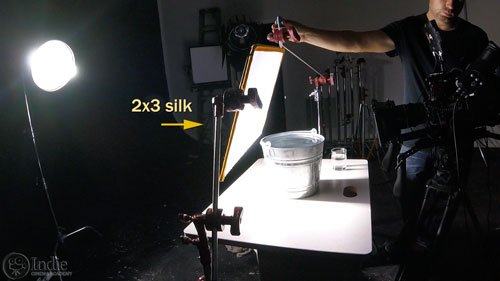
To effectively light water, you aren’t actually lighting the water itself. Instead, focus on creating reflections in the water to reveal the shape and texture. In this example of the water droplet, we created a big white surface directly behind the water using a large white silk. The silk was angled so it reflected in the surface of the water. What you end up seeing is the white silk in the top of the water, with everything else falling off into darkness.

Next we placed a high output LED light directly behind the silk to get enough illumination for our shot. The LED worked because this set-up was so small. Since a drop of water doesn’t take up much space, we could get the light quite close, giving us enough output for our exposure.
A Bullet At 150,000 Frames Per Second!

Yeah, you read that correctly: 150,000 frames per second. We needed that speed in order to capture multiple frames of the bullet mid-flight before and after piercing the apple. We started at 8,000 frames per second, and worked our way up to 150,000. Obviously frame rates of this magnitude require a lot of light! Fortunately, like with the water drop, our subject was small enough that we could bring our 5k lights in close, bringing up our light levels to where we needed it.
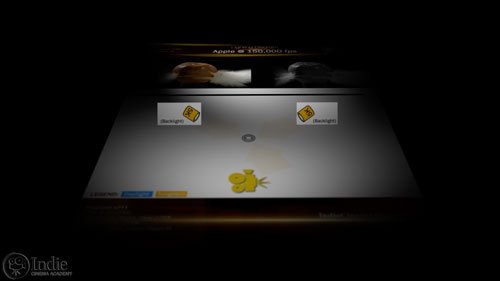
As with the pie shot, the goal of this shot was to reveal texture and shape as the bullet tears the apple apart. We placed our two 5k tungsten lights in the ¾ back position to act as our backlights. As you can see in the footage, these backlights highlighted the spray of the juices from the apple, along with the apple flesh as the bullet pierces it.
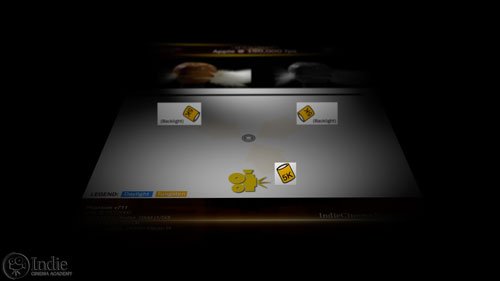
To show the surface of the apple, we placed the third 5k light in the ¾ frontal position on the right side. The placement of all three of these lights were more about getting the proper light levels for shooting at 150,000 frames per second than anything else. It was a delicate balance to get them close enough to get proper exposure while at the same time leaving enough room for the marksman to line up the shot.
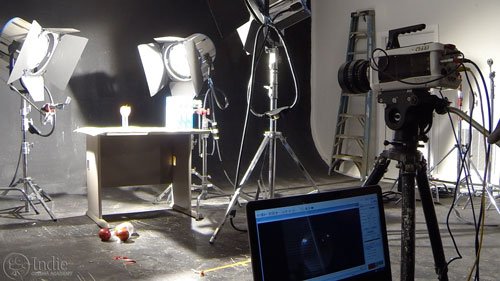
In order to get as much light as I could, I needed to spot-in the two backlights to get the maximum light output from them. The result was harder light than I wanted, as can be seen in the reflection of the lights on the apple’s skin. The ideal would have been two 10k lights, along with some silks to soften the light. But since we didn’t have those on hand, we made these 5k lights work.
Water Cascading Over Tomatoes
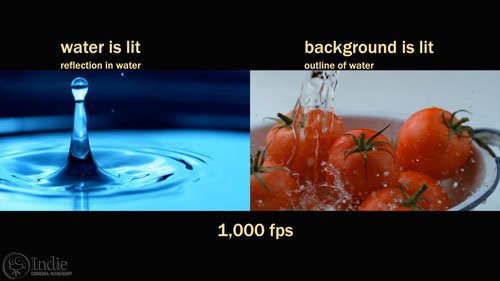
Lighting just water is one thing. But when that water is flowing over something else, the approach is a bit different. In our example of water cascading over tomatoes, we now have to focus on lighting the tomatoes in addition to the water. In the water drop example, our soft source reflected in the water to show us shape and texture. But with the tomato set-up, we’re going to switch things around: instead of creating reflections in the water, we’ll show the water by lighting the background. With this method, instead of seeing the surface of the water like with the water drop, we will only see the edges of it.
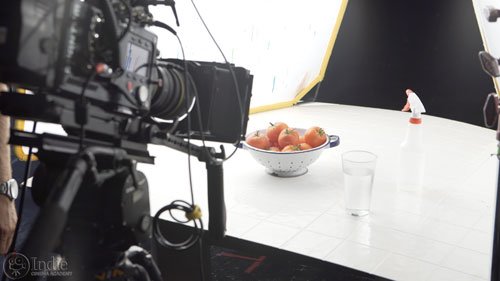
Now for lighting the tomatoes. We want to light the scene in a way that accentuates their smooth and reflective skin. By using big soft sources to gently light the tomato’s curves, the surface reflections will make the tomatoes feel extra plump and make their translucent skin glow. If we had hard light sources, we would have harsh specular highlights and deeper shadows. Instead the reflections and highlights are soft and smooth, making the tomatoes look fresh and appetizing.
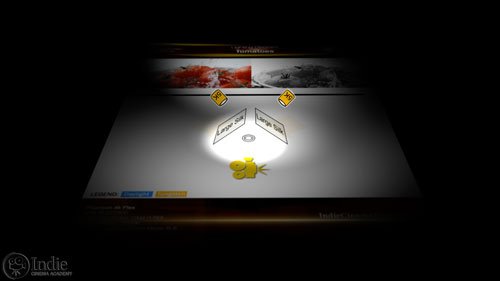
This lighting setup is pretty simple and easy to accomplish. We created a light box type set-up using two 4×4 silks in the ¾ back positions. This lighting setup is exactly the same for shooting at 24 frames or at 1,000 frames like we did here. The only difference is the amount of light we need. Because we had more area to cover, we went with two 5k tungsten lamps to get the levels we needed for our exposure.
“Bullet Time” – Almost…
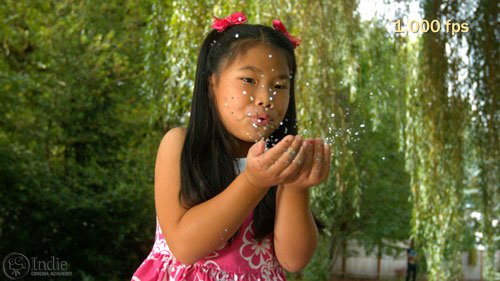
One of the fun things about slow motion is that it opens up opportunities for some unique shots. One look that we can mimic is the “bullet time” shot made popular by the Matrix series. Our example involves our talent blowing glitter from her hands while we spin the Phantom Miro around her. Recording at 1000 frames per second, the camera nearly stops each piece of glitter mid-flight.

While we could have filmed this in the studio, we shot this outside for a couple of reasons. First off, the background outside emphasizes the parallax between the subject and the background, giving us the bullet time feel. Secondly, we had been shooting all day in the studio against black and white, so bringing in some colors from nature would be a nice way to mix things up.

To light this the simple choice would have been to just set up in full sun. But that’s quite boring. Instead we wanted to give our shot more shape and dimension. There is a majestic willow tree next to the studio, and we knew this would be great way to break up the direct sun hitting our talent. So we placed our table in the shade of the tree..

A quick tip when working with children: it is extra important to make children as comfortable as possible. This will go a long way in ensuring everyone has a pleasant experience and you get the shots you need. Sitting in direct sun is hard enough for an adult, and even more so a child. Same goes with sitting in front of bright lights or reflectors bouncing intense lights. So if you are using bright lights on your high speed shoot and your talent is a child (or an adult who acts like a child), keep in mind how intense the lights are and find ways to minimize them looking into those lights. Between takes you can have them close their eyes, the gaffer can turn off the lights, or an assistant can give the talent sunglasses.
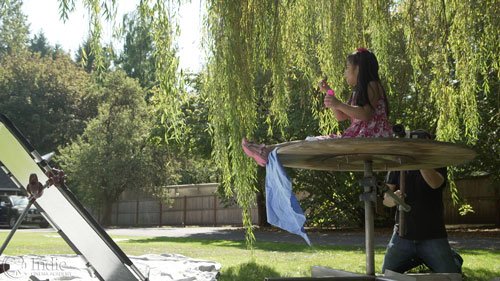
But back to how we lit this shot. With our talent in the shade of the willow tree, I wanted to add some shape and directionality to the light. Sitting in full shade meant the light was essentially coming from everywhere. And since this shot involves the camera moving 360 degrees around our subject, any key light would be seen. This meant I had to bounce the light from underneath so the light source didn’t appear in the shot.
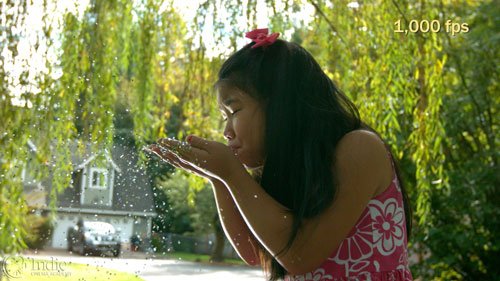
I originally began with the white side of a sun bounce, but the resulting light was too soft, lacking the punch to get to the light levels we needed. We next tried flipping the bounce over to the silver side. We were shooting midday in the summer meaning the sun was almost straight overhead. With our subject in full shade, I could have picked either side to light from. I opted for the talents right side as that felt more natural, especially as the camera moves around and reveals the bright house and sky in the background.
That extra push of light across our talents face gives her additional shape and dimension that wasn’t there before.
Playing With Fire
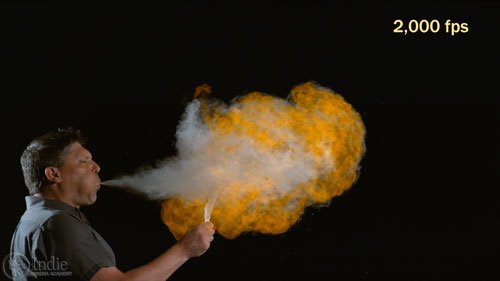
You might ask, “Why in the world do we need to light fire?” Great question. Technically you aren’t lighting it. The fire will provide the illumination for itself. But what if you want to see more than just the flame? There is a lot of smoke and other particles created in the fireball, which adds to the fiery effect. To see them, you have to light them. For this, a backlight comes in very handy.
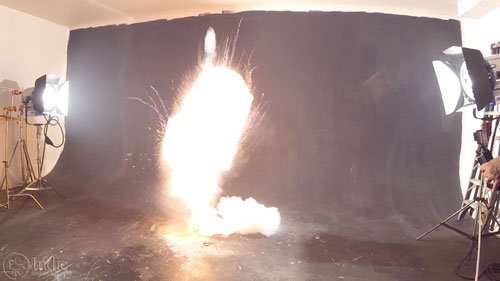
The only way to see smoke or other particles lingering after the fire is if they are backlit. In both Tim’s fireball and the explosion we used two backlights in the ¾ back positions. We then set the exposure for the fireball, and everything fell into place from there. We chose to use two bare 5k lights due to the distance we had to create to give us enough room for Tim and the fireball. The bigger the space we have to light and the farther they are from the subject, the bigger the lights we have to use. For this set-up, if we went with our LEDs the smoke and particles would have been underexposed.
Final Thoughts
So as you can tell from our six examples, once you overcome the hurdles that go along with shooting high speed video like light flickering and the sheer quantity of light that you need to get proper exposure, all the principles that we cover over in our cinematic lighting series all remain the same. It’s just a matter of putting the light in the correct position in order to get the mood and the look that you are after. If you haven’t done so already, I highly encourage you to jump on over to Daniel’s site over at Via Films. Not only is he creative, but his work is amazing. He’s got a lot of great shots and examples of shooting high speed video.
So what stood out to you about how we lit any of our sets? Are there any tips or tricks you’d like to share? I want to know, so leave a comment below. And if you have any questions, ask away, and I’ll be sure to respond.
Click Images To See Large Version
Camera / Audio
High Speed Cameras
Interview Camera Package
- Sony Alpha a7S Mirrorless Digital Camera
- Canon EF 24-70mm f/2.8L II USM Lens
- Fotodiox Lens Mount Adapter – Canon EOS (EF / EF-s) to Sony E-Mount
- Bright Tangerine Misfit Matte Box
- Tilta FF-T03 15mm Follow Focus with Hard Stops
- Sachtler Panorama 7+7 Head 100mm (similar head: 1006 DV 10 SB Fluid Head)
- Sachtler Carbon Fiber Tripod (similar tripod: Carbon Fiber HD Tripod Legs)
- Movcam Cage for Sony A7S
- Sekonic L-758Cine DigitalMaster Light Meter
- Sekonic C-700 SpectroMaster Color Meter
- Wooden Camera A/B Gold-Mount Plate for Sony A7, A7r and A7s
- Audio Technica AT835b Shotgun Microphone
(similar microphone: Audio Technica BP4071 Shotgun Microphone)
- Wooden Camera DSLR A-Box
- Delkin Devices 64GB SDXC Memory Card 600x UHS-I
- DSC Labs One Shot Reference Chart (Matte Finish)
Behind the Scenes (BTS) Cameras
- GoPro Hero3 Black (similar camera: GoPro HERO4 Black)
- GoPro Hero4 Session
- GoPro HERO+ LCD
- Luxebell Aluminium Skeleton for GoPro Hero Black 4
- PolarPro ProGrip
- GoMount GoClamp
- Sony Alpha A7S Package (see interview camera above)
Lighting / Grip Gear
- ARRI ST5 Studio Fresnel – 5000 Watts, Stand Mount (120-230VAC)
- Aputure Light Storm LS1/2w
- Aputure Light Storm LS1
- Fill-Lite 200
- Fill-Lite Wall Soft Light
- Open End Scrim – 24×36″ – White Artificial Silk
- Solid Frame Scrim – 48×48″ – White Artificial Silk
- Pro Sun-Bounce Kit – Silver/White Screen (4 x 6′)
- 24×36″ – Black Double Net
- Matthews Century C Stand Grip Arm Kit – 10.5′ (3.2m)
- Master Combo HD Stand (11′)
- PBL Sandbags x4 bags
 https://indiecinemaacademy.com/wp-content/uploads/2016/01/LC120-CorporateVideo-Thumbnail-Web.jpg
450
800
Ryan E. Walters
https://indiecinemaacademy.com/wp-content/uploads/2013/12/Indie_cinema_Logo_2color-MF-300x116-web.png
Ryan E. Walters2016-01-11 00:15:082016-05-05 11:22:30How to Cinematically Light a Corporate Video (Cinematic Lighting Lesson 20)
 https://indiecinemaacademy.com/wp-content/uploads/2015/12/LC119-LightFast-Thumbnail.jpg
450
800
Ryan E. Walters
https://indiecinemaacademy.com/wp-content/uploads/2013/12/Indie_cinema_Logo_2color-MF-300x116-web.png
Ryan E. Walters2015-12-29 12:38:562016-01-10 21:42:39How To Light Quickly (Cinematic Lighting Lesson 19)
 https://indiecinemaacademy.com/wp-content/uploads/2015/12/CS006-HighSpeed-Part06-FREE-Thumbnail-Web.jpg
450
800
Ryan E. Walters
https://indiecinemaacademy.com/wp-content/uploads/2013/12/Indie_cinema_Logo_2color-MF-300x116-web.png
Ryan E. Walters2015-12-14 00:15:052015-12-29 13:20:06Your Guide To High Speed, Part 6: Five Tips For A Successful Shoot
 https://indiecinemaacademy.com/wp-content/uploads/2015/12/CS005-HighSpeed-Part05-FREE-Thumbnail-Web.jpg
450
800
Ryan E. Walters
https://indiecinemaacademy.com/wp-content/uploads/2013/12/Indie_cinema_Logo_2color-MF-300x116-web.png
Ryan E. Walters2015-11-30 09:00:282015-12-29 15:41:16Your Guide To High Speed, Part 5: Lighting Six High Speed Sets
 https://indiecinemaacademy.com/wp-content/uploads/2015/12/CS004-HighSpeed-Part04-FREE-Thumbnail-Web.jpg
450
800
Ryan E. Walters
https://indiecinemaacademy.com/wp-content/uploads/2013/12/Indie_cinema_Logo_2color-MF-300x116-web.png
Ryan E. Walters2015-11-16 00:15:182015-12-29 13:17:26Your Guide To High Speed, Part 4: Common Lighting Problems
 https://indiecinemaacademy.com/wp-content/uploads/2015/12/CS003-HighSpeed-Part03-FREE-Thumbnail-Web.jpg
450
800
Ryan E. Walters
https://indiecinemaacademy.com/wp-content/uploads/2013/12/Indie_cinema_Logo_2color-MF-300x116-web.png
Ryan E. Walters2015-11-02 00:15:272015-12-29 13:15:49Your Guide To High Speed, Part 3: Camera Operation & Workflow
 https://indiecinemaacademy.com/wp-content/uploads/2015/12/CS002-HighSpeed-Part02-FREE-Thumbnail-Web.jpg
450
800
Ryan E. Walters
https://indiecinemaacademy.com/wp-content/uploads/2013/12/Indie_cinema_Logo_2color-MF-300x116-web.png
Ryan E. Walters2015-10-19 12:25:282015-12-29 15:21:30Your Guide To High Speed, Part 2: Frame Rate
 https://indiecinemaacademy.com/wp-content/uploads/2015/12/CS001-HighSpeed-Part01-FREE-Thumbnail-Web.jpg
450
800
Ryan E. Walters
https://indiecinemaacademy.com/wp-content/uploads/2013/12/Indie_cinema_Logo_2color-MF-300x116-web.png
Ryan E. Walters2015-10-05 00:15:592015-12-29 13:20:38Your Guide To High Speed, Part 1: Introduction
 https://indiecinemaacademy.com/wp-content/uploads/2015/09/LC121_LightingHighSpeed-Thumbnail-Web.jpg
450
800
Ryan E. Walters
https://indiecinemaacademy.com/wp-content/uploads/2013/12/Indie_cinema_Logo_2color-MF-300x116-web.png
Ryan E. Walters2015-09-21 00:15:372016-01-10 21:42:57Lighting For Extreme Frame Rates (Cinematic Lighting Lesson 21)
 Pie In The Face
 “Bullet Time”
 Fireball
 Bullet Through Apple @ 150,000 fps
 Tomatoes Splashed With Water
 Water Drop
Leave a Reply
Want to join the discussion?Feel free to contribute!