The Power Of X
A simple yet powerful lighting technique anyone can master in under a minute.
Yes! Send Me My Free Video
By Tim Park
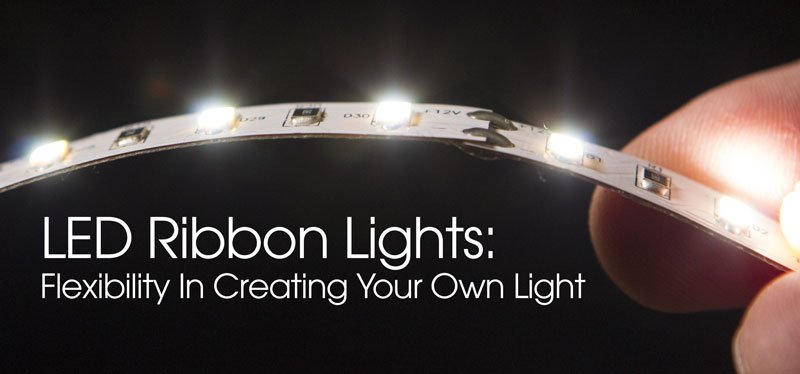
LED lights are becoming very common on-set because of their low power, low heat, and compact size. One type that is very useful is the ribbon LED, also called LED tape lights or LED strip lights. These come in different colors: white, red, green, yellow, and blue. There are also multicolored red/green/blue (RGB) lights that come with a remote so you can adjust the color and create effects.
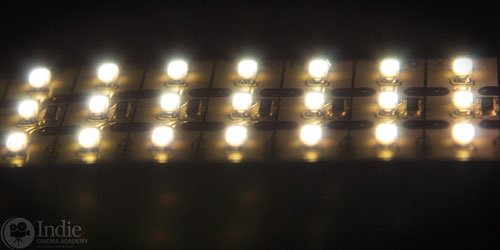
The LED diodes are embedded on a thin ribbon that is flexible, compact, and often have an adhesive on the back. Different models and brands come with different sizes and densities of diodes based on how bright you need the light. Keep in mind though, that both bigger diodes and more diodes per meter require more power.
LED ribbon lights are great for any sized video production since they allow you to create any sized light you want. This is handy when small accent lights are needed in tight locations, or a light needs to fit in a prop, on clothing, or within an actor’s palm. No longer do you have to worry about hiding a light behind a pillar or piece of furniture, and since they are so lightweight, you can often just tape them to an object.
You can also treat ribbon LEDs like modular pieces of light, building them together as you would LEGOs. There are connectors that quickly snap onto the ribbon terminals allowing you to quickly wire together multiple short LED ribbons to create a longer or wider light. Just make sure you get the right size for your LED tape light. The two most common sizes of ribbon LEDs are 8mm and 10mm, and there are connectors for both of these sizes.
The LED diodes on ribbon LEDs look a lot different than most standard LEDs. It isn’t the old-school bulb LEDs that are surrounded by a thick, clear plastic the size of a wooden match. Instead the diode is in its most basic form: a phosphor resin sitting in a “dish” with electrodes embedded in it. There might be a thin clear coating over the phosphor, but that is it.

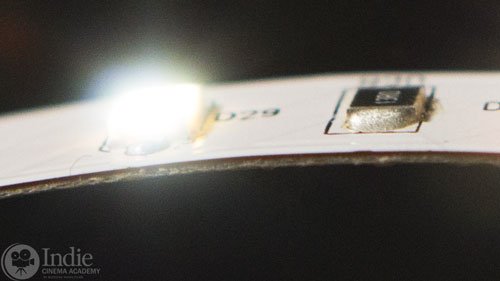
As you look at a LED strip you will notice various resistors and other electrical components on the ribbon, almost always paired with each LED emitter or diode. LEDs require these electronics to function, and by pairing them with each LED you can cut the ribbon into shorter segments depending on your needs. These components are very low-profile allowing the ribbon to remain thin and lightweight.
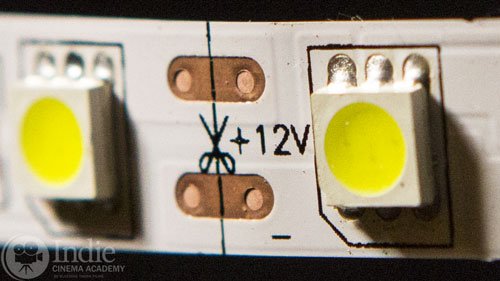
Since these electronics are right on the LED strip, the strip is relatively fragile when compared to a standard LED light. They don’t have a plastic or metal enclosure, and have no mount points. Many LED strips are not waterproof, while others are specifically waterproofed for use outdoors. All that being said, you don’t have to be super careful using them. I’ve bent mine all over the place and only have had one fail due to a connection within the ribbon breaking.
Another thing about ribbon lights is there no power source. One reason is that the power source depends on how many LED diodes you want to use for your light. The way you determine your power needs is by looking at the wattage per meter of your ribbon LED (such as 18 W/m), then calculating what amount of power you’ll need to light it. (Wattage equals volts multiplied by amps.) No worries if you accidentally don’t provide enough power; too little and it either won’t light up (or only some of the ribbon with light up) or it will flicker something fierce. If you find this happening, detach the power source and find something bigger. (Using a power source that is too small for any length of time could harm the power supply and/or the ribbon LED; short tests are fine, though.) Better to go with a power source with more amps than you need. As long as the voltage is correct (often 12V or 24 V), you are good to go.
Also make sure that the positive and negative terminals are connected correctly. Since both ends of the LED ribbon have terminals, it is easy to get them switched if it wasn’t for the plus and minus symbols (although they are awfully small, so I like to mark them with a paint pen).
LED ribbons do give off heat just like standard LED lights. This is normal. You will want to test each ribbon LED before attaching it to something to make sure whatever mounting material you use can handle the heat.
Like standard LEDs, many ribbon LEDs also have a hard time reproducing certain wavelengths and colors, especially the R9 value (saturated red) and the R12 value (saturated blue) of the Color Rendering Index (CRI). [For more on this check out our article “Is CRI Relevant In An LED World?”] This is especially true for ribbon LEDs since it isn’t possible to use the remote phosphor technique used in some standard LED light to improve color quality. Having a low R9 value is particularly concerning since this saturated hue is crucial for proper skin tones, as well as when imaging meat, fish, vegetables, and fruit. As we continue to build our database of LED lights, we are shocked at how low the R9 and R12 values of many higher end LEDs!
For this review we looked strictly at white lights, since this is the main light used for video projects. Additionally, evaluating CRI of LED lights that are designed to be colors other than white is a bit pointless.


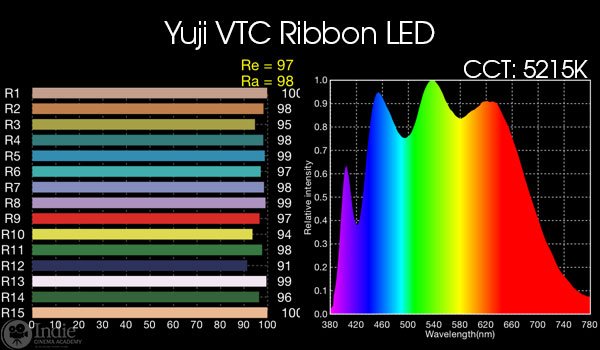
The Yuji VTC series creates the new standard for LEDs. We actually didn’t believe our readings so remeasured these LEDs in different environments with different color meters. Not only are the CRI values better than every LED we’ve tested (and we’ve tested dozens of top brands), but they’ve overcome some of the major issues of LED light. For one, the wavelength spectrum is much more smooth than any other LED in our database The blue spike around 460nm is smaller and more in line with the green and red levels with a much reduced valley around 500nm. This makes this daylight balanced LED the closest to real daylight than not only any other LED, but most other lighting technologies on the market. The R9 value (saturated red) is 97, and the R12 value (saturated blue) is an impressive 91, an accomplishment since LEDs have a VERY hard time with this color.
The Yuji VTC series have ribbon lights balanced to different correlated color temeratures (CCT): warm white (3200K), natural white (4000K), and two daylight whites (5000K and 5600K). We haven’t tested the 3200K and 4000K versions, but from the info on their website I wouldn’t be surprised if they are just as good.

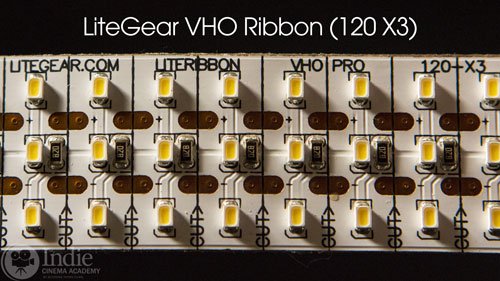
LiteGear’s VHO series of ribbon LEDs have very good CRI values, with the average at 96 and an extended CRI of 94. The R12 (saturated blue) value is fairly low at 68, but the more important R9 (saturated red) is 94.
These LEDs come in two densities along the length of the strip: 60 (low density) and 120 (high density). Within these two categories there are four options for how many diodes width the ribbon is: one row of diodes (called X1), two rows (X2), three rows (X3), or six rows (X6). As such these ribbon LEDs have the most configurations already built into the ribbon. The downside is that the ribbon widths are not standard, so you cannot use any third-party snap connectors to join them. Soldering wires to the terminals is your only option.


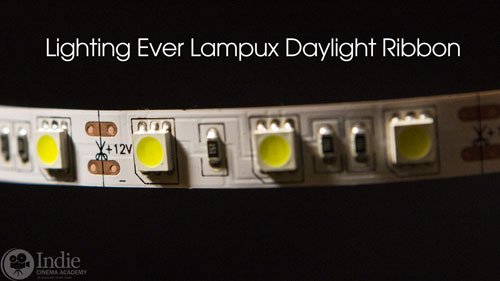
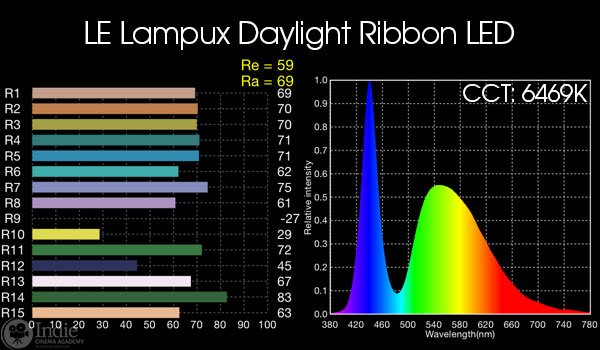
The LE Lampux LED Lights are some of the least expensive daylight balanced LEDs on the market, but also have some serious color rendering problems. (Yes the R9 value is negative, and yes this is possible.) With a CRI of under 70 and an extended CRI of under 60, this isn’t the light to get proper colors off of anything. However, before you dismiss them, realize that not all lights in your projects need to have high CRI values. Remember that low pressure sodium vapor lamps have a negative CRI rating (often reported as zero to simplify things). So for certain situations and effects lighting, having low CRI lights could be useful to give certain feels to your image. And with such a low price, they are great for those who want to experiment with ribbon LEDs.
There are hundreds of power supplies on the market that can run your ribbon LED lights. As long as they are 12V or 24V direct current (DC) (depending on what your specific ribbon requires) and have enough amperage for your LEDs, you are good to go. Some larger power supplies let you dial in the voltage, so you can give it a bit more umph if you need it to travel farther before it reaches the first LED. This is important because voltage decreases along wires depending on the gauge and type of wire. (See more later.) You should calculate all this out so that when the power finally reaches the first LED is arrives with close to 12V (or 24V if your ribbon requires that) as possible (a little more is okay). If your power supply is large enough, you can also put parallel branches at the beginning using “Y’s.” this is great if you want to take the ribbons in different directions or create a wider light.

The simplest power supply is the 12 volt 1 amp, which delivers 12 watts
. This works great for small stretches of ribbon LEDs, such as if you have small LEDs highlighting different areas of your background. These are inexpensive power supplies, and can be bought in multi-packs if you anticipate using LED ribbon lights throughout your set. They are relatively compact too, compared with many of the other power supplies.
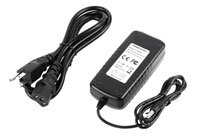
If you need to have longer stretches of ribbon LEDs or your lights require more power per meter, a more powerful option is the 12 volt 6 amp, which supplies 72 watts
. These are a little more expensive, but not much. It’s worth having at least one of these power supplies since they give you more flexibility, especially if you want to power a few runs of ribbon LED lights.
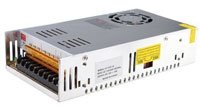
If you have some serious power needs and want to power multiple circuits, you can go with this beast: 12 volt 30 amps, which can deliver 360 watts
. Some things to note about this power supply: you need to wire in your own plug since it doesn’t come with one. (I just took an extra plug for a pc computer, cut off the end, and wired it in.) Another thing is that all of terminals on this power supply are exposed, so be very careful! Third, this power supply allows you to adjust the voltage. CHECK THE VOLTAGE BEFORE USING! When I received my power supply, it was factory set at around 13 volts which would have harmed my LEDs if I had wired them in without checking first.
With thin wires like those used with LEDs, voltage drop can be a big limiting factor. The longer the wire is, the more voltage drop occurs. With regular lights that have higher voltages and thicker wires, this drop isn’t very noticeable. However, since LEDs require exactly 12 volts to work and use thin wires, voltage drop can cause problems if you aren’t prepared for it.
Voltage drop is less in thicker wires than thinner wires, and less in copper than in aluminum. So one way to improve your odds is using thicker copper wire. In America the thickness of wire is measured in AWG (American wire gauge). Larger numbers equal thinner wire, so 18 AWG wire is thicker than 22 AWG wire. As an example of voltage drop: after 10 feet 12 volt power drops to 11.87 volts when using 18 AWG copper wire. If you instead were using 22 AWG aluminum wire, the voltage over that same 10 feet would drop to 11.49 volts.
Here is a voltage drop calculator to better determine wiring for your specific needs:
This voltage drop also happens within the ribbon LED, limiting how many you can string together. If you want longer distances, your options include powering them from the middle, having an amplifier at set distances to boost the power, or by having separate power supplies along the distance.
There are numerous accessories that are made specifically for ribbon LED lights, but here are a few that I think are a must to have:
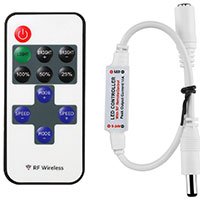
Whether you are using LED ribbon lights for a film set or your home, one accessories that I feel is required is the remote controlled dimmer.
And at $6, there really is no reason to not get one. And since LEDs can’t be dimmed the same way incandescent lights are dimmed, you can’t use a standard dimmer on LEDs. (Incandescent bulbs are dimmed by decreasing the voltage to them. Since LEDs require constant voltage, they can’t be dimmed this way.)
As the name implies, it allows you to not only dim the LEDs to the intensity that you need, but it lets you do it remotely. And if you suddenly want to have a dance party on set, there are multiple modes built into the remote to make the LEDs flash and strobe different ways and at different speeds.

If you need to make one ribbon LED stretch longer than your power supply or voltage drop will allow, you can easily insert a power amplifier
into the ribbon LED. There are a few different types of amplifiers, but this one is the simplest and smallest. They also make amplifiers for Red/Green/Blue (RGB) LED Ribbons.
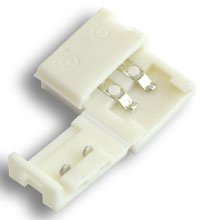
There are different types of connectors depending on your needs. Many are snap-on so you don’t need to solder anything, making it quick and easy to modify your LED ribbon.
The simplest is the 2-pin end-to-end connector, which allows you to butt two ribbon lights together. The ribbon LED easily slides under the contacts, and the the connector snaps shut to lock it into place. Just make sure the polarity of the ribbon LED matches the label on the connector. As mentioned before, make sure you get the right width connector, often 8mm or 10mm
.

The next type of connector allows you to create 90 degree elbows with your ribbon LEDs, such as when you are wanting to create a rectangular light or put the ribbon LED around the border of something. These are simply two end-to-end connectors with a L-shaped circuit board connecting them. Some L-connectors come with the 2-pin end-to-end connectors, while others require you to buy the end-to-end connectors separately. These also come in 8mm
and 10mm
.

Another type of connector that allows for more flexibility is the wired snap-on connector. These consist of two end-to-end connectors with wires already soldered to them. Within the end-to-end connection is a different type of connector so that a wire can solidly be attached, so they can’t necessarily be switched with true end-to-end connectors. These also come in 8mm
and 10mm
.

Getting some wire specifically for your LEDs give you latitude on where you place the ribbon LEDs if you are not running them off of a battery. As mentioned above, there is a voltage drop depending on the thickness of the wire and what metal makes up the conductor. So keep this in mind when purchasing your wire. Getting 18 AWG copper wire might be more expensive, but it also has less voltage drop than 20 AWG copper or 18 AWG aluminum wire.
Also, like with most online purchases, wire on places like Amazon is sometimes mislabeled. I purchased this wire that claimed to be 20AWG copper, and it ended up being 22AWG aluminum. Since it is a cheap price, I can make it work. I just make sure to not do long stretches before the first LED diode.
Using LED ribbon lights for the first time might be intimidating for some, especially those who haven’t worked with electronics and solder before. But I highly recommend taking the leap. The components are very low cost, there is very little technical knowledge required, and the benefits on-set can be huge no matter the budgets of your productions. If you make a few mistakes when building your first light it might cost you a dollar or two, unlike working with standard LED lights that cost hundreds and often thousands of dollars. Plus, the new skills you’ll learn will help you in other areas too.
 https://indiecinemaacademy.com/wp-content/uploads/2015/11/AlexaEpicBlackmagic-web.jpg
211
800
Ryan E. Walters
https://indiecinemaacademy.com/wp-content/uploads/2013/12/Indie_cinema_Logo_2color-MF-300x116-web.png
Ryan E. Walters2015-11-04 17:53:112018-01-25 10:53:37The Problem With The Digital Camera Look & My Solutions To Correcting It
 https://indiecinemaacademy.com/wp-content/uploads/2015/10/Thumbnail-EasyDay-01-web.jpg
337
800
Ryan E. Walters
https://indiecinemaacademy.com/wp-content/uploads/2013/12/Indie_cinema_Logo_2color-MF-300x116-web.png
Ryan E. Walters2015-10-14 00:15:332018-01-25 10:49:33Three Lighting Tips For Your Next Action Film
 https://indiecinemaacademy.com/wp-content/uploads/2015/09/LC115_12Questions-Thumbnail-Free-Web.jpg
450
800
Ryan E. Walters
https://indiecinemaacademy.com/wp-content/uploads/2013/12/Indie_cinema_Logo_2color-MF-300x116-web.png
Ryan E. Walters2015-09-07 00:30:532015-10-30 19:06:3612 Crucial Questions To Ask Before You Light Your Set (Cinematic Lighting Lesson 15)
 https://indiecinemaacademy.com/wp-content/uploads/2015/08/LC114-3StrLightingNghtExt-Thumbnail.jpg
450
800
Ryan E. Walters
https://indiecinemaacademy.com/wp-content/uploads/2013/12/Indie_cinema_Logo_2color-MF-300x116-web.png
Ryan E. Walters2015-08-24 00:30:112015-10-30 18:55:173 Strategies for Lighting Your Night Exteriors (Cinematic Lighting Lesson 14)
 https://indiecinemaacademy.com/wp-content/uploads/2015/08/LC112_5SratDayExt-Thumbnail-800x450-jpg-web.jpeg
450
800
Ryan E. Walters
https://indiecinemaacademy.com/wp-content/uploads/2013/12/Indie_cinema_Logo_2color-MF-300x116-web.png
Ryan E. Walters2015-08-10 00:15:422015-10-30 18:54:545 Essential Strategies To Lighting Day Exteriors (Cinematic Lighting Lesson 12)
 https://indiecinemaacademy.com/wp-content/uploads/2015/07/LC113-10TricksDayExt-Thumbnail-800x450-web-.jpg
450
800
Ryan E. Walters
https://indiecinemaacademy.com/wp-content/uploads/2013/12/Indie_cinema_Logo_2color-MF-300x116-web.png
Ryan E. Walters2015-07-27 00:15:252015-10-30 18:55:0310 Tips To Lighting Day Exteriors (Cinematic Lighting Lesson 13)
 https://indiecinemaacademy.com/wp-content/uploads/2015/07/LC123_SmallCommercial-thumbnail-800X450.jpg
450
800
Ryan E. Walters
https://indiecinemaacademy.com/wp-content/uploads/2013/12/Indie_cinema_Logo_2color-MF-300x116-web.png
Ryan E. Walters2015-07-13 14:24:582015-10-30 19:19:44How To Light A Small Commercial (Cinematic Lighting Lesson 23)
 https://indiecinemaacademy.com/wp-content/uploads/2015/07/AR015_LEDRuinProduction-Thumbnail-Web.jpg
450
800
Ryan E. Walters
https://indiecinemaacademy.com/wp-content/uploads/2013/12/Indie_cinema_Logo_2color-MF-300x116-web.png
Ryan E. Walters2015-07-06 01:00:122018-01-25 10:49:13Are LEDs Ruining Your Projects? [VIDEO]
 https://indiecinemaacademy.com/wp-content/uploads/2015/06/LC126_LightingShortFilm-Thumbnail-Web.jpg
450
800
Ryan E. Walters
https://indiecinemaacademy.com/wp-content/uploads/2013/12/Indie_cinema_Logo_2color-MF-300x116-web.png
Ryan E. Walters2015-06-15 12:00:042016-10-10 07:59:55How To Light A Narrative (Cinematic Lighting Lesson 26)
https://indiecinemaacademy.com/wp-content/uploads/2015/06/LC126_LightingShortFilm-Thumbnail-Web.jpg
450
800
Ryan E. Walters
https://indiecinemaacademy.com/wp-content/uploads/2013/12/Indie_cinema_Logo_2color-MF-300x116-web.png
Ryan E. Walters2015-06-15 12:00:042016-10-10 07:59:55How To Light A Narrative (Cinematic Lighting Lesson 26)You must be logged in to post a comment.
This site uses Akismet to reduce spam. Learn how your comment data is processed.
This site uses cookies. By continuing to browse the site, you are agreeing to our use of cookies.
AcceptHide notification onlySettingsWe may request cookies to be set on your device. We use cookies to let us know when you visit our websites, how you interact with us, to enrich your user experience, and to customize your relationship with our website.
Click on the different category headings to find out more. You can also change some of your preferences. Note that blocking some types of cookies may impact your experience on our websites and the services we are able to offer.
These cookies are strictly necessary to provide you with services available through our website and to use some of its features.
Because these cookies are strictly necessary to deliver the website, refusing them will have impact how our site functions. You always can block or delete cookies by changing your browser settings and force blocking all cookies on this website. But this will always prompt you to accept/refuse cookies when revisiting our site.
We fully respect if you want to refuse cookies but to avoid asking you again and again kindly allow us to store a cookie for that. You are free to opt out any time or opt in for other cookies to get a better experience. If you refuse cookies we will remove all set cookies in our domain.
We provide you with a list of stored cookies on your computer in our domain so you can check what we stored. Due to security reasons we are not able to show or modify cookies from other domains. You can check these in your browser security settings.
We also use different external services like Google Webfonts, Google Maps, and external Video providers. Since these providers may collect personal data like your IP address we allow you to block them here. Please be aware that this might heavily reduce the functionality and appearance of our site. Changes will take effect once you reload the page.
Google Webfont Settings:
Google Map Settings:
Google reCaptcha Settings:
Vimeo and Youtube video embeds:
You can read about our cookies and privacy settings in detail on our Privacy Policy Page.
Privacy Policy
Great article Tim. Thanks for putting this together! It’s really timely because I was looking to build some custom lights and was looking into LED options. There’s so many options out there and the few I have used (tried to use) to date have caused flicker issues. When I’ve been forced to use them on jobs, I’ve had to compensate by using odd shutter speeds and I really don’t like doing that.
My main question is about flicker. Does the Yuji VTC flicker at all at 24 fps, 30 fps, 40fps, 60 fps, etc? If they don’t that would be incredible.
Thanks!
–Matt
Thanks!
I have not noticed flicker in the Yuji VTC ribbons that we have, but I also have not yet put them into full production. Your question is good; my next set of tests are to look at that very thing. This is what I know about LEDs in general when it comes to dimming LEDs (which indirectly applies to your flicker question):
1) The only way to dim an LED is by purposely making them flicker, although at high frequencies. This is because LEDs run at a set voltage, and the way the diodes work is that they are either on or off. I am going to run tests using two types of dimmers on the ribbon lights in this article to see if there are any levels that introduce flicker at common frame rates.
2) We did test a few brands of LEDs during our high speed series (note: we didn’t show the tests in those lessons) and we never saw flickering issues at the high frame rates. That says a lot. However, I don’t think we were running them at a dimmed level, so I don’t know how much that would factor in.
Cool man, thanks for the info! I think I should test these things out.
–Matt
Does the remote dimmer that you linked regulate voltage without considerable flicker? Most cheap dimmers I’ve seen aren’t reliable for this reason.
Dimmers for LEDs don’t regulate the voltage. Instead they induce high frequency flicker into the LED, done at a rate that it not perceptible. This is because LED diodes can only be either on or off.
To my eye I haven’t noticed any flicker. One place I use the dimmer is to some LED ribbon on the back of my plasma television, set at the lowest setting. If anything will cause flicker it’s using it at the lowest setting, yet no flicker. Additionally I’ve used the dimmer for one video project filmed at 24 fps, without flicker. I still need to go through all of the lighting levels at various frame rates to confirm that this dimmer doesn’t cause any problems on set, but at this point I am very impressed with it.
What about constant current drivers, that can alter the dc voltage? You can actually dim a LED altering the voltage across them. This very fine adjustment will result in a current change, and the maximum current IC of the driver will ensure that a too high voltage will not result in disaster by overdriving the leds?
From experience I know that not delivering enough voltage will cause an LED to dim. However this method won’t work if you are lighting more than one diode since other LEDs will not receive enough voltage to even turn on. Remember that just running current through a thin wire decreases the voltage as the distance increases (“voltage drop”), not to mention issues with components being in series or parallel.
In talking to many manufacturers, they all mentioned that voltage needs to be constant due to the nature of LEDs, and so dimming is done through high frequency flicker. If you can find a source that says otherwise, please post a link here! I’d love to here how manufacturers use those methods.
I think the voltage on multiple LEDs will actually spread evenly across the leds if you underpower them. So it should work for more than one diode.
Watch this COB test video:
https://www.youtube.com/watch?v=NjKgPLeJ79Q
You can easily see two parallel strings of 10 LEDs in series. It both works for parallel and serie diodes so it seems?
Great video!
The specifics of LED circuitry is not my specialty, so there could be a way to dim the LEDs the way you’ve described. One problem with comparing this LED with a ribbon light is there is effectively no distance between the diodes, so no voltage drop solely from distance along a wire. Also it is mainly wired in series, while ribbon lights are mainly in parallel. Also, ribbon lights are designed for a specific voltage, and have resisters on the ribbon to take just a little of the voltage from the main feed. (Each LED diode in a ribbon light can be powered with much less when you bypass the resistor, which I’ve done when testing individual diodes on a ribbon light.) However, if the minimum voltage isn’t supplied to the main feed, the resisters stop the LED from lighting. (I once didn’t supply enough amperage, and the ribbon light started to flash most likely due to the capacitors within power supply inverter building up just enough charge to light the LEDs briefly before getting drained.)
In your example video, the reason the diodes on the bad LED don’t light evenly is that each diode either requires a slightly different voltage or the circuitry between the diodes wasn’t allowing adequate voltage to reach each diode. Once ample voltage was flowing through the chip, those diodes started to light up. This demonstrates how LEDs are very specific in what type of power they get.
Anyway, thanks for the video. You might be on to something, so you should continue to explore this as an option to dimming LEDs.
Tim, there are several ways of dimming LEDs. Switching them on and off quickly (PWM) is just one way. There are also dimming constant current power supplies, and dimming constant voltage power supplies. LEDs don’t have a set voltage. They have a characteristic curve of current vs. voltage. Power the LED at a different voltage and it draws a different current. Mean Well, for example, makes LED power supplies that can operate in constant voltage mode or constant current mode, and dim in constant current mode in response to an external signal or potentiometer.
Good to know! Thanks for sharing!
Hey Tim and All,
I wanted to share a resent experience, while using Litegear’s VHO ribbon LED’s. I had run out of Litegear dimmers and needed to set one more LED fixture. I had a pwm http://www.amazon.com/Dimming-Controller-Adjustable-Brightness-Zitrades/dp/B007V1B0W8 dimmer available so I used it. Our Sony camera had a 2000 iso so all our fixtures were dimmed to about 5%. The pmw dimmer was a disaster! At such a low percentage there was obvious “phasing” going on. At 5% it was visible to the naked eye. Between 5% and 60% it was visible to the camera. So be very careful with pwm or triac dimmers for LED’s. Always test before you shoot!
Thank you James for this valuable info. I actually bought the PWM dimmer along with some others, but haven’t had a chance to test it out yet. Good to know that it won’t be useable at the lower settings.
For what it’s worth; color was very stable from 0 to 100 with the PWM dimmers. As a bit of a side note, as Much as I like Al DeMayo at Litegear I hate paying his prices! I’m on a world wide search for DIY LED fixture system. Maybe you could start a thread on the topic.
Great article, Tim. I have been considering ribbon LEDs as a replacement for T8 fluorescent tubes ever since I saw your test data on Light Gear products. Any suggestions on how you could permanently wire a ribbon to an AC source that could be connected turned on with a conventional light switch? I’m also interested in having a daylight color temperature for daytime and something warmer for the evening.
All LED ribbons require a power supply to transform the AC in the wall to DC at a much lower voltage, either 12 V or 24 V depending on your ribbon light. I guess one option would be to buy a socket to outlet adapter and then plug your power supply into that. Another option, which I use at home, is to use a LED ribbon dimmer and then control it with the remote. (I have a ribbon light taped to the back of my plasma television to light up the wall behind the tv.)
As for having a ribbon that lets you switch from daylight to tungsten balanced, LiteGear offers hybrid ribbons; other companies offer hybrids as well. For these hybrid LED ribbons you will need to get a different remote dimmer to control them. I have not tested this out yet, but here is a dimmer that also controls color temperature. If you go this route, let me know how it works out for you.
For those of us who don’t have the cash yet to buy ready made LED panels, would building our own using these ribbons be a reasonable use of time? Or do the panel manufacturers have a special sauce that we don’t know about?
Thanks!
Very good question. Part of the answer involves how much time and skill does a person have when it comes to building electronic equipment. There is some basic knowledge required, enough to figure out voltage, amps, and wattages. Also there might be soldering involved, but not always. Also, LED ribbon lights with high color quality are not cheap, and after you’re done building your light with these high CRI LEDs you may have only saved 20% from an equally good panel light. My go-to recommendation when cost is a factor is the Aputure Amaran. It is a REALLY good light for the price, and has CRI values much higher than lights four times more expensive. There is no way you can build a comparable light with ribbon lights and still beat this price by more than 20%. You can check our our review of three models of Aputure lights.
A benefit of buying from a panel manufacturer is that everything is put together in a housing that will protect the wires and diodes, along with all the LED diodes are pointing in exactly the same direction. That being said, there are many instances when you only want a very small light, or a light in a strange shape. This is where ribbon lights are a must.
(Disclaimer: We do not make money off suggesting any specific brand or product–including Aputure–other than sometimes getting a small commission from Amazon or B&H Photo, if they happen to provide that product. However this commission is equal for all brands, and it does not sway our recommendations at all. We use these commissions to help recoup some of our costs of testing products and doing reviews.)
Im a bit new to LED CRI ratings and i was wondering why evaluating CRI of LED lights that are designed to be colors other than white is pointless? I just made my own lights using Marswell 80+ CRI LEDs in 4000k and 5600k and made two Bi-Color panels spending about $270 in total including supplies. I did this just to see if i could and because i stumbled upon a Youtube video showing how to do it (https://www.youtube.com/watch?v=qlMtakaa7u8). I wanted lights for photography and for film and also to be portable. My next plan is to do the exact same thing with the Yugi lights and make another 2 panel lights as well as a direction light with a lens(https://www.youtube.com/watch?v=kh9j5mDU_hA). But depending on your response about my previous question i may not do Bi-Color, if its pointless to do so. I thought doing Bi color would make it easier to match the color temp of the location you are in and allow the use of practicals.
CRI is one color standard currently used to measure color quality, but it assumes that the light being measured is white (or at least attempting to be white 😉 ). In fact all of the color standards — TLCI, CQS, TM-20-15 — all assume the light being measured is white. This is because each color standard is comparing the spectrum of the light being tested to a standard spectrum of a white light at that same correlated color temperature (CCT). We discuss this in much more detail in our article “Understanding the Complete LED Database: Testing Procedures,” which explains our current LED database.
It sounds like you are working with white LEDs since CCT only makes sense with white light. Remember, 4000K and 5600K are both white lights, with the 5600K daylight balanced, and the 4000K right between tungsten balanced and daylight balanced.
Great job at building your own lights! The videos you linked to are great. I always encourage filmmakers to try building some of their gear, even if they completely fail doing it, since it teaches the filmmaker a lot about how the gear works, how to troubleshoot and fix it, and perhaps even how to tweak it to make it work better for your needs.
Bi-color lights are very useful for what you are trying to do: match the color temp of your location. So I’d say go for it. Yuji makes outstanding lights, and has both ribbon lights and COB lights (chip on board). Check out our analysis of the Yuji BC series bicolor, where we break down the color quality across the entire CCT range. It should answer most of your questions. Let us know if you still don’t understand something and we’ll do our best to fill in those gaps.
Thank you for getting back to me. The only thing i i need clearing up is how to measure the quality of RGB LEDs. If i were to make my own RGB lights using RGB strips (so that i wouldn’t have to gel my lights) how would i know the quality of the light? Would i just set the lights to different white color temps and measure that instead of the colors?
I knew about the amazing 98 CRI Yuji VTC Series LEDs before I stumbled upon your site and your reviews of them made it easier to decide to use them for my next higher quality light build! With Yuji LEDs I’m noticing a savings of 25-65% compared to the name brand lights and the Yuji light will be 1-2% better quality based on CRI. I just haven’t ben able to decid if i want to make these BiColor as well since i prefer the look more of the daylight balanced LEDs. The best part is No warranty needed because i’ll fix it myself, i built it. Which also means i’m free to do any and all modification to the light to best suit my needs, unlike the name brands!
Here is a link to a picture i took of one of the nearly finished panels using the 80 CRI LEDs: https://www.instagram.com/p/BLpPvz8h0jz/?taken-by=ojofilms Thanks for taking the time to answer me and to make such an informative and detailed site, most people these days buy only based on what their friends or “influencers” buy. But i prefer to have the knowledge as well to able to make better informed decisions, ill be sure to mention you guys when i start my YouTube channel!
Measuring the color quality is pretty easy with the right equipment. We use the Sekonic C700 and Asensetek Lighting Passport to measure lights. There really are only two other color meters on the market that I’ve heard DPs use, however I haven’t heard good things about them so I won’t mention them. (Scientists also have research spectrometers, but those are even more expensive and not portable.)
I’d recommend talking to other filmmakers in your area to see if anyone will let you borrow/rent their color meter for a day. (People are always borrowing ours.)
Creating LED white light with bicolor emitters vs. RGB emitters uses a slightly different method. For each emitter for bicolor lights (tungsten and daylight balanced), the phosphor blend is tweaked to create the necessary type of white, and includes phosphors that create many different colors. However with RGB, there aren’t any intermediate colors mixed in so the spectrum is a bit more spikey. As a result pastel colors don’t render as well. With “white” phosphor based LEDs, the phosphor blend softens the spectral curves. The more expensive LEDs do a great job of removing a lot of the major peaks and valleys.
Looking at our LED Database, it is easy to pick out the RGB LEDs from the phosphor-based LEDs: look for the RGB spikes. Here are some examples (there aren’t many RGB white lights currently on the market, since the electronics are tricky):
* Creamsource Sky
* ARRI L5-C
* ARRI S60-C
* Coemar Softlight
Which brings up the next issue: to successfully mix RGB into high color quality versions of white (from 3000 K to 6500 K), you will need to ACCURATELY dial in each color. This is where the tricky electronics come in, since each version of white will need different amounts of the RGB emitters. The goal is to match the spectral curve for each correlated color temperature, such as the tungsten spectral curve and daylight spectral curve at the top of this article. To reduce the valleys between the red, green, and blue spikes you could try mixing in some white LEDs (not sure how well this will work, but I’ve seen brand name lights do this).
Have you guys seen these yet?
http://kamerar.com/collections/camera-accessories/products/kamerar-brightcast-v15-345-with-ac-adapter.
Yes, we tested the BrightCast LEDs last April. We included them in our LED database under the name BrightCast. Not sure their relationship with Kamerar. Anyway, the color quality is VERY good.
Correction: LEDs don’t require constant voltage. That’s just one way of powering them.
It depends. LEDs circuitry is either constant-voltage or constant-current. They are not interchangeable. The label will say which it is. If it doesn’t say it, then look to see if either the voltage or amperage requirements are given as a range, such as 12-14V, or 0.5-1A. If you see a range, then the other needs to be constant. So constant-voltage will have a range for current, and constant-current will have a range for voltage.