Introduction:
In Part One and Two of this look at Red’s Dragon sensor we explored the dynamic range, latitude, diffusion filters and the IR issues of the new sensor and how it stacks up against the old MX sensor. In this final installment we’ll be taking a closer look at low light, color, compression, and fill ratios. And at the end of this video, I’m going to wrap up this entire series by sharing my recommendations for you on how to get the most out of either sensor.
As with the rest of this series, I am only going to cover the highlights that you need to know in this video. If you want to pixel peep and look at every single frame we shot, they are available for download in all of their 6k & 5k goodness below this video.
Color:
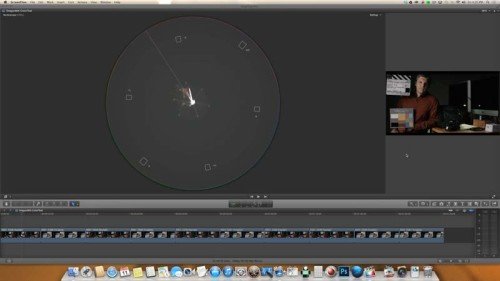
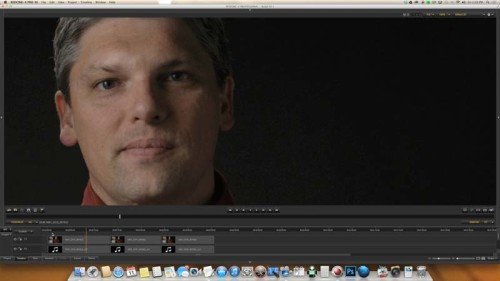
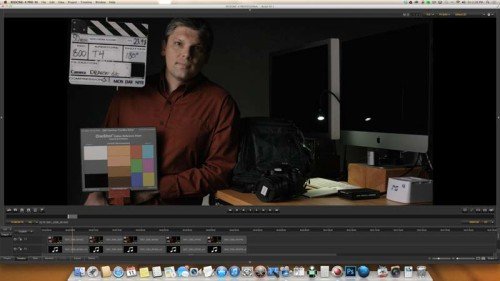
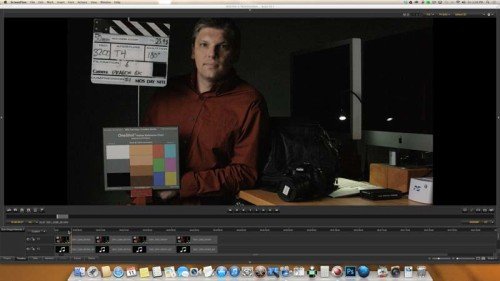
I’ve got these clips loaded up in Final Cut X here. And before we get started, just a quick note about what is going on with these frames. So I took each of these frames and I blew them up so that you just see this chart here. So I have the daylight scene, and then we’ve got this tungsten scene here. So I blew them up and now we see that. (Just the chart).
As we look at these frames you’ll want to pay attention to this white center dot, as well as to the orientation to the rest of these dots. That is where you are going to see the differences between these two frames. This white dot represents the white gray, and black, and then obviously all of these colors represent the colors on this chart. And they should be headed towards their intended vector. Ro Red should go towards red. Skin tones, which are all of these guys, should be lining up on this vector here. The white dot, should be here in the center. So that is a quick run down of how to read this vectorscope.
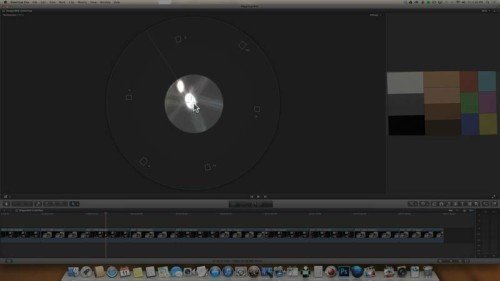
Taking a look at this daylight verses tungsten, with the Dragon… oh, before I get started, you might want to know what color and gamma space I am in. So with the Dragon, I am taking a look at this in DragonColor and RedGamma 4. With the MX, I’m taking a look at RedColor 3 and RedGamma 4. The reason for the change in color space, is because DragonColor is obviously for the Dragon, and RedColor 3 is the last version of RedColor which was for the MX. So that’s why I chose those.

Okay, so on to the rest of the results. We have daylight and tungsten. As I flip between these two, there isn’t an epic change going on, sorry about that pun, but there is a bit of a change. As we jump over to the MX, we will see a bigger change going on then we see here. So we have our daylight, and tungsten. Daylight and tungsten. So our skin tones are becoming a little less saturated and they are moving a bit further away from our line here in tungsten. Not a huge amount, but a little bit. The thing that is going on, is that our green dot and cyan dot are bouncing a bit away from the intended vectors that they should be on under tungsten than in daylight. Really that’s the biggest difference there is in the cyan and green channels, and then with the skin tones- they all tend to move away. So there is some difference, but it is minor, not a huge difference between tungsten and daylight when it comes to the Dragon.

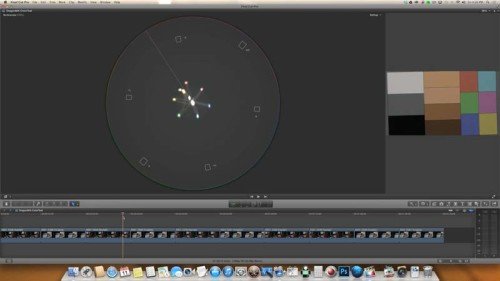
Moving on to the Epic MX, this is where we are going to see a bigger shift. So we have daylight, and tungsten, daylight, and tungsten. So as far as the bigger shift goes, notice how everything jumps over towards magenta, and kind of the blue, everything goes right. So the entire vectorscope just all jumps. That jump towards magenta is part of the reason why I think that there is this “red look” and it becomes fairly easy to see when something was shot on the Red, or at least with the Red MX anyway. It has to do a little bit with this color shift that is going on right there. At least that is part of the reason.
We can see our dots here are all shifting more towards magenta, our skin tones are fairly close to the line. And actually that shift towards magenta is actually bringing some of those skin tone dots a little bit closer. So that kind of helps out with the skin tone there, but it does make a shift towards magenta which I don’t particularly like. But that is what is going on with the MX sensor.
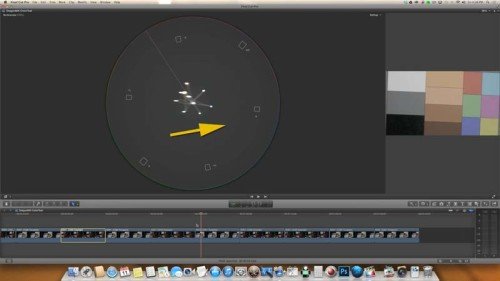
So let’s compare the two sensors together. And now we’ve got the Dragon in daylight, and then the MX in daylight. Both of these seem to be fairly accurate as I jump back and fourth. Dragon, MX. The first thing that immediately jumps out to me is the Dragon is a lot more saturated. So not only are these colors brighter here, but they are further out on their vector, which means they are more saturated. And the other thing that stands out are all of these skin tones. Take a look at that. So Dragon, MX, Dragon, MX. On the Dragon, all of the skin tone patches are closer to the vector, so it means the skin tones are more accurate in the Dragon than they are in the MX. So that’s a huge win, at least in my book. Because I want people to look their best, and I want skin tones to look accurate. So the more I can have these line up along that vector, the better.

Let’s jump on over to tungsten. And now I’ll flip back and forth. Dragon, MX, Dragon, MX, Dragon, MX. And as we take a look at that, again we see this magenta shift in the MX footage so everything jumps over towards magenta, and stays fairly neutral in the Dragon. Of course there is a bit of a shift going on towards yellow and a little bit towards green. This ideally should be centered up. It’s not, but it is fairly close. And on the MX it is now shifted towards blue / magenta. If you are having a hard time seeing that here in this vectorscope, take a look at this gray patch here as I flip back and forth. You can also see it in the white patch too. As I flip back and forth those patches become more magenta. And in the Dragon footage it is more yellow. So magenta and yellow. Magenta and yellow. If I have to choose one, I definitely want to go with the Dragon. These skin tones and everything being juts a touch more yellow is a lot more acceptable to me because that is closer to skin tone magenta. I don’t like purple people. Purple people eaters are bad. So the Dragon definitely has better skin tone rendition especially in tungsten light.

And speaking of recommendations, when it comes to shooting with either of these sensors I highly recommend shooting in daylight if you want to get the best results from either of these chips. Of course we were not seeing anything egregious in tungsten, so if you use RedGamma 4, you’ll be fine in either daylight or tungsten. But if you want the most pristine image, and the most accurate image, then shoot in daylight.
When it comes to skin tones, and the most accurate colors, then you’ll definitely want to go with the Dragon. The Dragon was performing a lot better with skin tones and also with the direction that the vectors were going with each particular color. And if you are shooting under tungsten light with the MX, then you’ll want to pay attention to that magenta shift that was going on, and you’ll want to adjust for that in the grade.
Oh, and when it comes to RedGamma 4, I think that is a great starting place for either of these sensors, for the Dragon or the MX. RedGamma4 is a great place to start your grade. Of course it’s not giving you all the information like RedLogFilm will, but if you are looking for a quick and easy place to start to grade your footage, then start with RedGamma 4 and you’ll be in a good starting ballpark to finesse your grade from there. If you want more information and you don’t want a look built in, of course go with RedLogFilm.
Fill Ratios:

Before we get started here, I just want to go over quickly fill ratios in case your not familiar with them. Anything form like a 2:1 to a 3:1 is pretty typical for what you’ll see on sitcoms. It’s pretty brightly lit. There is a little bit of modeling, but it is not completely flat. So that’s what you are used to seeing if you are watching your traditional sitcom. From 4:1 – 8:1 is a lot more moody and cinematic or dramatic looking. It’s typically where I like to live in my key to fill ratios. Somewhere on the more moody side. It tends to model the face a little bit more. Anything over an 8:1 is really ballsy and really gutsy, at least when it comes to lighting for film.
Today with our digital cameras, our digital cameras see a lot more into the shadows than film does. And that is true with the MX and the Dragon. Both of those sensors do a great job all the way up to 8:1, so I’m not going to both taking a look at any of those previous key to fill ratios. If you want to download the footage and play with them yourselves, feel free to have at it. But anything to 8:1 is completely safe and fine. We are going to have some fun by taking a look at the extremes.
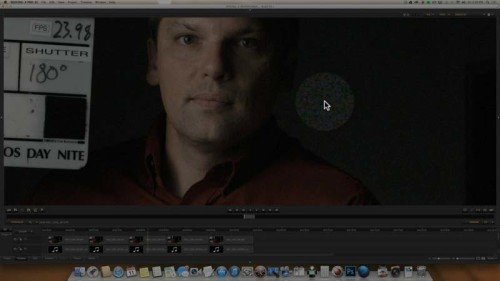
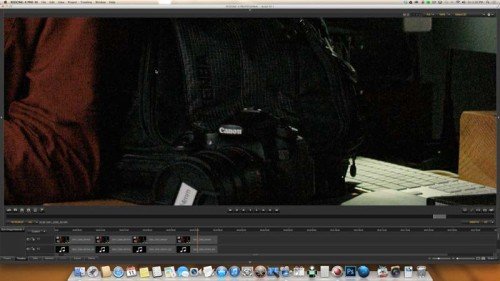
So I’ll load up RedCine-X here and we’ll start with 11:1. As we take a look at this, our key is at a 4 our fill is at 1 and a 1/2, which is 11:1. And now we will zoom in so we can see really what is going on here. As we take a look at this, pay attention to Tim’s nose, around the cheek area, the side of the face, that is where you will be able to see the biggest difference going on.

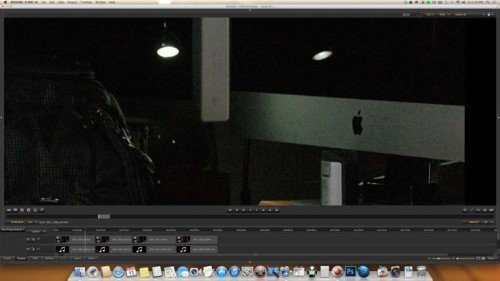
So at 11:1 everything looks totally acceptable, again, I’ll try to play a little bit of the footage back, it is a little taxing on my system trying to play and record. So, anyway, not a lot of crawlies, so everything looks fine. And by crawlies, I mean noise. And we’ll jump over to 16:1. So now we’re at 16:1, and for me, personally, I would stay away from 16:1. I’ll play this back here. So we can see the noise actually moving around, and not looking all that great to my eye. I prefer to stay away from this level, so 16:1, in my imagery. Now we are at a 23:1. So 23:1, I’d actually use this. So lets play this back. So a lot of that noise, or crawling around gets hidden in the darker shadow regions because it’s more contrasty than the image was before. So here is the 16:1, which shows more detail, and now here is the 23:1. So if I was going to guts with my key to fill ratios on the Dragon, skip over anything in-between 11:1 – 23:1. On either side of that, it’s totally usable and fine.
Let’s see what is happening with the MX. So now we are back at the 11:1 ratio. Again, everything looks nice and clean. Everything looks good. Not surprised about that. And now we are on to our 16:1. And I’ll play some of this back. And this actually looks cleaner, there is less noise going on here in the MX sensor, than in the Dragon. So I would actually use 16:1, or anything in-between 11:1 and 23:1 if I was shooting on the MX. 23:1, let’s check that just to see how this is looking. Which all looks great. I’ll play a little bit of the footage back, and yeah, totally acceptable.

So when it comes to my recommendations with the MX or with the Dragon sensor, go ahead and use any of the traditional contrast ratios. If you are going to be more ballsy, and a little bit more gutsy with extreme ratios, and you are shooting on the Dragon, I’d avoid ratios in-between 11:1 and 23:1. As long as you stay on either side of that you’ll have some great looking imagery. If you are in-between that, just be aware that there could be some additional noise in the shadow area.
Low Light:
Alright so I’ve got the clips loaded up here in RedCine-X, and just a quick note about what I did. Is that I lit this scene to a T4 at ISO 800, cryptic I know. And then what I did is I added ND filtration to each exposure and compensated with the ISO. That way the lighting stays consistent, and the camera actually sees less light and it simulates a low light shooting environment.

Anyway, let’s jump on in and see this at 100 percent. There we go. And so we’re at ISO 800 on the Dragon, and just taking a look here everything looks nice and clean as it should. Nothing to objectionable going on, which we really shouldn’t. So at 1600 we start to see a little bit of noise here, over here, down here on the shirt. So there is just a tad bit of noise going on. You can see a little bit of this red noise going on here. Nothing objectionable, I’d totally use this, not a big deal.
And now 3200, this has jumped to the place where it is objectionable for me. I would not use this. You’d have to hold a gun to my head and say “USE IT!”. So, yeah, too much red stuff going on, it’s just to grainy, it doesn’t really fit the aesthetic that I like. I’m going to try and play this back, I’m recording at the same time, so I don’t really know how well that will work. But just watch the image as it crawls around. Here we go. So the whole thing really crawls around and it doesn’t look good, at least not to my eye. You might be able to salvage this. Maybe through like Neat Video, or some other clean up algorithm, maybe in Resolve. So you potentially could get a usable image out of this, but it is really pushing the limits.

Just for grins and giggles, let’s go over to 6400. This is now just all kinds of awful. We’ve got red noise everywhere. And it just doesn’t look good. I do know that Red is working on a new firmware, that’s supposed to help with this problem. So we’ll see what that does, when it comes out. But as of right now, until a new firmware is out, it’s definitely not a good thing on this camera. And for more gins and giggles, here is the 12,800 ISO. So that’s definitely not usable. That’s all kinds of ugly.

Let’s go over to the MX. So jumping over to the MX. We are now at 800. Everything looks great as it should. Nice and clean, totally usable. Jumping over to 1600. This does look cleaner than Epic Dragon does, however, both 1600 on both sensors is totally usable and fine. Nothing bad going on here.
And now we are at 3200. 3200 does look a little bit better to my eye on the MX than it did on the Dragon. In both situations, I would still not use this. You’d literally have to hold a gun to my head. The image just crawls around, and I don’t like that, that’s distracting to my eye. So I would prefer to not use either sensor at 3200. But the MX does seem to be a little bit cleaner there.
Now we are jumping to 6400, and definitely not clean enough for anything I think. I might be able to clean up that 3200 ISO image, but at 6400 there is just way to much going on here. And for grins and giggles, let’s check out 12,800. Yeah, 12,800 is just not acceptable at all. Just way to much craziness going on. So that is what is going on as far as low light shooting is concerned with the MX and the Dragon.

As far as actually recommendations go, if you want a low light camera, really look somewhere else. check out the Sony F5, F55, or the A7s or check out anything from the Canon C-Series. Both Sony & Canon have done a great job at producing cameras that do really well in low light. you wouldn’t be seeing these noise issues on either sets of those cameras. And I really don’t think that the Red Epic, the MX or the Dragon is ever going to be a low light monster. There are just way to many pixels crammed into a tiny space to really make that feasible. That’s not where these cameras shine. They shine in other areas, just not low light.
So you can push these cameras up to 1600 to 2000, maybe even 3200, if you are a little bit more tolerant of all those little crawlies, of all that noise going on. But really that is probably going to be the upper limit, which is 3200. So if you need something more sensitive than that, just look else where.
Compression:

Before we get started here, I just wanted to mention a couple of things I noticed through out this entire shoot. The first thing that I noticed is that the Dragon requires a lot more storage space than MX does. We shot on 128GB cards for both cameras, and with the Dragon it got almost completely filled up, while the MX was only about half way. And both cameras were shot at a 5:1 compression ratio. So there is a lot more data going through that Dragon sensor than there is with the MX.
The other thing, specifically when it comes to compression, I didn’t notice a big difference between the Dragon and MX sensor, so I’m only going to show you the results form the Dragon and you can just apply that to the MX. If you really want to see all the differences and pixel peep, then down the R3D’s that are below this video and you can take a look at all of the results from the MX sensor. We shot all the way from 5:1 up to 18:1. I’m just going to show you what stood out to me here.
Another note about the test. I shot it at a high ISO for the reason of trying to really stress things out and really see where the differences are at. Shooting things properly at a lower ISO it is going to be harder to see the differences between the different compression rates. so shooting at a higher ISO is going to allow me to see more of the differences and more of the nuances, and be able to point them out to you easier.
So I’ve go things loaded up in RedCine-X and we’ll take a look at what’s going on here. We’re seeing the entire frame right now, so we’re going to zoom in to 100%, and go down and take a look at Tim’s sleeve and shirt here.So I’ve got some fine detail, some fine pattern lines in his shirt going horizontally, and vertically. And I’ll do a little bit of playback. So yeah, all that detail is is there, which looks great. We are at a 5:1 compression ratio right now.

Now we will bump on over to 7:1. And we still see those lines there, we’ll do a little bit of playback. Detail is still there. The noise has gotten just s touch more blocky. But it is hard to notice from 5:1 to 7:1. We’ll jump on over to 12:1, and this is where we start to lose detail. So we are loosing detail in our horizontal lines, and in our vertical lines. We’ll do a little playback. And yeah, we’re loosing the fine detail at 12:1. And we’ll jump on over to 18:1. And it just continues to worsen. So we’ve almost lost all the horizontal, and we still have a little bit of vertical, but it is getting mushed together in the noise. The noise has become bigger and blockier. So we are picking up less detail at 18:1. Which is really of no surprise, it is more compressed.
Move on over to the Tenba Logo here. So we’ve got this Tenba logo in a dark area and some dark textures next to it. Now we are going to work backwards here, so we are at 18:1. Now we’ll jump on over to 12:1. So we can see a little bit more delineation in this “A’ area here at 12:1. Now we’ll jump on over to 7:1. And just a touch more, not a huge difference. And now we are at 5:1. So again, just a little bit more. Nothing huge, but there is just a wee bit more in the 5:1 as far as this dark shadow area goes.
Let’s move on over to the iMac, and the other cinema screen. So we are going to use these gray areas right here, and also right here. to take a look at our grain pattern, or our noise pattern at different compression levels. So I’ll do a little bit of playback. And everything is nice and tight and small, which is how I prefer my noise or my “grain” to look. I like those tight patterns. it is a lot more filmic to my eye. So 5:1 is looking very nice.
Jump on over to 7:1. 7:1 has gotten a little more blocky. So let’s take a look at that. Agin not objectionable, it totally works, it is just not as tight as 5:1. Jump on over to 12:1. And here we are, and things again continue to get more blocky. And we’ll do a little bit of playback. It still looks more blocky. This is on the verge of not working for my own personal taste. So I’d want to stay away from this. And 18:1 now we are definitely looking like noise or video noise to my eye. I’ll do a little bit of playback. And it is just big, blocky and chunky. That’s not how I like my noise to look. I like it to be fine tight and small.
So we are at 18:1 right now, and 5:1. Just look how much that cleans up. As I go from 5:1 now we’re over to 18:1. It’s a lot more blocky, it’s just .. yuck. That’s just not what I want. So lower compression get’s you a tighter noise pattern.
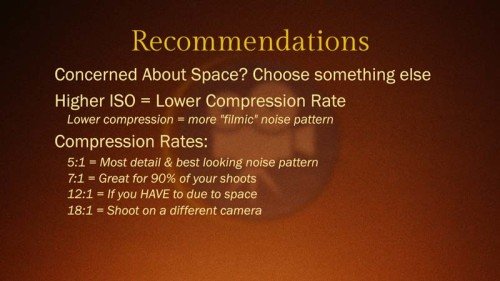
As far as it comes to my recommendations that I have for you when it comes to compression are if hard drive space is a concern for you, then really you should be choosing a different camera. Neither the MX nor the Dragon are going to be a good fit if you are concerned about hard drive space. You have chosen the wrong camera. And when it comes to compression levels, you are going to want to use a lower compression when you use a higher ISO. The lower compression is going to give you a more filmic look to your noise at higher ISO levels.
So when it comes to specific compression rates. You’ll want to use a 5:1 if you need everything and you want the finest noise pattern possible. 7:1 is going to be a great fit for most of your situations, anytime you go out and shoot. Most of the time 7:1 should be totally fine. It looked good to my eye, the noise was just a little bit bigger than 5:1. But if you want a nice trade off, 7:1 seems to be a good fit. 12:1, well, I’d go there if you really need that extra space. But agin, if you are concerned about space, choose a different camera. And 18:1 I would avoid that if at all possible. I don’t know why you’d be shooting on a great camera like the Epic and then choose to shoot at 18:1. That just doesn’t make sense to me. Get enough hard drive space and shoot at 7:1 or 5:1.
Final Thoughts:
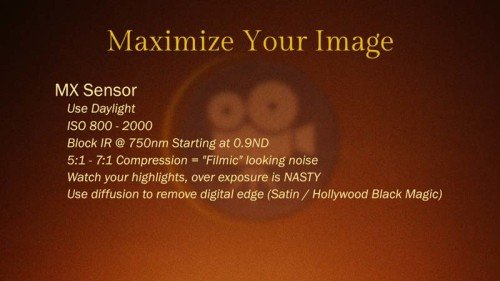
So to wrap up this entire series, here is how you can get the most out of these two sensors. If you are shooting with the MX, shoot using daylight color temperature lights at an ISO of 800 to 2000. Anytime you are using ND’s, make sure you block IR pollution at 750 nanometers starting at a 9. For a more filmic looking noise pattern shoot at a lower compression ratio. 5:1 is the best, and 7:1 should be fine for most situations. As you expose your image, watch your highlights as they clip fast, and they look ugly. And finally, if you want your talent to look more attractive, and you want to take some of that digital edge off of your footage. I recommend using either the Schneider Hollywood Black Magic or the Tiffen Satin filters.
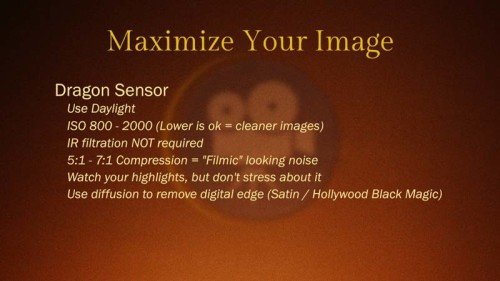
If you are shooting on the Dragon sensor, use Daylight color temperature lights at an ISO of 800 – 2000. However, if you want a cleaner image you can choose a lower ISO and not suffer the same kind of issues that you do with the MX sensor. Especially when it comes to IR. With the Dragon sensor you no longer have to worry about IR problems. And when it comes to getting a more filmic looking noise pattern, choose a lower compression, like 5:1 or 7:1. The highlight roll off on the Dragon is also a lot more filmic than the MX, so while you should still keep an eye on them, you don’t have to be as concerned about it. And just like MX, if you want your talent to look more attractive, and you want to remove some of that digital edge from your footage. Then use the Schneider Hollywood Black Magic or Tiffen Satin filters.
And as always, if you have any comments or questions, leave them in the comment section below, and then come join me in the next video.


Thanks for doing this test! I finally got to use the Dragon in Taipei, Taiwan two weeks ago and my experiences with it are perfectly aligned with your tests.
You are welcome!
Great- we are glad to hear it. 🙂 Congrats on getting to use the camera- the new sensor has come a LONG way since the original Red One M sensor- and it really shows.
Hi Ryan,
TNX for wonderful serial!
Just trying to understand what is 750nm refer to ?
Hi Adi,
The visible spectrum is from 380nm (violet) to 750nm (red). The wavelength 750nm (nm = nanometers) refers to the beginning of the infrared spectrum; wavelengths of light longer than this are all infrared.
Hi Ryan,
What is the native ISO for Dragon with Skin-Tone OLPF? Some say its ISO 320. And like many others you suggest to go ISO 800 for a balanced dynamic range. It would be great if you can explain a bit more on this.
The “Native” ISO for a camera is a hotly debated subject. Unfortunately, there are a lot of ways to interpret that. (Which is why we created two videos that go into detail about that here: The Truth About Raw & Log & Advanced Exposure: Raw & Log )
The question to ask yourself, is not, “What is the native ISO,” but “How is the dynamic range of the sensor distributed at different ISOs”? What does the noise look like? Am I ok with the noise? How is the dynamic range distributed within the scene I am shooting? If you have a scene that has more highlight range, you’ll want a different ISO than a scene with a lot of shadow range. Answer those questions, and you’ll be able to select an ISO that will fit your needs, and light the scene appropriately for the ISO you are choosing. (For myself, with the Dragon, I like using 800.)
If you haven’t already, I’d encourage you to watch those two videos I linked to above. That should help clarify what is going on with RAW, dynamic range, and altitude when you choose / determine what you think is the “Native” ISO. 🙂