The Power Of X
A simple yet powerful lighting technique anyone can master in under a minute.
A simple yet powerful lighting technique anyone can master in under a minute.
Description: In Part 01 of this three part series Ryan uncovers the differences between the dynamic range & latitude of the new Red Epic Dragon sensor and the Red Epic MX sensor to see if all of the hype is real.
Length: 22:56 minutes
 |
 |
Red Epic cameras provided by Isaac Marchionna & Shawn Nelson

(Click images to enlarge)
Red Epic MX |
Red Epic Dragon |
 |
 |

** You must be an Advanced or Pro Access member for article video downloads. **
[mepr-s3-link bucket=”ica-blog-vids” path=”cam-test/LatitudeDragonMX.zip” expires=”2:00:00″]>> Download Dragon & MX Latitude Test R3Ds <<[/mepr-s3-link]
* (File size: 318 MB; Redcode .R3D (5k FF & 6k FF at 5:1); Compressed as a zip.)
[mepr-s3-link bucket=”ica-blog-vids” path=”cam-test/SekonicChartDragonMX.zip” expires=”2:00:00″]>> Download Sekonic Chart R3Ds <<[/mepr-s3-link]
* (File size: 70 MB; Redcode .R3D (5k FF & 6k FF at 5:1); Compressed as a zip.)
[mepr-s3-link bucket=”ica-blog-vids” path=”cam-test/SekonicDragonMXProfiles.zip” expires=”2:00:00″]>> Download Sekonic Dragon/MX Profiles <<[/mepr-s3-link]
* (File size: 4.5 KB; .SPF (Version 3); Compressed as a zip.)
!! Links expires 2 hours from when page loads. For information about downloads: FAQ downloads !!
Now that Red is finally starting to deliver their fabled Dragon sensor I decided to take it our for a spin to see if all of the hype is real and how it compares to their previous MX sensor. So I met up with Isaac & Shawn to run a a battery of 7 different tests that compared things like dynamic range, latitude, IR, compression, low light, and color response. And rather than bore you with a 2 hour video that compares about 300 exposures, I’ve split the results into three different videos, and each video contains just the highlights of what you need to know. If you want to pixel peep and examine every frame for yourself, then you can download all of the 6k & 5k goodness in the post below. So in this first set of test let’s take a look at the dynamic range and latitude, in these two sensors.
Ah yes, the good old Sekonic Exposure chart. While charts are not the most sexy thing to shoot, they do give us a precise and controlled way of measuring and evaluating a sensor. Now I’ll be the first to admit that it isn’t as easy or quick to use as the DSC labs 21 step chart, but I have found it to be an accurate, helpful, and affordable tool to help me map and evaluate a camera’s response as well as create a camera profile for my meter. If you want to know how I created the profile, then click on the Smart Side Link to watch the video on how I did that step by step. And you can also have the profile I created available for download in the post below this video. So let’s launch the Sekonic DTS program and take a look at the test results. Alright, so I’ve launched the Sekonic DTS software here and we are going to take a look at the profiles that I created. Before we do that, I want to give you a quick side bar about that the difference between the “-log” and the “-R” profiles that you see here. They are both exactly the same as far how the camera responds. The difference is that I have modified the “-R” one.
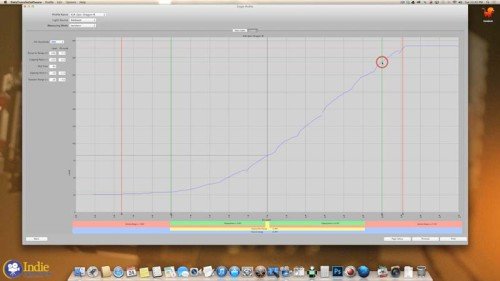
So as we take a look at the Dragon “-Log” file at 800, what you want to pay attention to is this green and red line here, and this green line here, so this is the default exposure range that the program created for me. I’m not a huge fan of defaults; I like to modify things to my own liking and personal preference, which is why I developed this profile here. Again this is just set to my own personal preferences. Take a look at this green this red, this green, and this red line. These are just based off of my own personal preferences. You can go ahead and modify these yourself if you happen to download this profile. You can adjust them to your own liking, they’re just settings you can change. If you take a look at the cameras response here, everything else has stayed exactly the same. It’s just personal preference. That’s the difference between the profiles. So let’s go ahead and take a look at some multiple profiles here. Oops, that said single. It would help if I could read, that would be helpful. Okay, so let’s take a look as I go to 800, that’s what I shot these profiles at. And we’ll make the Dragon purple, and the MX pink. So the first thing that jumps out at me is over-exposure range right here. As we take a look, the MX sensor clips out at about 5.5 stops over. And it clips out into a harsh clip. The Dragon sensor, it keeps on trucking. It continues on and then it finally clips out just past 7 stops. It looks like it’s about 1.5 stops more than the MX, maybe up to 2. But 1.5 stops of additional over-exposure is a safe place to bet there. What I really appreciate about this additional over exposure range is that it is going to make my life a whole lot easier on set, and it is going to make the digital imagery I create a lot more filmic.
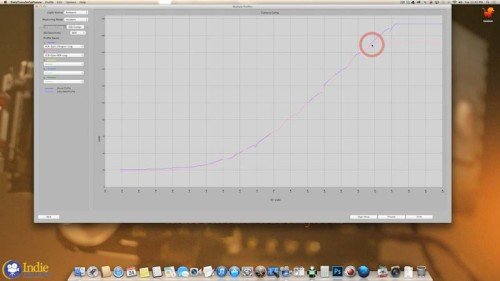
When it comes to what I’m used to working with and seeing when it comes to film, it is a nice soft shoulder roll off, and a nice extended range in my highlights. One dead give away of digital is this harsh clip right here. And a lot of digital cameras don’t have a lot of over exposure range, they have a lot of underexposure, but not a lot of over. So this Dragon sensor really increases my over-exposure range which helps in creating a more filmic look. Or at least creates an image that closer resembles the way film looks. Something else that is interesting to point out here is this harsh clip. So you can see MX goes pretty abruptly into clip and then it just flat lines. Where as the Epic continues on and it has a softer shoulder than the MX. So this softer shoulder is really going to help it produce a more filmic roll off in the highlights. Of course as soon as it does hit the saturation point, when it is fully exposed, there is no more data there, it just flat lines. So it does have the same flat line characteristics as the MX when it gets there. But getting there is a much softer curve than the MX sensor.
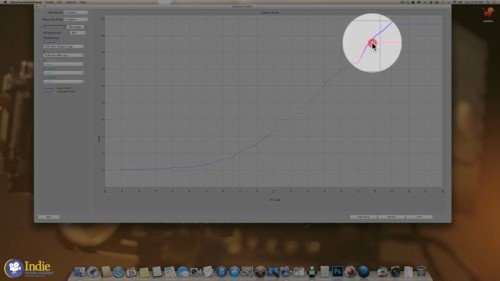
So I’m going to hide the Dragon right now, and we’ll go over to the Alexa. As we take a look at the Alexa, this is one of the reasons why I have chosen the Alexa more often than the Epic MX. It is because of this highlight roll off. The MX sensor clips hard, like I said before, where as the Alexa continues on. And take a look at that shoulder- it is a nice soft roll off. And that roll off creates a more filmic image when it comes to the over-exposure range. And that is what I’m looking for when it comes to the digital cameras that I choose to use when the budget allows. So let’s take a look at the Dragon sensor and add that back in. Now this is what is really encouraging with Red’s new sensor. Take a look at this roll-off here compared with the Alexa. So both are very similar. Both of them have a similar highlight range. Of course the Alexa has maybe about 1/4 or 1/3 stops more in the highlights. Really, I think we are splitting hairs at this point. The over-exposure range is going to be so close that the differentiation right here is going to be lost more often than not in the grade. Unless the colorist really works on finessing that difference. Of course the roll-off in the Alexa is softer than the Epic is right here. Again we’re splitting hairs at this point.
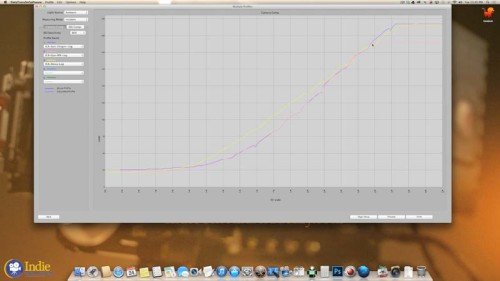
Let’s hide that Alexa sensor there, and take a look at the rest of this exposure range. As we see the Dragon sensor and the MX are essentially identical the rest of the way. There is some slight variation which is interesting to notice. But I was expecting there to be a bigger differentiation when it comes to the underexposure range. But that just doesn’t seem to be the case, at least when it comes to shooting the chart. So let’s bring the Alexa back in to see how that is comparing. It is interesting to notice as I look at these that the Epic MX and the Epic Dragon have a bit of an S-Curve to them. These are the log files. As you can see it curves down here at the bottom, and then it also curves here at the top. Again, it’s not a huge curve. But if we compare it to the Alexa, which has a straighter line in its log file. And the difference really becomes noticeable in the underexposure area right here. You can see that the Alexa has brighter underexposure values and that jives with my own experience with the Alexa camera. I use a lot more grip material and grip gear in general to create richer and stronger blacks with the Alexa and its underexposure values. The camera just sees into the darkness. And that bares itself out right here where I can see these brighter underexposure values. But as soon as we it -5, or 5 stops under, all three cameras are essentially performing the same. There is little variance between all three. So really the major difference is in between the first 5 stops of underexposure. So that is pretty much what these test results reveal. Charts are great as they give me a clear picture of what’s going on. But we don’t shoot charts, we shoot reality. So let’s take a look at the latitude test and see how these chart results translate into something that is actually usable.
For this latitude test I shot in 1/3 stop increments all the way up to 5 stops over and 5 stops under, and then I processed them using the latest version of RedCine-X in two different passes. The first pass was at the exposure I shot it at, with no adjustments, and the second pass I used the FLUT adjustment to correct the exposure back to normal. The point of this corrected exposure isn’t so much to say, “Hey you don’t need to worry about exposing correctly.” You do, even with raw cameras. The point it to take a look at what is really going on in the image and how the sensor behaves as it is over- and underexposed. That way, if I want to deliberately create a look through underexposing or over-exposing an image, I know what to expect. So I’ve got Photoshop launched here, and let’s take a look at these latitude tests that I have going on. Here are the spot readings, I trust that you can read for yourself. We’ve got the Tenba bag, and the chart over here. Here are the incident readings of that setup. A quick note about the TruND filters. They are the most neutral filters that I have come across yet. Even at really strong grades, they still remain really neutral and they also have some IR blocking built into them. They block IR at about 750. So that’s what’s going on. The left hand side of these exposures is at exposure, the right hand has been normalized via FLUT.
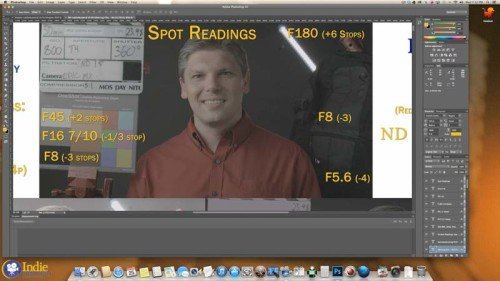
So lets scroll on down to 3 1/3 stops over on the MX chip. As we take a look at the slate, the slate seems to be starting to burn out. Looks like we’ve still got detail in the white chip. Just above Tim’s eye, pay attention to that area and also to Tim’s forehead. That’s where we are going to start to see some noticeable changes. As we go to 3 2/3 stops over the slate continues to disappear; it looks like we’ve lost, or about to lose detail in that white chip, which is now 5 2/3 over. At 4 stops over the area above Tim’s eye is starting to burn out, his forehead is starting to burn out. We’ve lost detail in the white chip here. At 4 1/3, now we’ve definitely lost detail in Tim’s skin. And that is what we were seeing in that Sekonic chart when it goes to that hard clip- that’s what ends up resulting here. This hard burn, it is not a soft roll-off it is now clipped and gone, which looks pretty nasty in my opinion. At 4 2/3 it continues to worsen, bye-bye slate. At 5 stops over, now we are in all kinds of nastyville. So that is how the MX sensor performs in the over exposure and why I have tended to favor the Alexa.
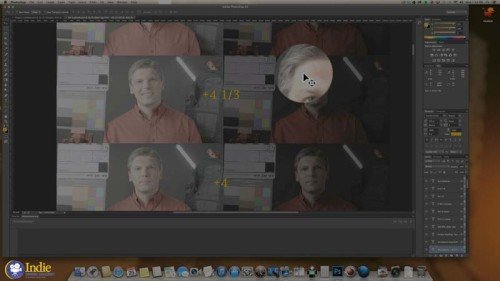
So let’s see how the Dragon compares. Scroll on down, whoa, that was a little fast, sorry about that. At 3 1/3 stop over, Tim’s skin is holding nicely, we see a lot more detail in our slate. The two stops over chip is still holding well. At 3 2/3 everything is still doing nicely. At 4 stops it looks like we are now just starting to lose a little bit of detail in the slate. Above Tim’s eye, and also his forehead is still holding nicely. And we still have detail in our white chip. 4 1/3 still doing fine. At 4 2/3 losing more detail in the slate, although there is a lot more detail here than in the MX. Tim’s skin still looks fine. The white chip looks like it might be on the edge of losing detail. It is noticeably different than the 4 1/3 chip. Continuing on to 5 stops over, Tim’s skin above his eye is just barely beginning to lose detail, as well as in his forehead. We’ve obviously lost detail in our slate. It also looks like we are losing detail in our two stops over chip. Which all jives with what we were seeing on the chart with the Sekonic profile.
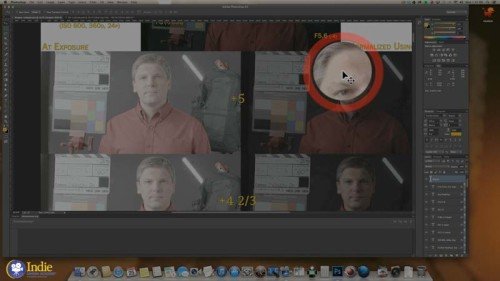
So this nicer softer roll off that we’ve got going on here, that’s what I to see in my highlights. This softer burnout creates a much more filmic, and less digital feeling image. Just as a quick reminder to what the MX chip looked like at 5 stops over. So that’s digital, that’s not the look that I personally prefer. So that’s what is going on with the over-exposure range with the MX and Dragon sensor. And that’s what excited me most about Red’s new sensor; at the end of the day, I don’t really care about 6k, or even RAW for a lot of my commercial work, ProRes out of the Alexa has been more than adequate. But the fact that the Dragon sensor now has almost the exact same over-exposure range as the Alexa is a big step forward for the Epic in my opinion. Now let’s take a look and the underexposures. But before looking at those results, I want to throw in a quick disclaimer: over-exposure is a cut and dry matter- either the image is clipped, or it isn’t. Underexposure on the other hand is influenced a lot by personal preference. It’s like salt: some people like a lot of it, and some people can only take a little. So I’m going to share my thoughts and opinions, but they’re just that. And it is also worth pointing out that Red is continuing to work on and update their camera and color science. And they are aware of noise issues with the Dragon sensor- which will be addressed in a future firmware update. But as these cameras are shipping and being used on productions now, it’s still worth taking a look at how the current camera performs. Okay, so we’re back in Photoshop, and I’m at -1 2/3 stops under for the MX sensor, in case those numbers are not big enough for you. What you want to pay attention to as we go through the under exposure range is the Tenba Bag. Pay attention to this checkered area and also this darker black area. That’s where you’ll see the biggest differentiation between these two sensors.
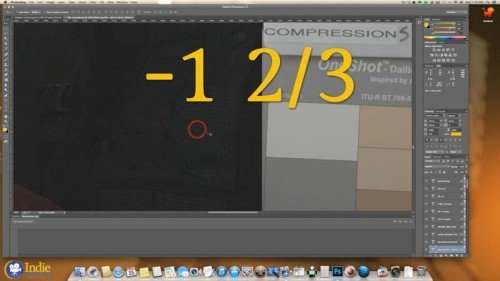
So here is the exposure, and here is the normalized exposure. At this level, the noise levels are still acceptable for my tastes. They are a little bit colorful, which is not what I prefer to see in my noise. I prefer my noise to be not colorful, or to be neutral in color, but it is passible. We’ll go to 2 stops under, which is still passible. As far as noise level goes, it has picked up a little more color, I’m still seeing a lot of detail in the Tenba Bag. At -2 under, this checkered spot is about 5 stops under, and this black area I believe is about 6 stops under. And we’ll go on down to -2 1/3. So here is where the noise level is unacceptable for my taste. This is too noisy for what I prefer. And the colorful bits of the noise are not what I like to see. It’s not my personal preference. We’re definitely still picking up detail in the Tenba bag.
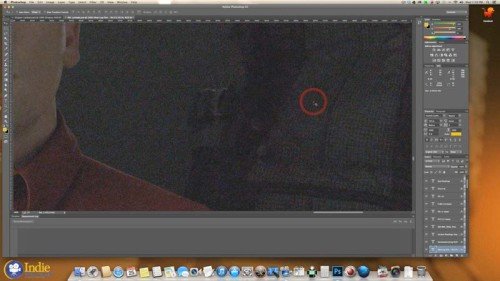
Let’s scroll on down, just for fun, let’s go down to 5. Here we go, So this is what we see in the -5 exposure. Not a whole heck of a lot of anything. Let’s see what we can recover. Again this is 5 stops under, and we’ve got all kinds of crazy colorful noise going on. The Tenba bag looks like I can see a little bit, at least on my screen, hopefully it translates over the web. I can see a little bit of the outline of the checkered pattern, and just a little bit of the black area. We’ll go up a 1/3 of a stop; it definitely becomes more noticeable and prominent. Another 1/3 of a stop and it is definitely easy to see here. We’ll zoom out on the image just to take a look. And as we zoom out it becomes a lot easier to see where everything is differentiated. The little zipper. So yeah, we can actually recover quite a bit. We’re looking at about 8 stops to 9 stops under. So that’s quite a bit of detail. Not that it is usable, but it does seem to be recoverable. Something else to point out with the MX sensor is that as it gets underexposed, it is getting a more magenta cast to the image. You’ll need to adjust for that in the grade.
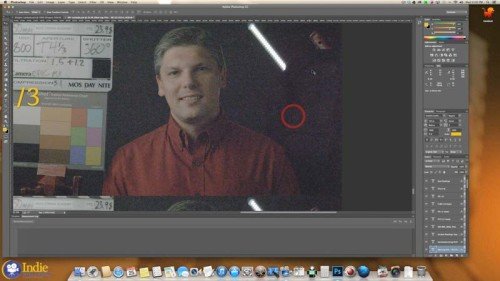
Let’s see how the Dragon sensor compares. So we are at -1 stop under. And here is our regular image and here is normalized. I see a lot less color here. The noise is more neutral. At this level it is still passible and acceptable for me. I do like that it’s less colorful than the MX sensor, that it’s more neutral. That is a huge plus. We’re still getting ample detail in the Tenba bag, which is good to hear, or good to see rather. And at -1 1/3 stops under, and it looks like we are still doing fine. It’s passible, it is getting more noisy. We’re picking up just a tad more color, but nothing like that MX sensor. And now we are at -1 2/3 stops under. So here is where I would draw the line for my own personal taste. The noise has gotten more color, but nothing like the MX sensor, so that’s a huge win. But at this level there is too much noise for my liking. We’re still getting detail in the Tenba bag, so that’s a win. Now let’s scroll down to 3 stops under. And now we are 3, so here what the image looks like. I’m not seeing anything in that Tenba bag and we are only at 3. Let’s see what we can recover. And yeah, not really recovering much of anything. I can faintly see the bag here. But it is not like we are seeing in the MX chip which kind of surprises me. I’ll zoom out and I can faintly see that outline here, but it is nothing like we were seeing in the MX chip. And that’s rather surpassing because according to the Sekonic chart, they should be behaving neck-and-neck to each other. So maybe that is something that will be fixed in a firmware update, who knows. But at this point, at 3 stops under, which would make this bag about 6 to 7 stops under.
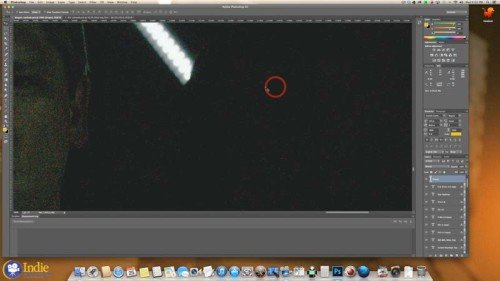
Just for grins and giggles, lets zoom on down to 5 stops under. Again not a usable image in my opinion. But let’s see if we can recover any detail. And yeah, there is nothing there. At least I’m not seeing it on my screen, even a faint outline. We’ll zoom back out just to be fair, I’m not seeing any outline there. Go up a 1/3, still not seeing any outline. So yeah, I’m not seeing that same bag that I was seeing in the MX sensor.
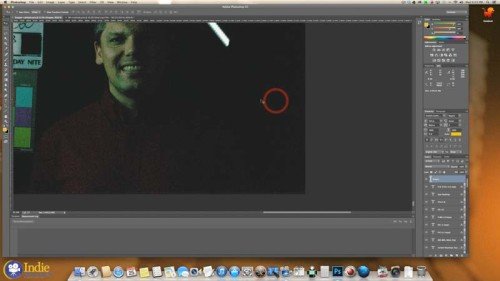
It is also interesting to point out that the Dragon sensor seems to go green as it is underexposed. Lighting, filtration, everything is exactly the same in-between these two. The MX is more magenta, and the Dragon is more green. So you’ll just need to pay attention to that as you underexpose the image or as you’re playing around with your underexposure values when your using either camera. So that’s how these two sensors currently perform using their current firmware and color science.
Well, I don’t know about you- but I am honestly impressed with Red’s latest sensor. The fact that the dynamic range is now as good as the Alexa without having to use HDRx, and that the over exposure latitude has been increased means that this camera is going to make it easier for us to paint with light and motion. Has it beaten film? I think that’s an overstatement- as Kodak vision 3 stock still has at least 8 stop of over-exposure range, but as you have seen in this test- the results are quite impressive. Stay tuned for the next video where we’ll be evaluating color, IR & fill ratios. If you have any comments or questions, leave them in the comment section below, and then come join me in the next video.
You must be logged in to post a comment.
This site uses Akismet to reduce spam. Learn how your comment data is processed.
This site uses cookies. By continuing to browse the site, you are agreeing to our use of cookies.
AcceptHide notification onlySettingsWe may request cookies to be set on your device. We use cookies to let us know when you visit our websites, how you interact with us, to enrich your user experience, and to customize your relationship with our website.
Click on the different category headings to find out more. You can also change some of your preferences. Note that blocking some types of cookies may impact your experience on our websites and the services we are able to offer.
These cookies are strictly necessary to provide you with services available through our website and to use some of its features.
Because these cookies are strictly necessary to deliver the website, refusing them will have impact how our site functions. You always can block or delete cookies by changing your browser settings and force blocking all cookies on this website. But this will always prompt you to accept/refuse cookies when revisiting our site.
We fully respect if you want to refuse cookies but to avoid asking you again and again kindly allow us to store a cookie for that. You are free to opt out any time or opt in for other cookies to get a better experience. If you refuse cookies we will remove all set cookies in our domain.
We provide you with a list of stored cookies on your computer in our domain so you can check what we stored. Due to security reasons we are not able to show or modify cookies from other domains. You can check these in your browser security settings.
We also use different external services like Google Webfonts, Google Maps, and external Video providers. Since these providers may collect personal data like your IP address we allow you to block them here. Please be aware that this might heavily reduce the functionality and appearance of our site. Changes will take effect once you reload the page.
Google Webfont Settings:
Google Map Settings:
Google reCaptcha Settings:
Vimeo and Youtube video embeds:
You can read about our cookies and privacy settings in detail on our Privacy Policy Page.
Privacy Policy
“The Dragon currently turns green in the underexposed areas”
Was there a grade applied to remove the red? I’ve seen the exact opposite in Dragon footage. Shadows pickup more and more red noise. If you crushed down the red channel it would explain why it went green and why you didn’t see any noise. You should see noise in the Dragon footage just like the MX footage from the RAW it’ll just be mostly red noise.
Yeah, looking at the RAW it’s there. Interesting. Thanks for the tests! I wonder what the difference in testing conditions was. Probably just the subtle difference between light CRI and color temperature. I must have been testing with a slightly warmer light at which point the extreme shadow digging revealed a lower red channel saturation.
I think you are on to something there. 🙂
The MacTech LED’s are daylight balanced and have a CRI of 93- so they are very color accurate. But since they are daylight balanced, they are lacking in the red channel.
Gavin, as we discussed on Facebook, no grading was done what so ever on these files. I wanted to see exactly what was going on without any influence from me- so to bring the normalized exposures back, the only adjustment that was done was a FLUT adjustment- which is noted in the file / picture above.
What is interesting to note, is that the MX footage turns red / magenta, while the Dragon turns green. And everything is exactly the same in both setups- only the sensor has changed.
(Original FB Thread for people who are interested: https://www.facebook.com/isaac.marchionna/posts/10152911216909186 )
As I understand it, Dragon is best used with regular ND filters because of the much improved IR filtration in the OLPF. Could using the TruND filters with built-in IR blocking be causing the greenish noise?
That is a good guess, but from the testing that I have done, no that is not the case. The True ND’s are exactly that- Truly Neutral, which is why they cost so much. I did an ND test in 2013 that shows that these filters do not cause any color shift.
Additionally, if it were the ND filters that were causing the shift, then the shift should show up in the MX footage. But since everything is exactly the same in the setup and exposure of MX and Dragon footage, and the MX footage does not have that green shift, that tells me that it is at the sensor level, not the filtration level.
(Here is the link to the ND filter test I did back in 2013: http://www.ryanewalters.com/Blog/blog.php?id=6201317295579746489 )
I’m content with the True ND filters not being the cause of the greenish noise but please help clarify something for me. I wasn’t referring to the general color shift some ND filters introduce. I was speaking more in terms of the IR filtration. MX NEEDS IR filtration but Dragon does not, at least in the most common strengths.
My limited knowledge on the subject suggests IR cut where none is needed (and already exists) would not equally affect the two different sensors because one (Dragon) would be getting extra cut. If Dragon has effective cut at, say, 750nm, and the True ND filter heaps on another cut at the same wavelength, wouldn’t that somehow be detrimental to the image, compounding the red cut?
These are just the most recent of many posts on this subject from which I’m basing my assertion:
http://www.reduser.net/forum/showthread.php?118722-Best-ND-filters-for-Dragon
and
http://www.reduser.net/forum/showthread.php?113190-Dragon-and-IR-ND-s-and-Hot-mirrors&p=1380834&viewfull=1#post1380834
Ah, gotcha- I’m following you now. 🙂
In personal experience with these filters, I have not found using them on cameras that already have IR cut built in to compound the issue or produce negative results. (At least not on Canon cameras anyway- C300, C100, 5D MKIII, etc. and they have great IR blocking built in.)
But with this test, it was shot in Daylight with 93 CRI LED bulbs, so there were no IR issues to begin with since those lights have minimal Red color in them to begin with.
I am working on the video that shows the results of the IR testing that I did with these cameras. In that test I used filters that had IR and no IR built in, and shot with a Tungsten light to emphasize the Red channel. It shows that the TruND’s are not adding anything (negative) to the image with the Dragon- at least not like we see here in this test. (And that would also be double IR filtration.) So if the double IR caused problems, I would expect it to show up there too…
So based off those experiences, I think that the double IR blocking is not doing anything here.
The problem with IR cut, is that there are a bunch of different ways of cutting IR, so even though two filters may both cut IR at 750nm they can produce different results and image artifacts…
Interesting. Thanks.
In follow up to the double IR question- the IR test is now live, and as you can see from the results, the double IR on the Dragon is not having a negative effect- at least not with the TruND filters anyway. 🙂
IR TEST RESULTS: https://indiecinemaacademy.com/red-epic-dragon-vs-red-epic-mx-part-02-ir-diffusion-video/
Great video Ryan.
I may be missing something, but isn’t there a contradiction here between the charts recording that the MX and Dragon both have the same curve into the shadows, but the real world test shows that the MX holds onto the darkness better than the Dragon? Seems to me that the Dragon has traded MX’s shadows for highlights and that the boasted DR, while greater, is not so great when you consider the loss of usable exposure in the shadows..
Thanks- I’m glad you liked it. 🙂
At first glance, it appears that there is a contradiction. But here is what I see: if you look at the chart, both cameras hold just fine to -5. At -5 according to the chart, they are about the same- the Dragon is just slightly higher. So if we pop on over to the latitude test and look at the Tenba bag at -2, the checkered pattern is at -5, which is viewable in both exposures (Dragon & MX).
The differences come after that, as we dig lower into the underexposure range. It looks like I can pull out more information from the MX sensor then the Dragon sensor (currently). And that surprised me, since according to the chart they should be the same. This is why I find it important to look at the chart as well as a real world controlled example.
As for the boost to the overall Dynamic Range, that comes down to personal taste and preference. I will always take more room in the highlights over room in the shadows. Digital has beat film in the shadows for years, but it has a tough time in the highlights. And it is that harsh clipping that makes digital look digital (and ugly IMO). So I’ll gladly trade a stop or two in the shadows if I can get more in the highlights. 🙂
Why did you test at 800 ISO? Is it the native sensitivity of the sensor?
If not will you test native & other ISO levels?
Coming from the photography I am surprised that the video sensors are still so small.
My PhaseOne P20 sensor is double the size of the epic dragon’s one, and the P20 is many years old.
800 ISO because that is the “native” sensitivity of the sensor. However, since this camera shoots in raw, you can download the R3D’s yourself and change the ISO to whatever you like. The ISO is just metadata- and when you change it what you are doing is changing where mid tone / middle grey falls within the dynamic range of the sensor.
As far as video sensors being small, that is due to two reasons. Firstly, it comes from a long 100+ year history of cinema that has defined the film “standard” for motion picture, which has settled around the Super 35 format, which is roughly 24.9mm x 14mm. So camera manufacture have been making sensors that are intended for that size. Which makes a lot of sense from a technical stand point as there are a TON of cinema lenses that will work with those sensors. To cover a Medium format camera like the P20, would require speciality cinema lenses- which is in the realm of IMAX lenses. So there isn’t much of a market for that, compared to the Super 35 format.
The second reason, from what I understand from talking with engineers, is a technological hurtle that they are trying to overcome. In motion we require at least 24 frames to be continuously captured every second, for a sustained period of time. (At least 5 minutes- these days, people like to have the option to roll for 30 minutes.) And that is a HUGE amount of data to be crunching, recording, and storing- all without introducing bad artifacting. (When video was first added to DSLR’s it looked a lot worse then what is seen today.)
As far as I know of, as of right now, there is only one company who is even trying to record video from their digital medium format camera, and that is the Pentax 645z. And I find it very curious that even though they have announced that it can record video, there are no examples from the camera. So it is my hunch that they haven’t quite got it all figured out yet…
I’m sure the technical side will be sorted out in a matter of time- then the problem will be sourcing lenses that will work in a cinema style work environment …
Hope that helps clear things up. 🙂
As a little side note, back in the Fall of 2008, Red announced that they were going to release the Monstro 645 (a 65MP, 9k camera) and the Monstro 617 (a 261MP, 28k camera) by the Spring of 2010. And now it has been 6 years after their announcement, and 4 years after their projected “deadline” and there hasn’t been any talk of those cameras…
So that tells me that there are some big technological hurtles that are trying to be overcome – at least in the realm of digital video.
Thanks for the test Ryan, it’s very informative. I am stuck on the disparity between the two cameras meter charts and their look (mx and dragon). Correct me if I’m wrong but the way the meter chart works is that you expose, say middle gray, at a given iso, you set the same f-stop on both cameras, you then bring that image into into the software and it then assigns a brightness value to the image and posts it into the chart. Your charts show that mx and dragon expose various gray values at almost exactly the same brightness values. So, why would dragon clearly go darker faster? Not questioning your methodology or execution here but I can’t come up with an explanation for this. It’s almost as if the cameras are offset by a stop with the dragon being 1 stop darker, yet that would show up clearly in the chart. I’m puzzled. On a side note its interesting that alexa maps the same gray chip about 1.3 stops brighter in the midtone areas. I realize this is log and manufacturers float their mid gray point at different places, but this seems fairly dark for the dragon. Do you consider dragon to be a 800 iso camera?
Great Question & Insightful Observation. 🙂
You are correct in how the chart is generated. And honestly, I’m perplexed as to why the Dragon goes darker faster too. But that is precisely why I test both in a “lab” with charts and in the “real world”. Test and verify.
Here is how I interpret what I am seeing- The chart says that both chips are nearly identical in the under exposure range. When I look at the latitude results and I compare the “At Exposure” frames, overall both the Dragon and the MX get dark at the same rate. Which seems consistent with the chart results. What is different between the two, is how much detail remains below -5. I can recover more detail from the MX then the Dragon. So after -5, even though the chart says they remain the same, in reality it looks like that’s not the case. (At least with this firmware build and color science.)
I’m not sure that clear it up- but it’s at least how I see things at this point. 🙂
Yep- the Alexa definitely maps things to brighter values. If I wanted the Dragon to map to the same values, then I would need to rate it at around ISO 320 [Corrected- thanks Mark! Sorry for the typo.].
Do I consider Dragon to be an ISO 800 camera? Unfortunately, that is a very subjective question. It all depends on what you mean by “native ISO”. But I’ll do my best to answer. Yes I do consider it to be an ISO of 800. At that ISO there seems to be a good balance of over exposure and under exposure (~7 stops in either direction).
Is this where the sensor is the cleanest? No. Lower ISO’s give cleaner results. I haven’t decided where I think the cleanest ISO is at yet. But ISO 400 & 640 are cleaner then 800. So if “clean” is how you measure “native ISO” then it is going to be lower then 800…
It would seem then, that indeed the Dragon is less sensitive and will require more watts and even maybe more heads (fill) to get a good image. So therefore it is two steps forward one step back with the new OLPF calibration.
I mean vs MX. above. BTW – your video was very interesting and useful, and thank you for that. How do you find True NDs hold up on Mx? Are they enough to fight IR contamination?
Oh yeah- the TrueND’s work great on the MX- that is what I have been using on the MX for over the last year. I have posted the results & stills in Part 02: https://indiecinemaacademy.com/red-epic-dragon-vs-red-epic-mx-part-02-ir-diffusion-video/
SO just true NDs and no IR issues on MX? Nothing else needed? If so I might pick up a set.
Correct- I’ve been using TruND’s on the MX chip with no problems at all. It’s great- as it cuts down on one more filter from being in the matte box. 🙂
The new OLPF has been very interesting indeed. Some people are swearing by the old one, while others say the new one is the way to go. I guess it all depends on what you want more- more room in the highlights, or cleaner low end…
Personally, I want more room in the highlights. 🙂
Yeah, but there are so many other problems with both Dragon OLPFs. Magenta CMOS smear that is much worse than anything I have ever seen (obvious pink lines around any bright large object in frame) , gate shadow… And the “low light OLPF” had all kinds of problems of its own, including weird flares from any light source.
The first Epics may have been beta cameras, but this is still an alpha camera – if I were them (or they were Arri) this would not be considered ready for release to users.
I shoot a lot at night, with lighting yes, but not with infinite budgets. As such, shadow detail is important to me, as is not having problems when light sources are in frame. At present I cannot get both those things on a Dragon – but I can on my Epic MX. I’m really, really glad I did not upgrade. I would be very upset now even if the upgrade had been free.
Agreed- it is a mixed bag for sure. Red has made a lot of people unhappy with this new sensor as it is not living up to the hype they promised. ISO 2000 is definitely NOT the new 800 on the dragon…
As we have received a lot of Alexa Xt including severe problems with audio and problems reading cards on Raw format …
Updates on firmware updates.
Sony also have problems with upgrades, blackmagic …. everyone has problems.
Red has its problems, but they have definitely improved, especially on the MX sensor.
Arri and Red at this time !! two different instruments, but in times like these I would vote for the smallest camera and light.
However Ryan excellent test very useful.
thanks for sharing 🙂
For sure- no camera company is perfect. They all have their issues.
However, with Red it is a bit of a different story. They have a track record of hyping up their camera- and that has been especially true with the Dragon sensor. So even though this sesnor is impressive. (I think it is Red’s best sensor. It’s my favorite between the M, MX, & Dragon.) But it isn’t living up to the hype, and I think that is disaapointing people…
Hey Ryan thanks for the answer. I do have one quibble that I would like to point out. In order for dragon to map mid gray to a brighter value, one would have to OVEREXPOSE the chart by a 1.3 stop in order to map at the same value as alexa. Which is the same thing as rating the sensor 320 iso, not rating it 2000. Of course as you do that you lose 1.3 stops of highlight latitude above mid gray, which ironically puts the sensor back to the same highlight latitude that it had with the first olph/calibration, although it did that at 800 iso. As iso “ratings” are fluid I consider one way to rate sensors as to where they put the 18% gray point in relation to ire scale. It seems that dragon is mapping the log brightness value fairly low (in order to make room for more highlight latitude) and that means that the lut has to bring that value up quite a bit to give a rec709 40-42 ire brightness for mid gray. Anyways, that’s my theory as to why people are having issues with noise on the new sensor. Many people on reduser are saying to rate the sensor at 320 and even 250 iso, which when looking at your meter mapping chart makes a lot of sense.
Oops- thanks for catching that- I did my math backwards- yes it would be ISO 320, not 2000. 🙂
I think your theory is spot on, and makes a lot of sense. Thanks for sharing it.
I’m still going to play around with the “rating” and see where I prefer it to be at. I do know that I like the 7 +/- range at ISO 800 and it doesn’t feel to noisy for me. I’m definitely, not sure that I would want to rate / expose / light it for ISO 250 / 320 and loose that extra room in the highlights…
Something I’m going to try and experiment with- not sure if it will work… but is expose for ISO 800, then adjust the look in RedCine-X- “print it down” and then adjust with an s-curve…
Dude, thanks for this very informative and enjoyable test! I learned a lot 🙂 Cheers!
You are welcome, and I’m glad you enjoyed it. 🙂
Hi, anyway I can download the files? I tried refreshing the page, log using different computers, etc not luck
Which files are you talking about?
The video file itself is only available to members to download.
The Free Downloads are available to anyone and can be downloaded by clicking on the title / name. For example, click on ” >> Download Dragon & MX Latitude Test R3Ds << " . I just clicked on the links and everything is working on our end. You might also want to check if you have a popup blocker on- sometimes that can get in the way / prevent the download from happening.
Hi Ryan ) Thank you so much for incredible work and tests and video lessons!
I suppose that These links that are expired:
>> Download Sekonic Dragon/MX Profiles <> Download Sekonic Chart R3Ds <<
Please? can you update these links ?
Thank you very much!
Thank you for pointing out that these links were broken. We have corrected the links, so they should work now.
Download links are down again. Any chance you could please fix this?
Strange. Can you check again? I just tested them in Safari and everything downloaded fine. If you are still having problems, please tell me specifically which link is giving you problems. Thanks!
I think the download link for the profiles are expired. Could you post the Dragon DTS profile again?
Thanks!
It appears to be running again. Try again and let us know if you continue to have problems.